


Logiline| Logistic CRM system - Site page "Drivers"
The “Drivers” page was created to register and add new drivers from transport companies for providing cargo transportation services.
To open the page, go to the “Equipment and drivers” menu section from the dropdown menu that opens when pressing the button ![]() , select the "Drivers" tab. After that you will be redirected to a page where you can view vehicle drivers, keep records of them, and, if necessary, add new ones.
, select the "Drivers" tab. After that you will be redirected to a page where you can view vehicle drivers, keep records of them, and, if necessary, add new ones.
On the website’s “Drivers” page there is a search bar, a filter by specified parameters, a page toggle, and a table displaying the full list of vehicle drivers with all corresponding information. These data include name, status, transport company, phone number and others (Figure 1).
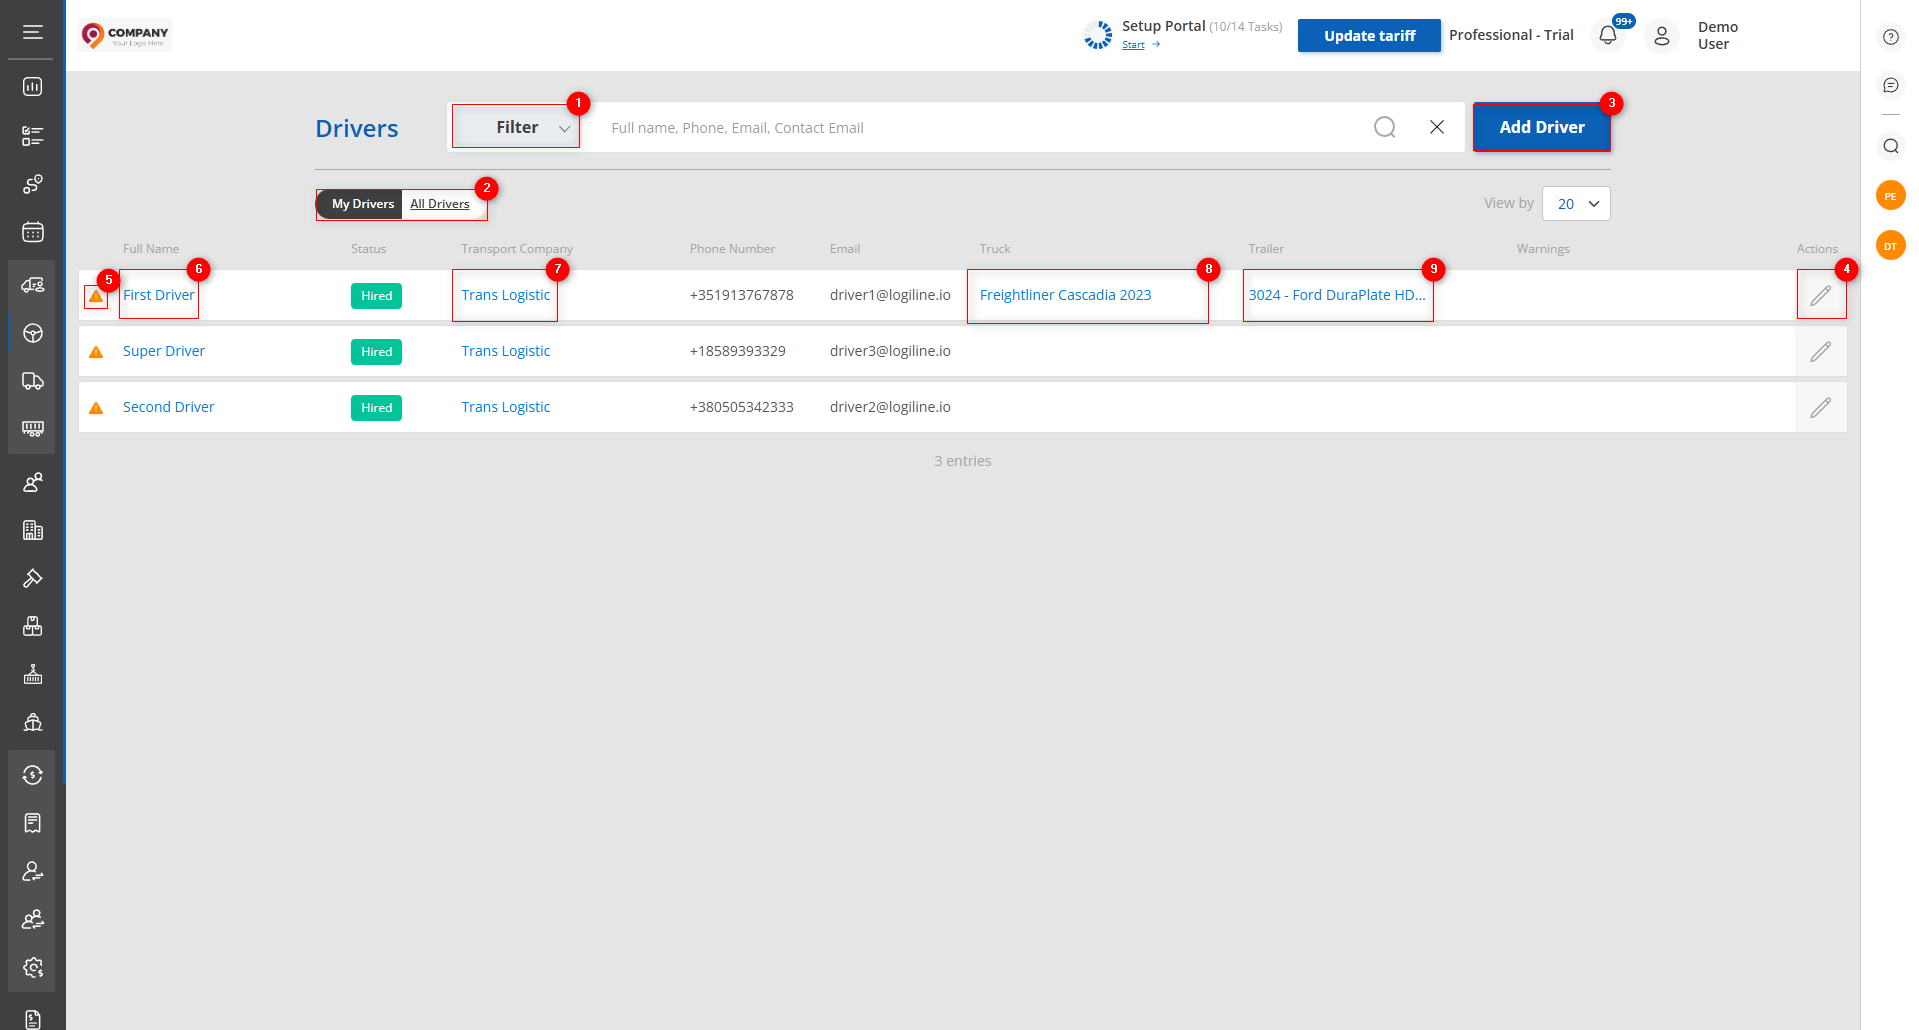 Figure 1 - Site page “Drivers”
Search
Search by specified parameters:
When you click the “Filter” button (Figure 1, Pointer 1) a filter window will open, allowing you to set search parameters (Figure 2):
- “Full name, phone, e-mail, contact e-mail” - enter the required value;
- “Transport company” - from the dropdown list that opens when pressing the button
 , select the transport company the driver works for;
 - “Status” - from the dropdown list select the driver’s employment status;
- “Document status” - from the dropdown list select the driver’s document status;
- “Hire date” - when you click the empty field, select the specific date of the driver’s employment;
Note: To perform a search, you may specify one or more parameters.
After entering the parameters, click the button ![]() . As a result, the table will display data according to the set filter parameters.
. As a result, the table will display data according to the set filter parameters.
 Figure 2 - “Filter” window
Search in the search bar:
The search bar allows you to search by any parameter (Figure 2, Pointer 1). To do this, enter any query and click the button ![]() located in the search bar or press the “Enter” key on your keyboard. As a result, the records found that match the entered parameters will be displayed in the table.
located in the search bar or press the “Enter” key on your keyboard. As a result, the records found that match the entered parameters will be displayed in the table.
To clear the entire search field and reset the filter, click the button ![]() . If you need to remove one of the parameters, click the cross located inside the query field (Figure 2, Pointer 2). On the “Drivers” page there is a toggle (Figure 1, Pointer 2) to select the display mode: “My drivers” (only the drivers you work with) or “All drivers”.
. If you need to remove one of the parameters, click the cross located inside the query field (Figure 2, Pointer 2). On the “Drivers” page there is a toggle (Figure 1, Pointer 2) to select the display mode: “My drivers” (only the drivers you work with) or “All drivers”.
This provides a convenient way to quickly find and manage information about transport company drivers.
Drivers table
The table displays information about each driver of the transport company. Below is a description of the main fields:
- “Full name”;
- “Status” - information about the driver’s employment status in the transport company;
- “Transport company” - the name of the transport company the driver works for;
- “Phone number”;
- “E-mail”;
- “Truck” - information about the truck carrier the driver will work with;
- “Trailer” - information about the trailer assigned to the truck carrier;
- “Warnings” - information regarding document-related issues that require attention;
Note: Clicking the icon at the beginning of the row (Figure 1, Pointer 5) will display details about the status of all the driver’s documents.
Add a driver
To add a driver, click the “Add driver” button (Figure 1, Pointer 3). After that the “Driver” window will open, which consists of 2 information blocks:
The “Driver information” block contains the primary information about the driver, with the following fields available for entry: (Figure 3, Pointer 1)
- “Transport company” - from the dropdown list that opens when pressing the button
 , select the company the driver works for;
 - “E-mail” - specify the driver’s email address;
Note: Only after filling in the “Transport company” and “E-mail” fields will the following fields become available for entry.
- “Status” - from the dropdown list, select the driver’s employment status;
- “First name” - enter the driver’s first name;
- “Last name” - enter the driver’s last name;
- “Date of birth” - when you click the empty field, select the driver’s date of birth;
- “Phone number” - enter the required value;
- “Passport number” - enter the driver’s passport number;
- “Address line 1” - enter the required value;
- “Address line 2” - enter the required value;
- “City” - enter the required value;
- “State” - from the dropdown list, select the required state;
- “ZIP code” - enter the required value;
“Equipment” block: (Figure 3, Pointer 2)
- “Truck” - from the dropdown list that opens when pressing the button
 , select the truck carrier the driver will operate;
 - “Trailer # 1” - from the dropdown list, select the required trailer assigned to the truck carrier;
- “Trailer # 2” - if necessary, from the dropdown list, select a second trailer, if applicable;
- “Fuel card #” - enter the required value.
To save the data, click the “Save” button; to exit the add window, use the “Close” button.
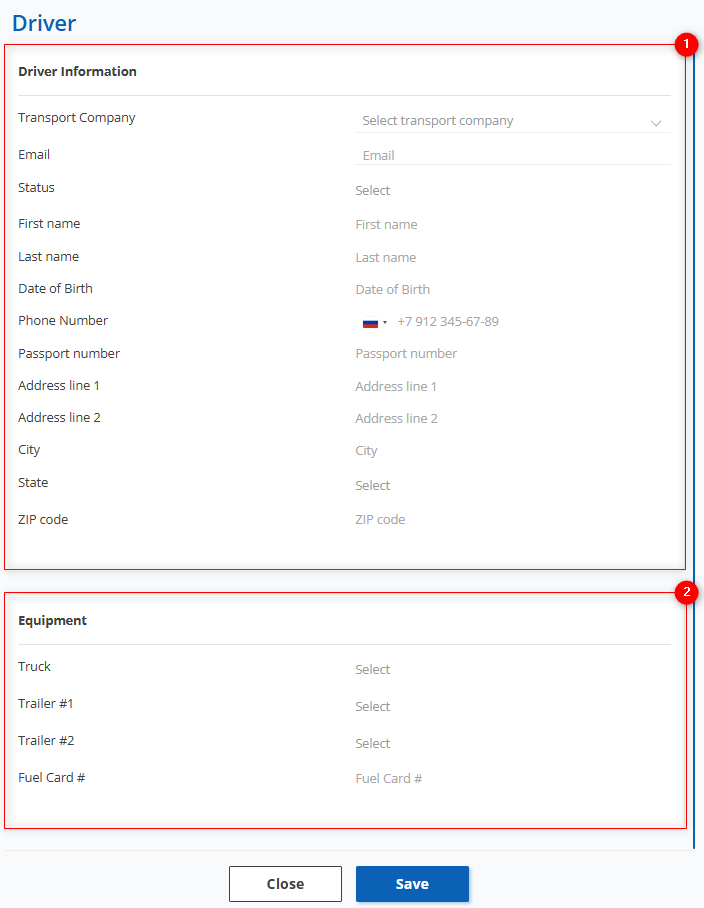 Figure 3 - “Driver” window
After adding a new driver, they will appear in the table (Figure 1), from where you can conveniently navigate to related data.
Thus, when you click on the transport company (Figure 1, Pointer 7), the company window will open with its deals, companies, users, drivers, and other information, providing the ability to edit data.
When you click on the truck carrier name (Figure 1, Pointer 8), a window with full information about it will open, providing the ability to edit data.
When you click on the trailer name (Figure 1, Pointer 9), a window with full information about it will open, providing the ability to edit data.
Editing driver information
To edit a driver’s information, select the required record in the table and click the button ![]() (Figure 1, Pointer 4). The edit window will also open when you click the driver’s name on the main “Drivers” page (Figure 1, Pointer 6). An edit window will open, which includes two blocks in the “General” section and eight blocks in the “Documents” section (Figure 4, Figure 5).
(Figure 1, Pointer 4). The edit window will also open when you click the driver’s name on the main “Drivers” page (Figure 1, Pointer 6). An edit window will open, which includes two blocks in the “General” section and eight blocks in the “Documents” section (Figure 4, Figure 5).
To make the fields available for editing, click the "Edit" button (Figure 4, Pointer 1); after that you will be able to make changes to the data in the same way as when they were originally created (see above).
- “General” section
This section contains 2 blocks: “Driver information” (Figure 4, Pointer 1) and “Equipment” (Figure 4, Pointer 2), and has fields for completion similar to those when adding a new driver. To make the fields available for editing, click the "Edit" button (Figure 4, Pointer 4); after that you will be able to make changes to the data in the same way as when they were originally created (see above).
Note: When you click the “Edit” button, an icon will appear in the upper left corner that allows you to upload the driver’s photo (Figure 4, Pointer 3).
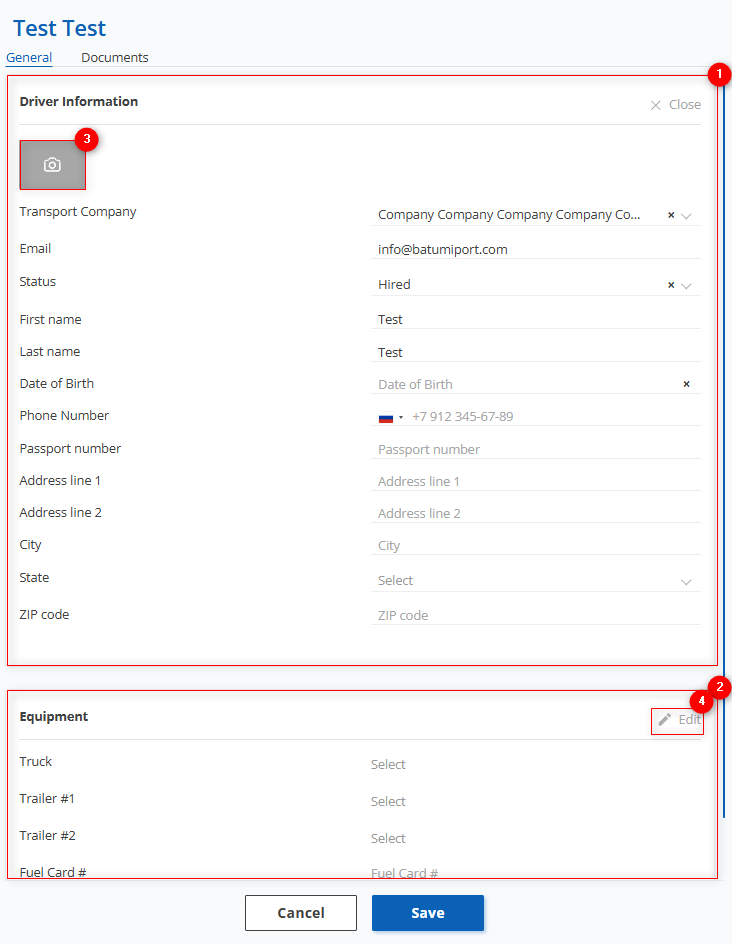 Figure 4 - Edit window (General section)
- Section “Documents”
Note: The “Documents” section is available only when editing; it is not present when adding a new driver.
The section consists of 8 blocks, each filled in the same way. When you click the button ![]() in a block, a row with an “Add” button will drop down (Figure 5, Pointer 1); clicking that “Add” button will make a row with the corresponding fields available for editing.
in a block, a row with an “Add” button will drop down (Figure 5, Pointer 1); clicking that “Add” button will make a row with the corresponding fields available for editing.
Block “Application” (Figure 5, Pointer 3)
- “Status” — from the dropdown list that opens by clicking the button
 , select the required status;
 - “Application date” — when you click the empty field, select the date the application was submitted;
- “Hire date” — when you click the empty field, select the driver’s hire date;
- “Termination date” — when you click the empty field, select the driver’s termination date.
Block “CDL (Commercial Driver’s License)” (Figure 5, Pointer 4)
- “Number” — enter the required value;
- “State” — from the dropdown list that opens when clicking the button
 , select the issuing state where the license was issued;
 - “Issue date” — when you click the empty field, select the license issue date;
- “Expirе date” — when you click the empty field, select the license expiration date.
Block “Medical card” (Figure 5, Pointer 5)
- “Number” — enter the required value;
- “Issue date” — when you click the empty field, select the card issue date;
- “Expirе date” — when you click the empty field, select the card expiration date.
Block “Drug test” (Figure 5, Pointer 6)
- “Status” — from the dropdown list that opens when clicking the button
 , select the required status;
 - “Date” — when you click the empty field, select the date the test was taken;
- “Notes” — enter the required value;
Block “MVR (Motor Vehicle Report)” (Figure 5, Pointer 7)
- “Date” — when you click the empty field, select the required date;
Block “SSN card (Social Security Card)” (Figure 5, Pointer 8)
- “Number” — enter the required value;
Block “Employment verification” (Figure 5, Pointer 9)
- “Status” — from the dropdown list that opens when clicking the button
 , select the required status;
 - “Date” — when you click the empty field, select the required date;
- “Notes” — enter the required value;
Block “Other” (Figure 5, Pointer 10)
- “Name” — enter the required value;
- “Issue date” — when you click the empty field, select the issue date;
- “Expire date” — when you click the empty field, select the expiration date;
- “Notes” — enter the required value.
To save changes made in each block, use the button ![]() located in the “Action” field; to cancel changes, use the cancel button
located in the “Action” field; to cancel changes, use the cancel button ![]() .
.
After saving changes, when you reopen the row a button ![]() will appear at the end; clicking it will reveal buttons to save and cancel changes and an additional button
will appear at the end; clicking it will reveal buttons to save and cancel changes and an additional button ![]() to delete the row.
to delete the row.
Note: The “Attachments” field is in the drop‑down row of each block. By clicking the “Upload” button (Figure 5, Pointer 2) you can upload photos from your computer; if necessary, you can upload several photos one after another.
Note: The icon on the left changes depending on the document status:
![]() — indicates no issues with the documents;
— indicates no issues with the documents;
![]() — less than 14 days remain until the documents expire;
— less than 14 days remain until the documents expire;
![]() — documents are expired and need replacement.
— documents are expired and need replacement.

Figure 5 - Continuation of the edit window (Documents section)