


Logiline| Logistic CRM system - Site page "Deal Dispatch"
The page "Deal Dispatch" is designed for creating, accounting, and editing deals for lots that have already been purchased and paid for, which are at the stage of removal from the auto auction and delivery to the destination.
To open the page, go to the menu section "Deal Dispatch", where you can view deals for transportation management, create them, and maintain records.
On the website page "Deal Dispatch", there is a search bar, a filter by specified parameters, a page switcher, and a table displaying the entire list of transportation management deals with all relevant information. This includes data such as status, deal creation date, origin, rate, cargo type, and others (Figure 1).
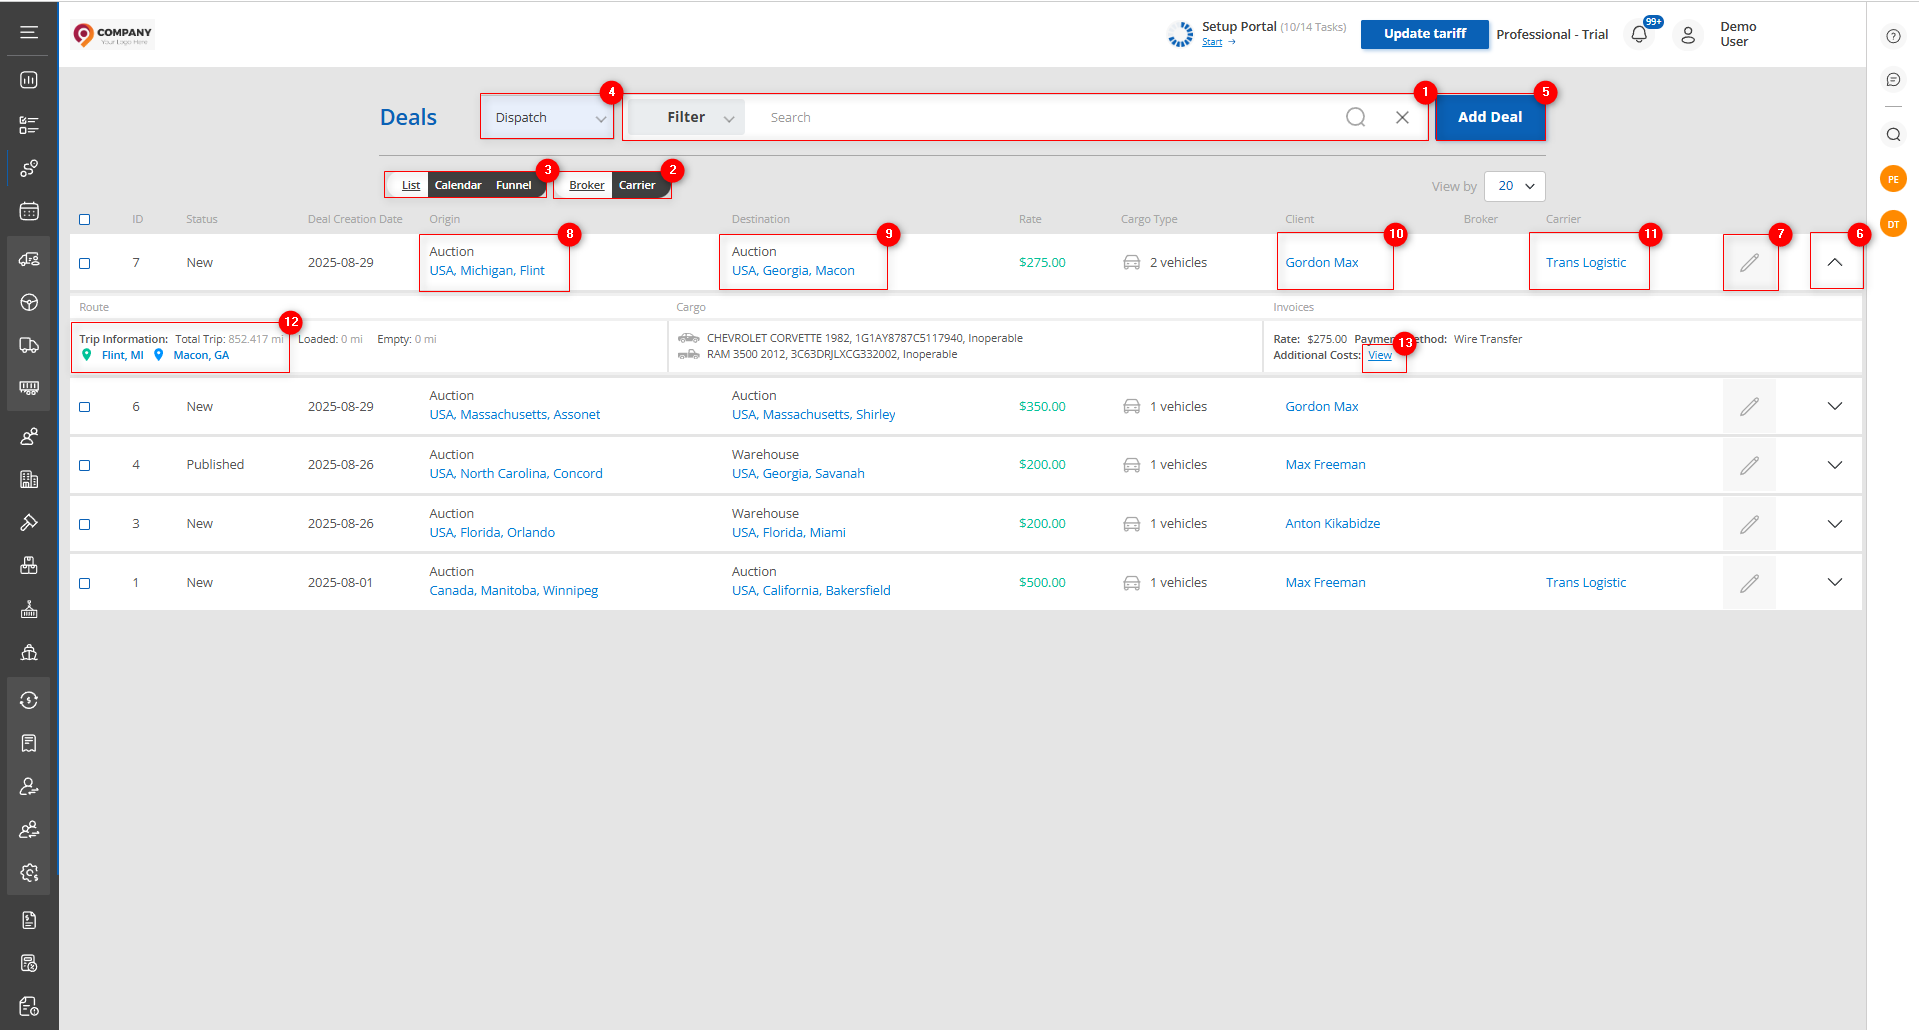
Figure 1 - Site page "Deal Dispatch"
Search
Search by specified parameters:
When you click the "Filter" button (Figure 1, Pointer 1), a filter window will open, allowing you to set search parameters (Figure 2):
-
"Search" - enter the required value;
-
"Client" - from the dropdown list that opens when you click the button
 , select the client;
 -
"Responsible" - from the dropdown list, select the person responsible for the deal;
-
"Stage" - from the dropdown list, select the deal stage;
Note: It is possible to set one or several parameters for the search.
After entering the parameters, click the button![]() .
.
As a result, the table will display data according to the set filter parameters.
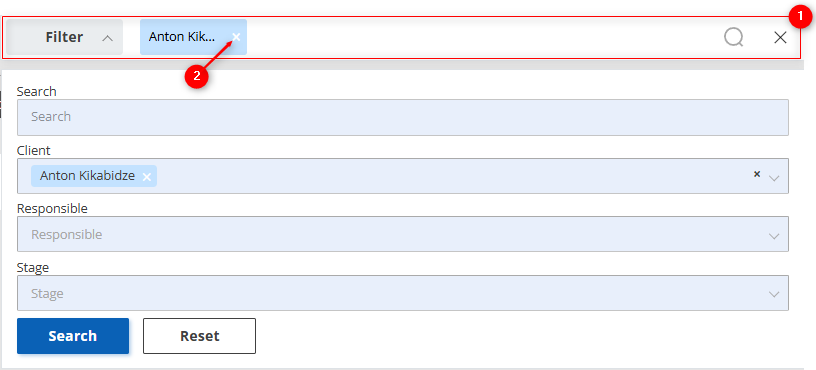
Figure 2 – “Filter” Window
Search in the search bar:
The search bar allows you to perform a search by any parameter (Figure 2, Pointer 1). To do this, enter any query and click the button ![]() located in the search bar or press the “Enter” key on your keyboard. As a result, the records matching the entered parameters will be displayed in the table. To clear the entire search window and reset the filter, click the button
located in the search bar or press the “Enter” key on your keyboard. As a result, the records matching the entered parameters will be displayed in the table. To clear the entire search window and reset the filter, click the button ![]() . If you need to remove a single parameter, click the “X” located within the query window (Figure 2, Pointer 2).
. If you need to remove a single parameter, click the “X” located within the query window (Figure 2, Pointer 2).
On the "Deal Dispatch" page, there is a switch (Figure 1, Pointer 2) for selecting the display mode by deal type: "Broker" (displays only deals where a broker is involved) and "Carrier" (displays only deals where a carrier is involved).
There is also a switch (Figure 1, Pointer 3) for selecting the mode by information display type: "List", "Calendar", "Funnel".
When switching the "Deal Dispatch" page to the "Calendar" display mode, you will be automatically redirected to the "Loads Calendar" page.
When switching the "Deal Dispatch" page to the "Funnel" display mode, the page view will switch to "Kanban" with the ability to edit data and manually change stages.
This provides a convenient way to quickly find and process information about transportation management deals.
On the "Deal Dispatch" page, you can quickly switch to the "Deals Auction Logistic" page and back by selecting from the dropdown list in the window (Figure 1, Pointer 4) the necessary option: "Logistics" to display logistics deals (will redirect you to the "Deals Auction Logistic" page) or "Dispatch" to display dispatcher panel deals.
Table
The table displays information about each transportation management deal. Below is a description of the main fields:
-
“ID”;
-
“Status” - shows the current status of the deal;
-
“Deal Creation Date”;
-
“Origin” - indicates the platform from which the vehicle will be picked up;
-
“Destination” - provides information about where the vehicle will be delivered;
-
“Rate” - shows the amount of the rate for transportation;
-
“Cargo Type” - indicates the number of vehicles for transportation;
-
“Client”;
-
“Broker”;
-
“Carrier”.
When clicking the button ![]() (Figure 1, Pointer 6), a row with additional fields containing corresponding information will appear:
(Figure 1, Pointer 6), a row with additional fields containing corresponding information will appear:
-
“Route” - provides more detailed information about the route;
-
“Cargo” - displays information about the cargo, including VIN and technical condition;
-
“Invoices” - shows information about the rate, payment method, and additional expenses.
Add a Deal
To add a deal, click on the “Add Deal” button (Figure 1, Pointer 5). This will open the “Deal” window, which consists of 4 information blocks:
Block “Deal Information” contains the main information about the deal, where the following fields are available for filling out: (Figure 3, Pointer 1)
-
“Deal Type” - from the dropdown list that opens when you click the button
 , select the type of deal;
 -
“Responsible” - from the dropdown list, select the person responsible for the deal;
-
“Client” - from the dropdown list, select the client;
-
“Distance Measurement Unit” - from the dropdown list, select the unit of measurement;
-
“Rate type” - from the dropdown list, select the type of tariff;
-
“Tariff” - enter the amount of the tariff in the empty field;
Block “Trip Information”: (Figure 3, Pointer 2) This block has two sections: “Origin” and “Destination”.
Note: These blocks have similar fields for filling out. The “Source” section is filled out for the platform from which the vehicle will be transported. The “Destination” section is filled out for the final delivery point of the vehicle.
Subblock “General Information”:
-
“Date” - when clicking on the empty field, select the date of vehicle transport from the dropdown calendar;
-
“Planned Date” - when clicking on the empty field, select the planned date of vehicle transport from the dropdown calendar;
-
“Time Frame” - specify the exact time interval in which you plan to transport the vehicle;
-
“Location Type” - from the dropdown list that opens when you click the button
 , select the type of location of the vehicle at the time of transport;
Subblock “Address Information”:
-
“Country” - from the dropdown list that opens when you click the button, select the country from which the vehicle will be transported;
-
"State" - specify the state from which the vehicle will be picked up;
-
"City" - specify the city of vehicle pickup;
-
"ZIP Code" - enter the required value;
-
"Address 1" - specify the address of the location from which the vehicle will be picked up;
-
"Address 2" - enter an additional address if necessary;
Sub-block "Contact Information":
-
"Email" - enter the email address;
-
"Select Contact" - from the dropdown list that opens when you click the button
 , select the contact responsible for the vehicle pickup;
 -
"Contact Name" - enter the first name of the responsible contact;
-
"Contact Surname" - enter the last name of the responsible contact;
-
"Contact job title" - enter the position of the contact person;
-
"Contact Phone" - enter the phone number of the contact person;
-
"Contact Email" - specify the email address;
-
"Contact Note" - enter additional information about the contact if necessary;
Block "New Vehicle": (Figure 4, Pointer 1)
-
"VIN" - enter the required value, then click the button
 ;
;
Note: When the button ![]() is clicked , the fields "Make", "Model", "Year", "Vehicle Type", and "Engine Type" will be automatically filled in.
is clicked , the fields "Make", "Model", "Year", "Vehicle Type", and "Engine Type" will be automatically filled in.
-
"Vehicle Color" - specify the color of the vehicle;
-
"License Plate" - enter the required value;
-
"License State\Province" - specify the state of registration of the vehicle;
-
"Inoperable" - using the toggle
 , indicate whether the vehicle is technically sound or not;
 -
"Oversized" - using the toggle
 , indicate whether the cargo is oversized;
 -
"Note" - enter any additional information regarding the vehicle;
Note: If you need to add two or more new vehicles, click the "Add Vehiche" button (Figure 4, Pointer 2).
Block “Additional Information” (Figure 4, Pointer 3):
-
“Additional Terms” – if necessary, enter additional conditions regarding the transportation;
-
“Pre - Dispatch Notes” – if necessary, enter shipping notes;
-
“Transport Special Instructions” – if necessary, specify special instructions regarding the transportation of vehicles.
To save the data, click the “Save & Close” button; to exit the add window, use the “Close” button. To save the data and remain in the creation window, click the “Save” button and continue working.
Note: If you attempt to save data with required fields left empty, the system will automatically highlight the unfilled fields in red. After filling them in, you will be able to save the transaction.
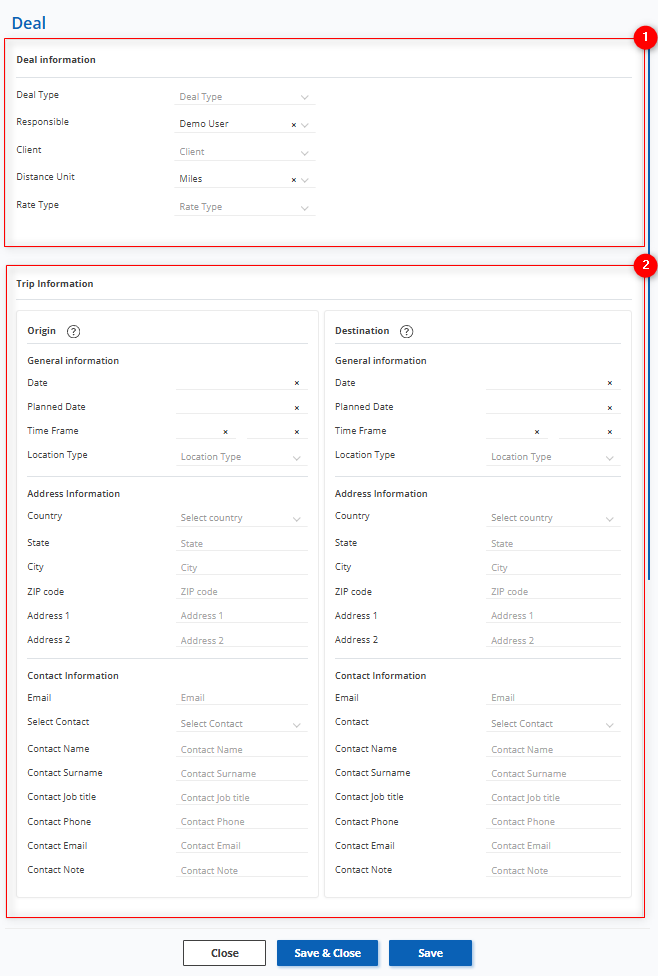
Figure 3 – “Deal” Window
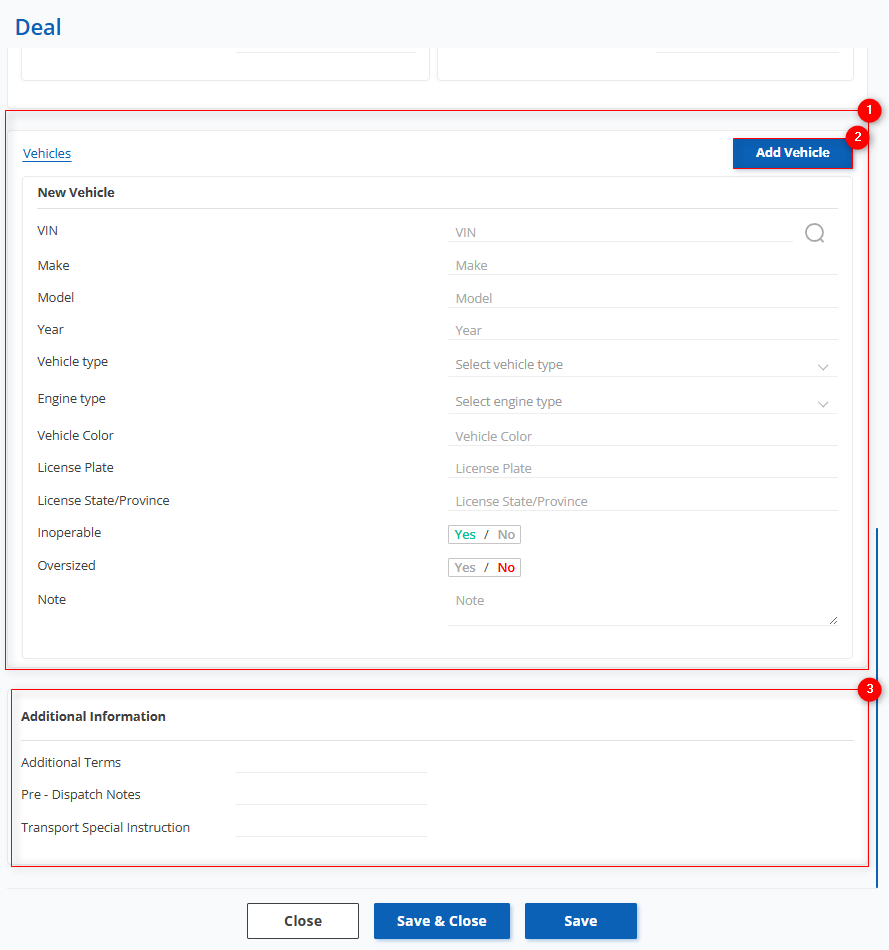
Figure 4 – Continuation of the “Deal” Window
After adding a new deal, it will appear in the table (Figure 1), from where it is convenient to navigate to related data.
When clicking on the origin (Figure 1, Pointer 8), the origin point editing window will open.
When clicking on the destination (Figure 1, Pointer 9), the destination point editing window will open in the same way.
When clicking on the client (Figure 1, Pointer 10), the client window will open, displaying all related information with the option to edit.
When clicking on the broker, the broker window will open, showing all their deals, companies, users, drivers, and other information, with the possibility to edit the data.
When clicking on the carrier (Figure 1, Pointer 11), the carrier window will open in the same way, with all available information and the option to edit it.
When selecting clickable links in the “Route” field from the dropdown list (Figure 1, Pointer 12), the corresponding route point editing windows will open, as described above.
When clicking the “View” button (Figure 1, Pointer 13), a popup window with information on additional expenses will appear.
Editing Deal Data
To edit deal data, select the required record in the table and click the button (Figure 1, Pointer 7). The editing window will open, which includes five sections: “General”, “Vehicles”, “Carriers”, “Pricing and Payment”, “Claims” (Figures 4, 5).
Section “General”
Block “Trip Information”
To edit, click the “Edit” button. When clicking the button in the route point window (Figure 5, Pointer 1), the route point editing window will open. By clicking the “Map” button (Figure 5, Pointer 2), a map with the built route will be displayed. By clicking the “Add Stop” button (Figure 5, Pointer 3), you can add an additional route point. By clicking the “Dispatch info to the Driver” button (Figure 5, Pointer 4).
Block “Deal Information”
To make fields available for editing, click the “Edit” button ![]() (Figure 5, Pointer 5). After this, you can modify the data in the same way as during initial creation (see above).
(Figure 5, Pointer 5). After this, you can modify the data in the same way as during initial creation (see above).
Note: The fields “Rate per Mile”, “Deal Creation Date”, and “Deal Update Date” are not available for editing.
Block “Broker Information”
To make the fields available for editing, click the “Edit” button:
-
“Company” – from the dropdown list opens when clicking the button
 , select the company the broker works for.
 -
“MC #” – enter the required value.
-
“Address 1” – enter the address.
-
“Address 2” – if necessary, enter an additional address.
-
“Country” – select a country from the dropdown list.
-
“State” – enter the state name.
-
“City” – enter the city name.
-
“ZIP Code” – enter the required value.
-
“Contact” – select the contact responsible for vehicle pickup from the dropdown list.
-
“Contact Name” – enter the first name.
-
“Contact Surname” – enter the last name.
-
“Contact job title” – enter the job title.
-
“Contact Phone” – enter the contact’s phone number.
-
“Contact Email” – enter the responsible contact’s email.
-
“Contact Notes” – if necessary, enter additional details.
-
“Dispatcher Phone” – enter the dispatcher’s phone number.
Note: For the “Carrier” deal type, the “Broker Information” block is not available.
Block “Additional Information”
To make the fields available for editing, click the “Edit” button. After this, you will be able to modify the data in the same way as during initial creation (see above).
Block “Loading and Unloading Photos”
-
To upload a photo, click the “Upload” button (Figure 6, Pointer 1) and select the required photo from your computer.
-
To delete a photo, click the “Delete” button.
Note: The option to upload photos is available only in the editing window. When adding a new deal, this function is not available.
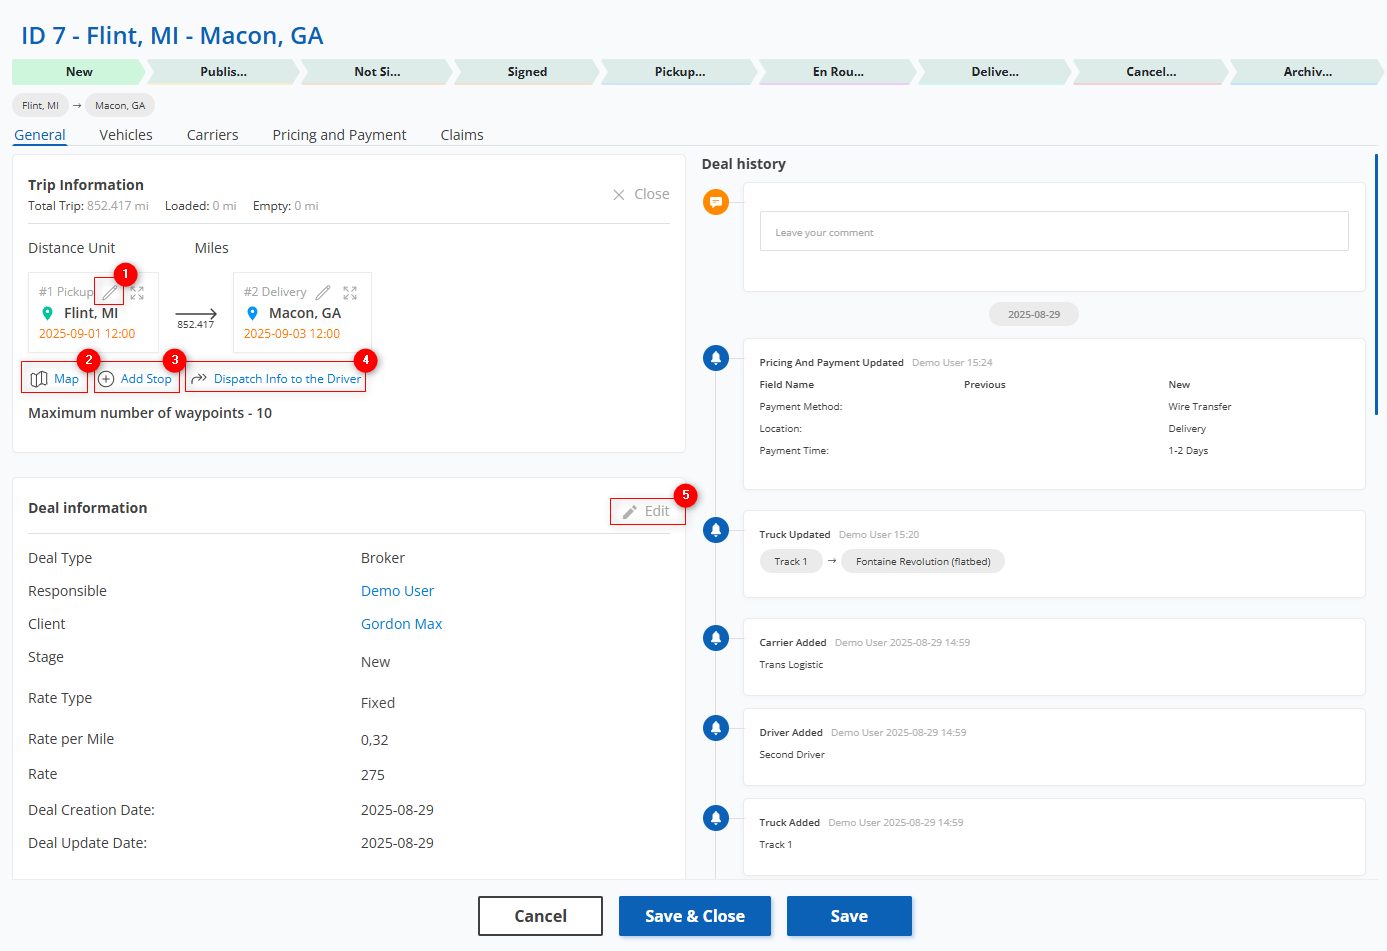
Figure 5 – Editing Window (Section “General”)
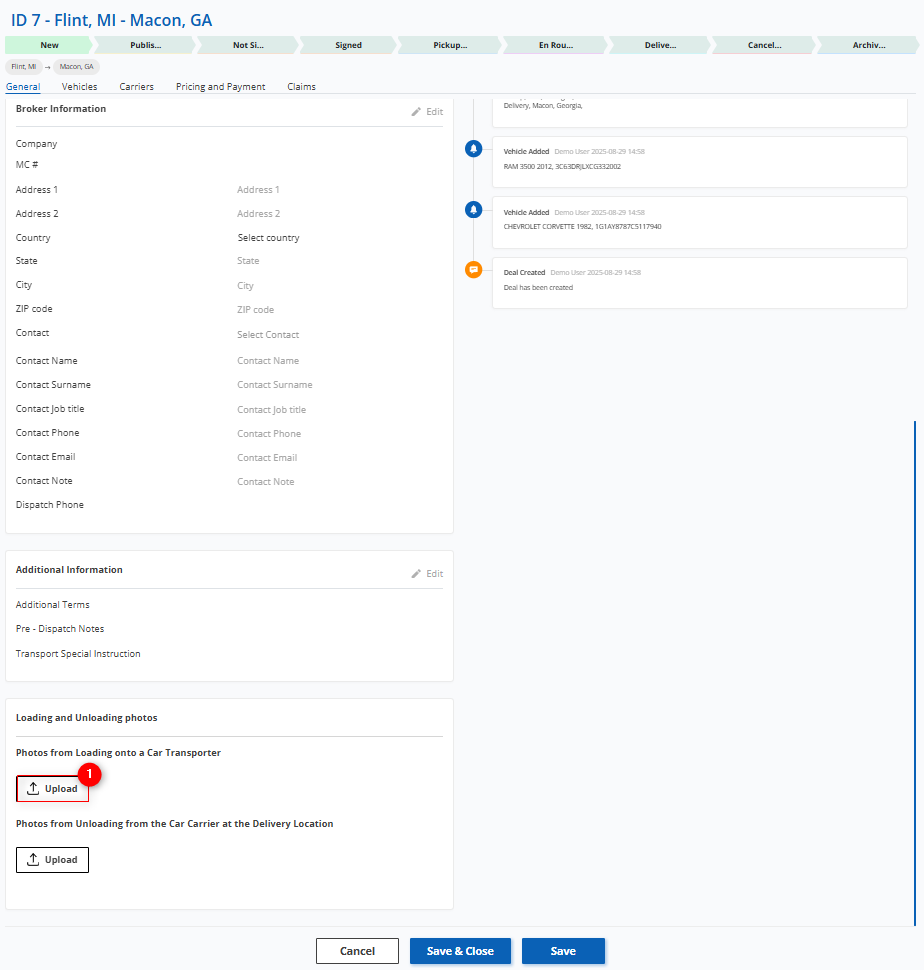
Figure 6 – Continuation of the Editing Window (Section “General”)
-
Section “Vehicles”
The fields in this section are identical to those used during creation.
To make the fields available for editing, click the “Edit” button. After this, you can modify the data in the same way as during initial creation (see above).
- Section “Carriers”
Block “Carrier Information”
To make the fields available for editing, click the “Edit” button. After this, you can modify the following fields:
-
Company
-
Phone Number
-
MC (Motor Carrier) Number #
-
DOT (Department of Transportation) Number #
-
Address 1
-
Address 2
-
Country
-
City
-
State
-
ZIP Code
Block “Trucks & Drivers”
To edit, click the “Edit” button. To add or edit details, click the button ![]() (Figure 7, Pointer 1). The creation and editing window will then open. To delete data, click the button
(Figure 7, Pointer 1). The creation and editing window will then open. To delete data, click the button ![]() (Figure 7, Pointer 2).
(Figure 7, Pointer 2).
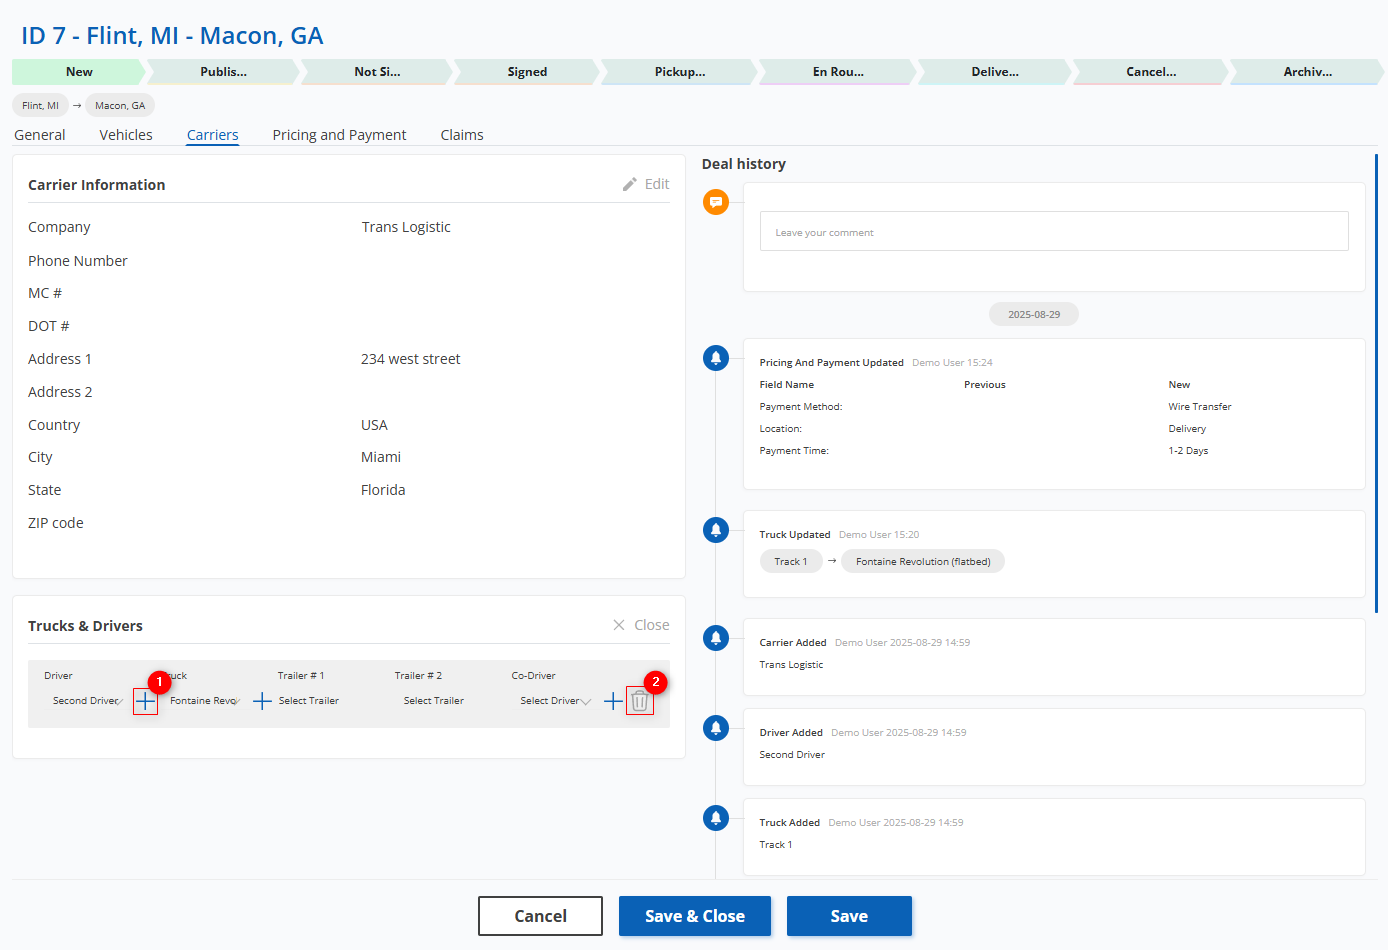
Figure 7 – Editing Window (Section “Carriers”)
Block “Pricing and Payment”
To make the fields available for editing, click the “Edit” button. After this, you can modify the following fields:
-
“Amount” – enter the transportation cost according to the rate.
-
“Payment Method” – from the dropdown list opens when clicking the button
 , select the payment method.
 -
“Location” – from the dropdown list, select the location (pickup or delivery).
-
“Payment Time” – from the dropdown list, select the payment period.
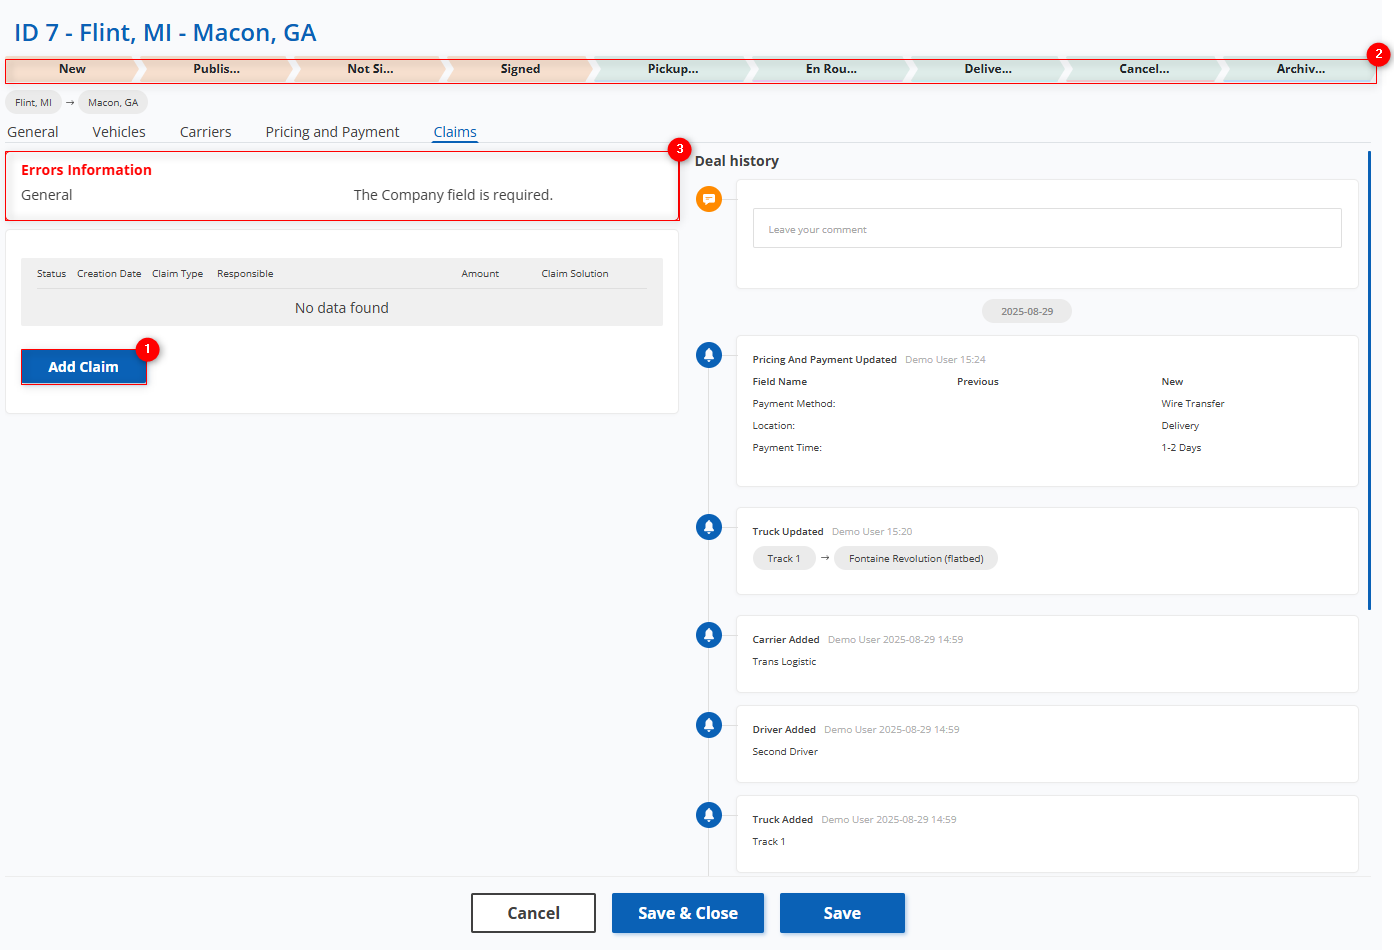
Figure 8 – Editing Window (Section “Claims”)
Block “Claims”
To add a new claim, click the “Add Claim” button (Figure 8, Pointer 1). To save the data, click the “Save&Close” button. To exit the add window, click the “Close” button. To save the data and remain in the creation window, click the “Save” button and continue working.
Note: Using the colored bar at the top of the page (Figure 8, Pointer 2), you can track and switch the stage of the deal. When switching a deal with incomplete data, the system will automatically highlight unfilled fields (Figure 8, Pointer 3).
Mass Editing Function
The mass editing function for transportation management deals provides a convenient way to simultaneously modify multiple records when the same type of data needs to be updated.
To use this function, follow these steps:
-
In the table, check the box
 next to each deal you want to edit (Figure 9, Pointer 1).
 -
After selecting the deals, a mass editing panel will appear at the bottom of the table. Use the available options in this panel to change the parameters (Figure 9, Pointer 2).
Note: If you select the “For All” checkbox (Figure 9, Pointer 3), all records will be selected, and changes can be applied to all of them at once.
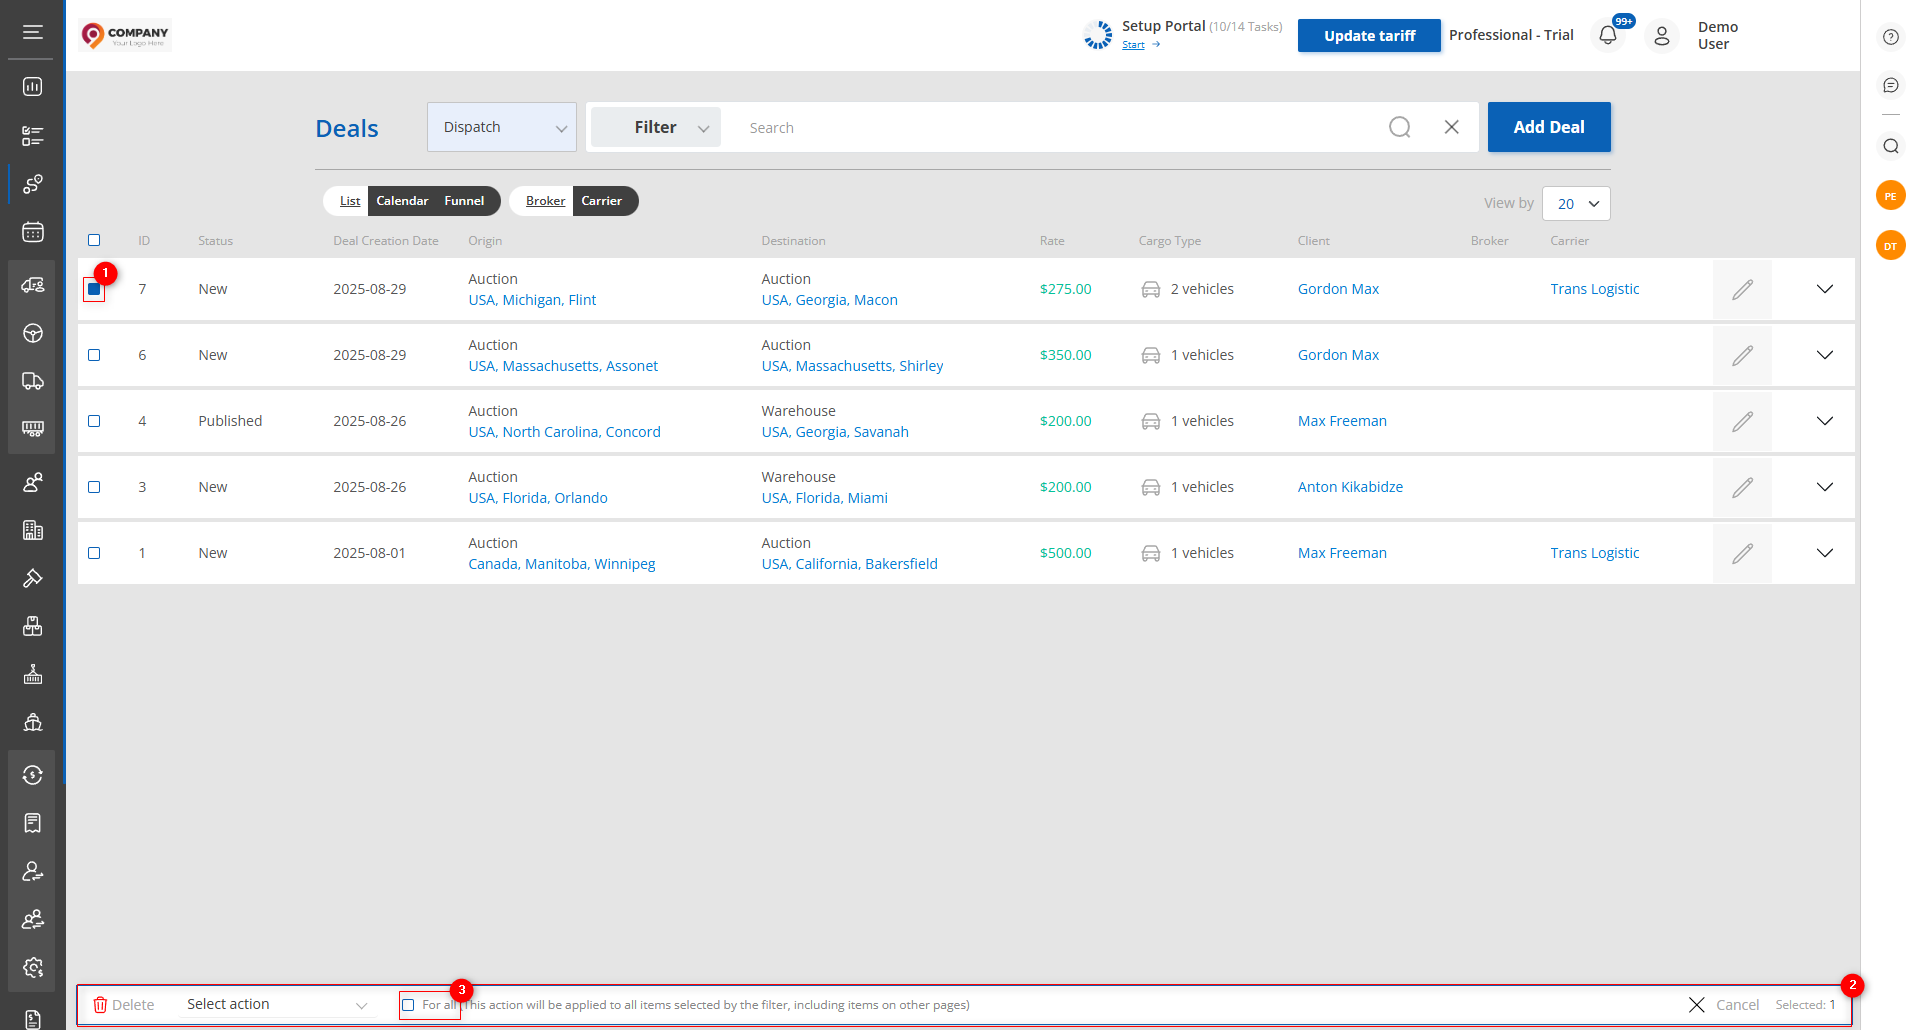
Figure 9 – Mass Editing Function
Available Options:
-
Deletion – In the mass editing panel, select the “Delete” option (Figure 10, Pointer 1). A confirmation window will open, where you can click “Yes” to confirm deletion or “No” to cancel.
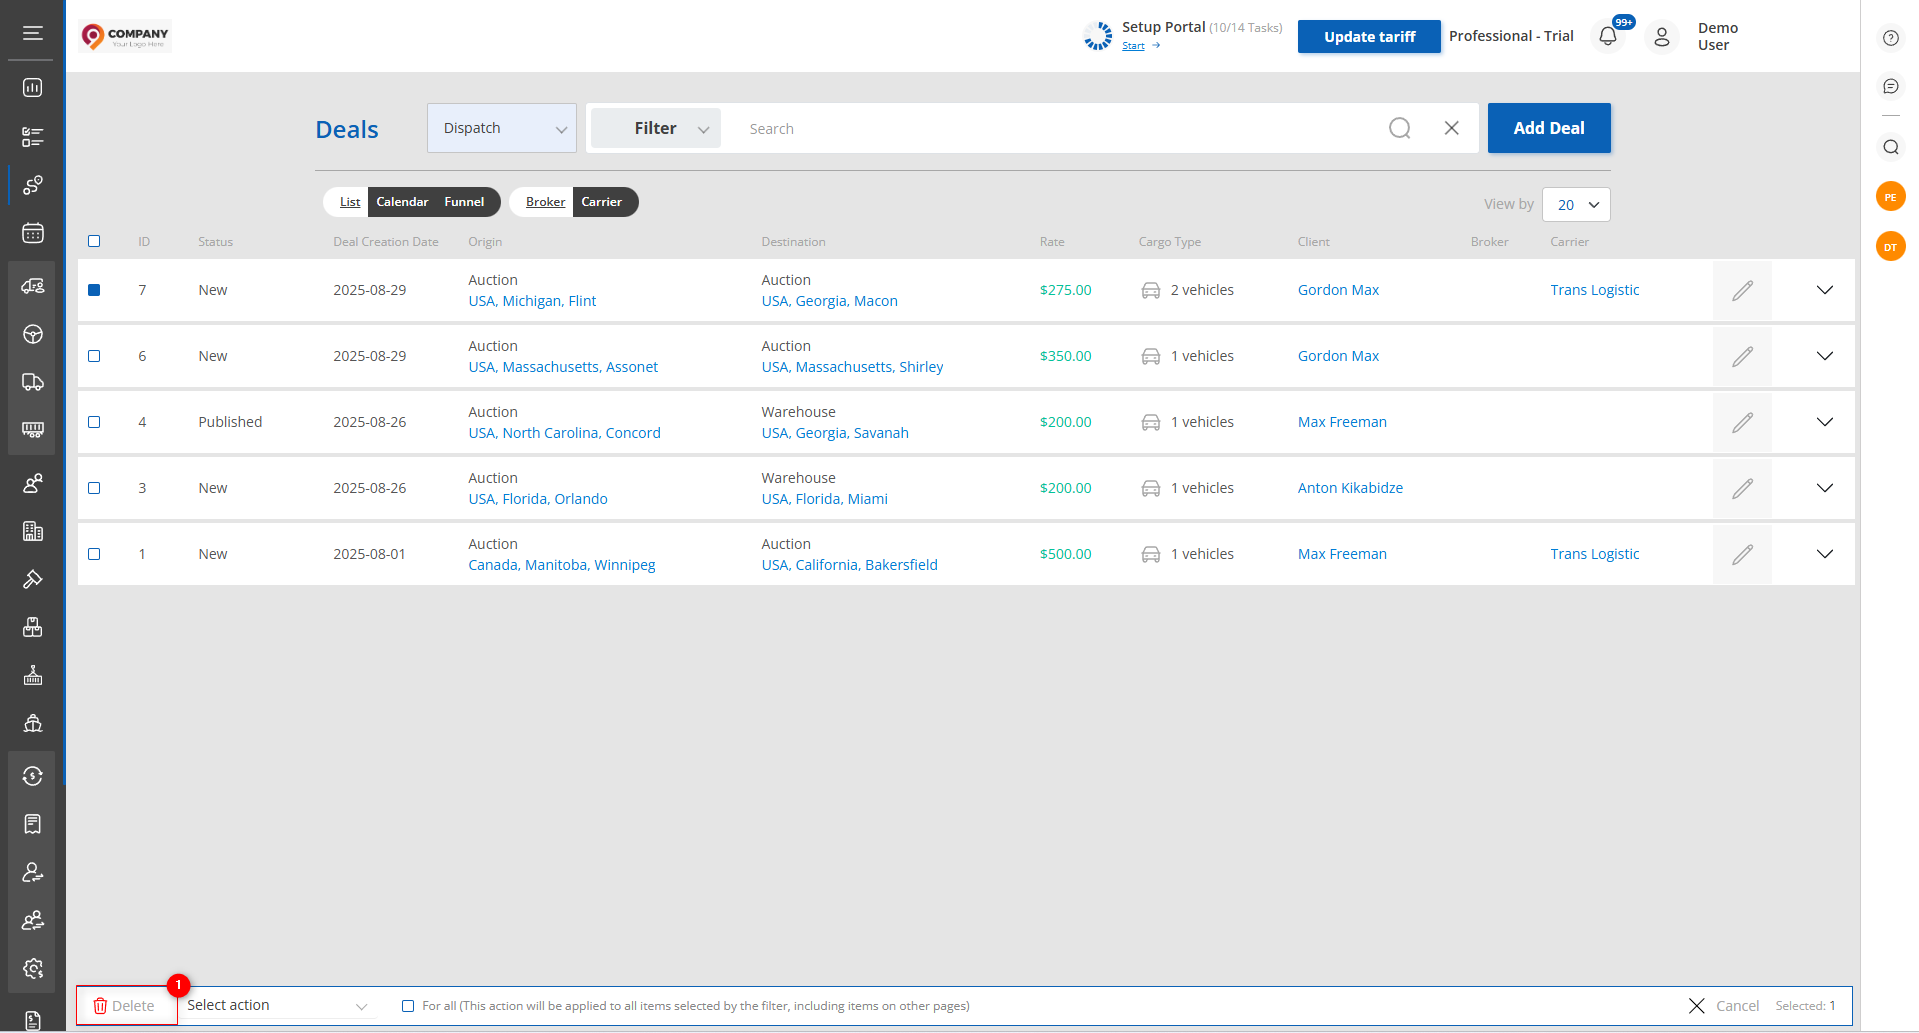
Figure 10 – Mass Deletion Function
-
Stage Setting. Select the “Set Stage” option (Figure 11, Pointer 1). Then choose the stage and click the “Apply” button (Figure 11, Pointer 2) to save the changes.

Figure 11 – Mass Editing “Set Stage”
-
Assigning Responsible Person. Select the “Set Responsible” option (Figure 12, Pointer 1). Then choose the responsible person and click the “Apply” button (Figure 12, Pointer 2) to save the changes.

Figure 12 – Mass Editing “Set Responsible”
-
Assigning Client. Select the “Set Client” option (Figure 13, Pointer 1). Then choose the client and click the “Apply” button (Figure 13, Pointer 2) to save the changes.
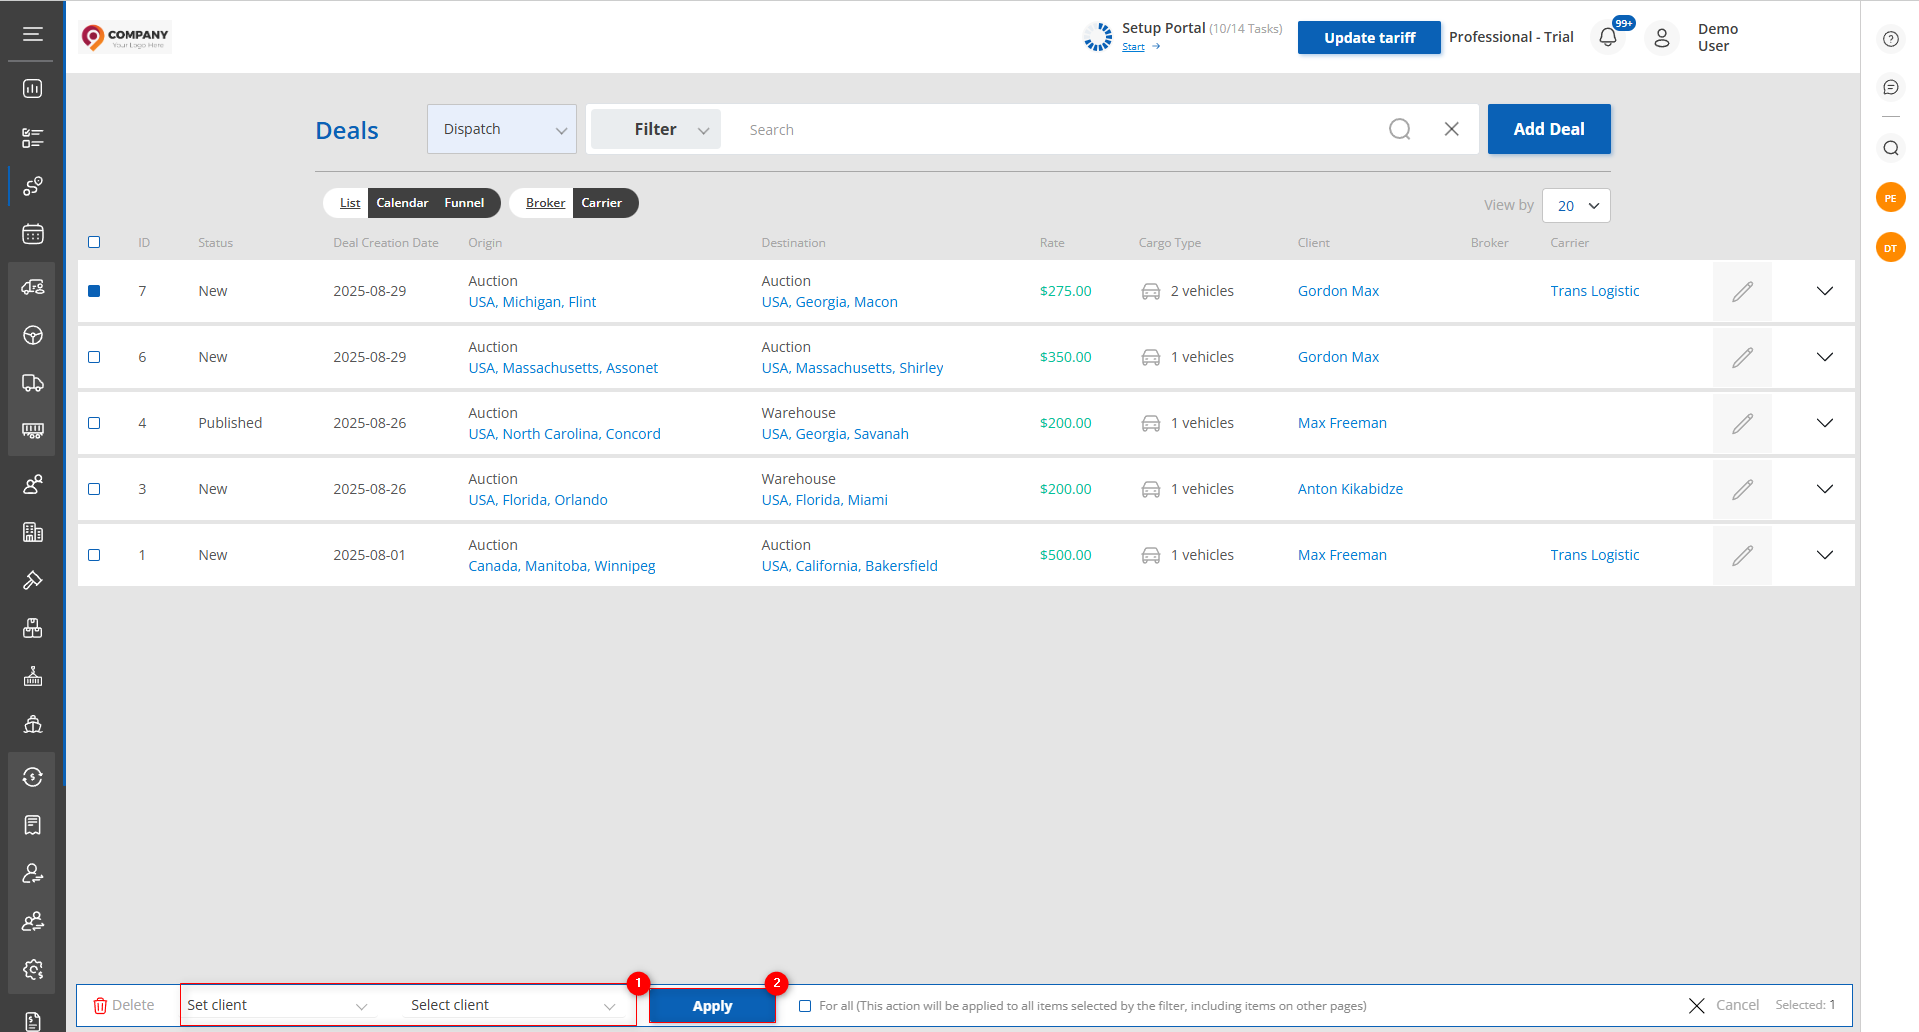
Figure 13 – Mass Editing “Set Client”