


Logiline| Logistic CRM system - Site page "Price lists"
The site page "Price lists" is designed to create a price list, with the ability to calculate the cost of shipping the vehicle to the desired country.
The functionality that is available on the page:
-
creating a price list;
-
price list editing;
-
creating a copy of the price list;
-
PDF price list creation;
-
price list export;
-
price list import;
-
price list deletion;
-
price list comparison.
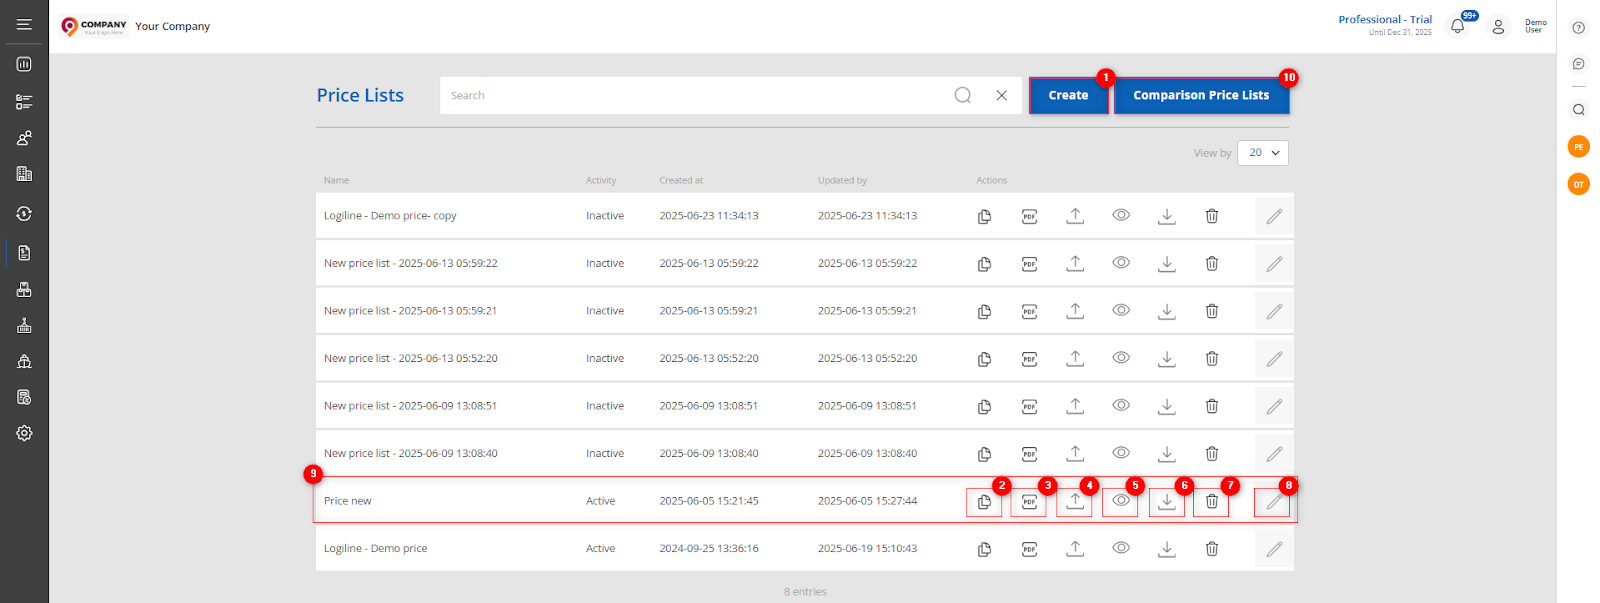
Figure 1 - Price lists page
Creating a price list
In order to create a price list, click on the "Create" button (Figure 1, Pointer 1). After that the site page "Edit price list" will open, in which fill in the fields (Figure 2):
-
"Title" - enter the price list title;
-
"Activity" - select the activity status from the drop-down list that opens when you click on the
 button.
After that, proceed to fill in the tabs.
Note: If you select the activity status "Inactive", the corresponding price list will not be available for use in calculations in Delivery Calculator.
"Warehouses" tab
When creating a price list, the warehouses created on the “Settings” page are automatically populated. To add a new warehouse for loading, click “Add” (Figure 2, Pointer 1). A detailed description of the steps to create a warehouse is given on the “Warehouses” page.
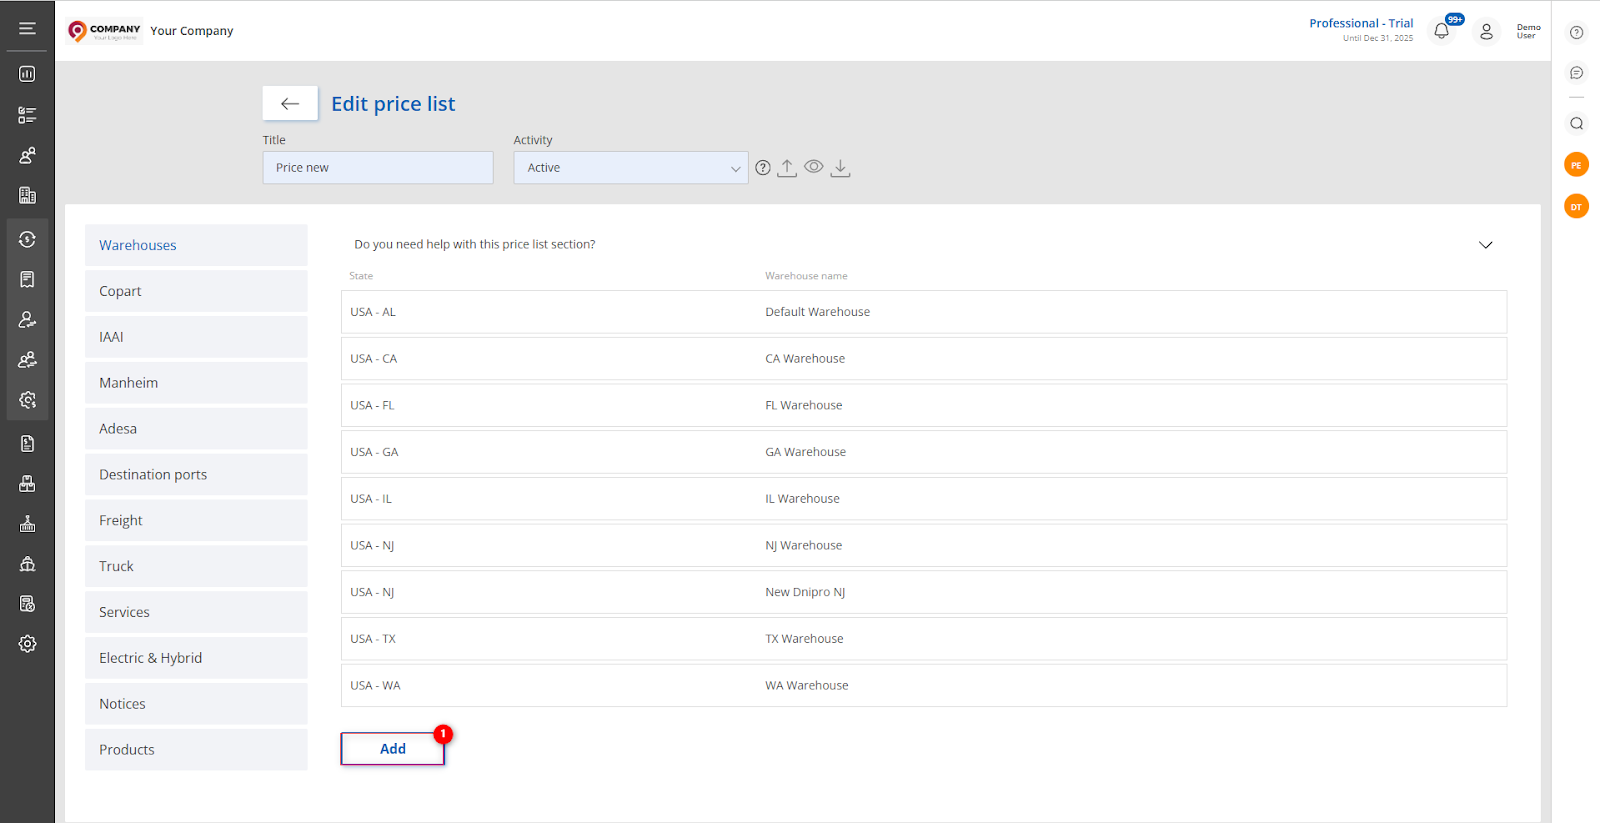
Figure 2 - Edit price list page
Tab "Copart"/"IAAI"/Manheim/Adesa
To add shipping costs from the auctions location to the warehouse where loading will take place, select one of the following methods:
-
To add one or more locations, click the “Add” button (Figure 3, Pointer 1). This will add a row (Pointer 2) in which fill in the field:
-
“State” - select a state from the drop-down list that opens when you click on the
button; -
“Location, from” - select the city where the auction site is located from the drop-down list that opens when you click on the
button; -
“Warehouse - Loading Port” - from the drop-down list that opens when you click on the
button , select the warehouse to which the delivery will be made; -
using the keypad enter the delivery cost in the appropriate field by vehicle type (Pointer 3);
-
"Status" - click the "On" button to activate the location, in case of cancellation the button is "Off".
To create multiple locations, add the required number of rows and repeat the process of filling in the fields (described above).
Figure 3 - Copart tab. Adding one or more locations
-
To add locations in bulk, click on the “Fill Locations” button (Figure 3, Pointer 4). This will populate the table with all locations, where click to make
 the field available for editing. Then specify the stock, cost and activity status as you would when adding a single location.
To delete unfilled locations, click on the “Delete unfilled” button (Pointer 5). As a result, only those locations with filled in fields will be displayed in the list.
Note: The mandatory fields are “State”, “Location, from”, “Warehouse - Loading Port” and the specified cost, for the first vehicle type (Pointer 3).
To delete unfilled locations, click on the "Delete unfilled" button (Pointer 2). As a result, only those locations with filled fields will be displayed in the list.
Note: The mandatory fields are "Warehouse, port of shipment" and the indicated value, for the first vehicle type (Pointer 3).
If you want to delete a line, click on the ![]() button (Pointer 4). After that a window will open, in which to confirm the deletion of location click on the "Delete" button, to cancel the button - "Cancel" (Figure 4).
button (Pointer 4). After that a window will open, in which to confirm the deletion of location click on the "Delete" button, to cancel the button - "Cancel" (Figure 4).
To activate all locations, click on the "Activate all locations" button (Pointer 6). After that a window will open, in which to confirm the activation of all locations click on the "Activate" button, to cancel the button - "Cancel" (Figure 5).
After adding locations using any of the methods, click the button ![]() to save the data, and the created location will be displayed on the tab.
to save the data, and the created location will be displayed on the tab.

Figure 4 - Confirmation/cancellation of location deletion

Figure 5 - Confirming/disconfirming activation of all locations
"Destination Ports" tab
When creating a price list, the ports that are created on the site on the “Settings” page are automatically filled in. To add a new port, click on the “Add” button (Figure 6, Pointer 1). After that the “Destination Port” window will open, a detailed description of the steps to create is given on the “Destination Ports” page.
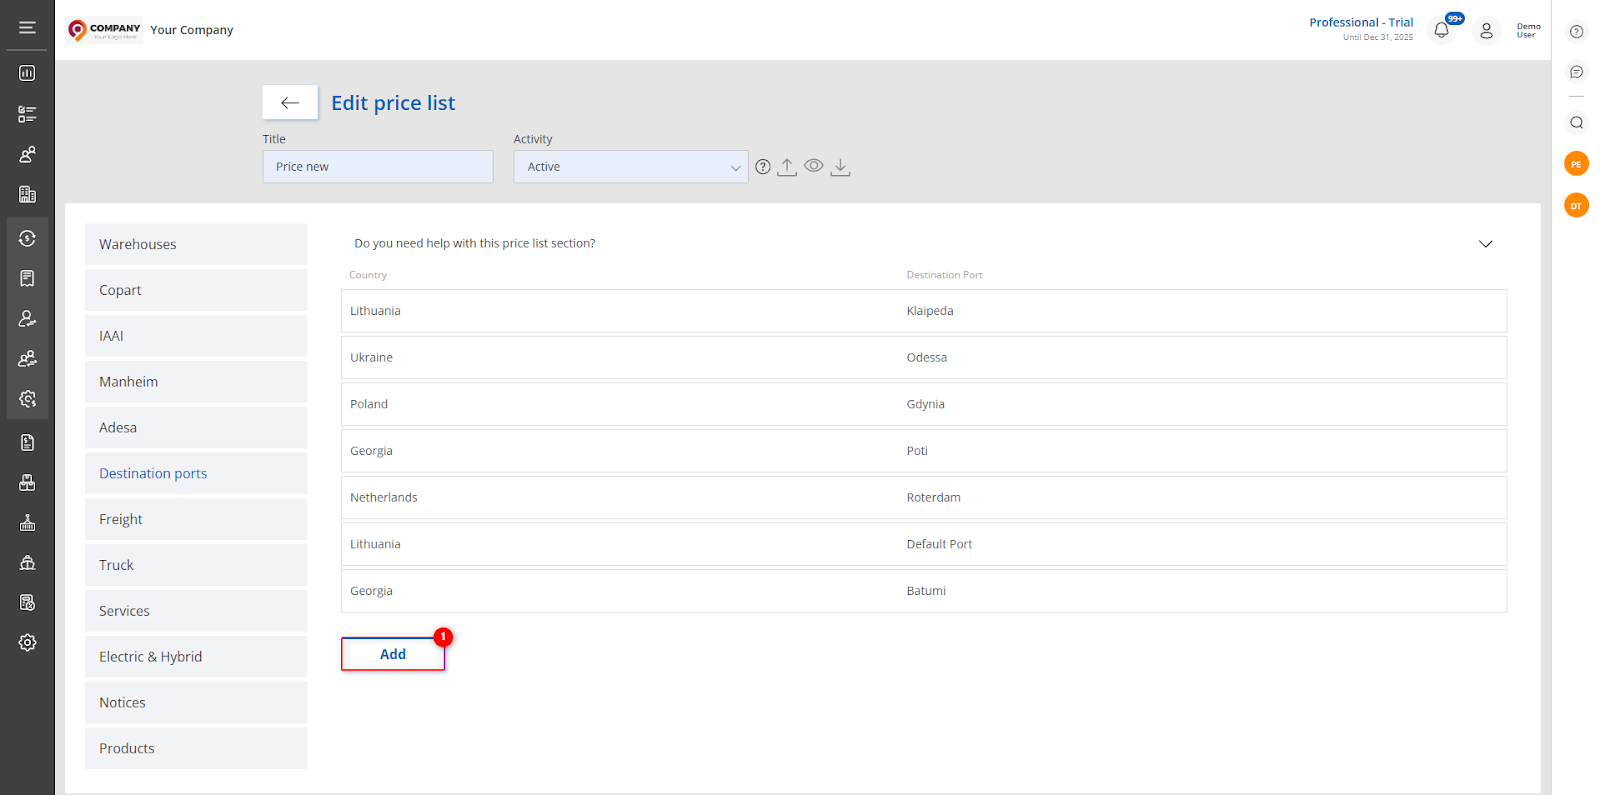
Figure 6 - "Destination Ports" tab
"Freight" tab
To enter the shipping cost to the destination port by sea, click the "Add" button (Figure 7, Pointer 1). This will add a new line (Pointer 2) where you fill in the field:
-
“Warehouse - Loading Pot” - from the drop-down list that opens when you click on the
button , select the warehouse from which the shipment is to be made;
-
“Destination Port” - from the drop-down list that opens when you click on the
button, select the port to which you want to send; -
using the keypad enter the cost of sea delivery in the appropriate field by vehicle type (Pointer 3);
-
"Status" - click the "On" button to activate the freight, in case of cancellation the "Off" button.
To save the data, click on the button ![]() and the created freight/freights will be displayed on the tab.
and the created freight/freights will be displayed on the tab.
To create multiple freights, add the required number of rows and repeat the process of filling in the fields (described above).
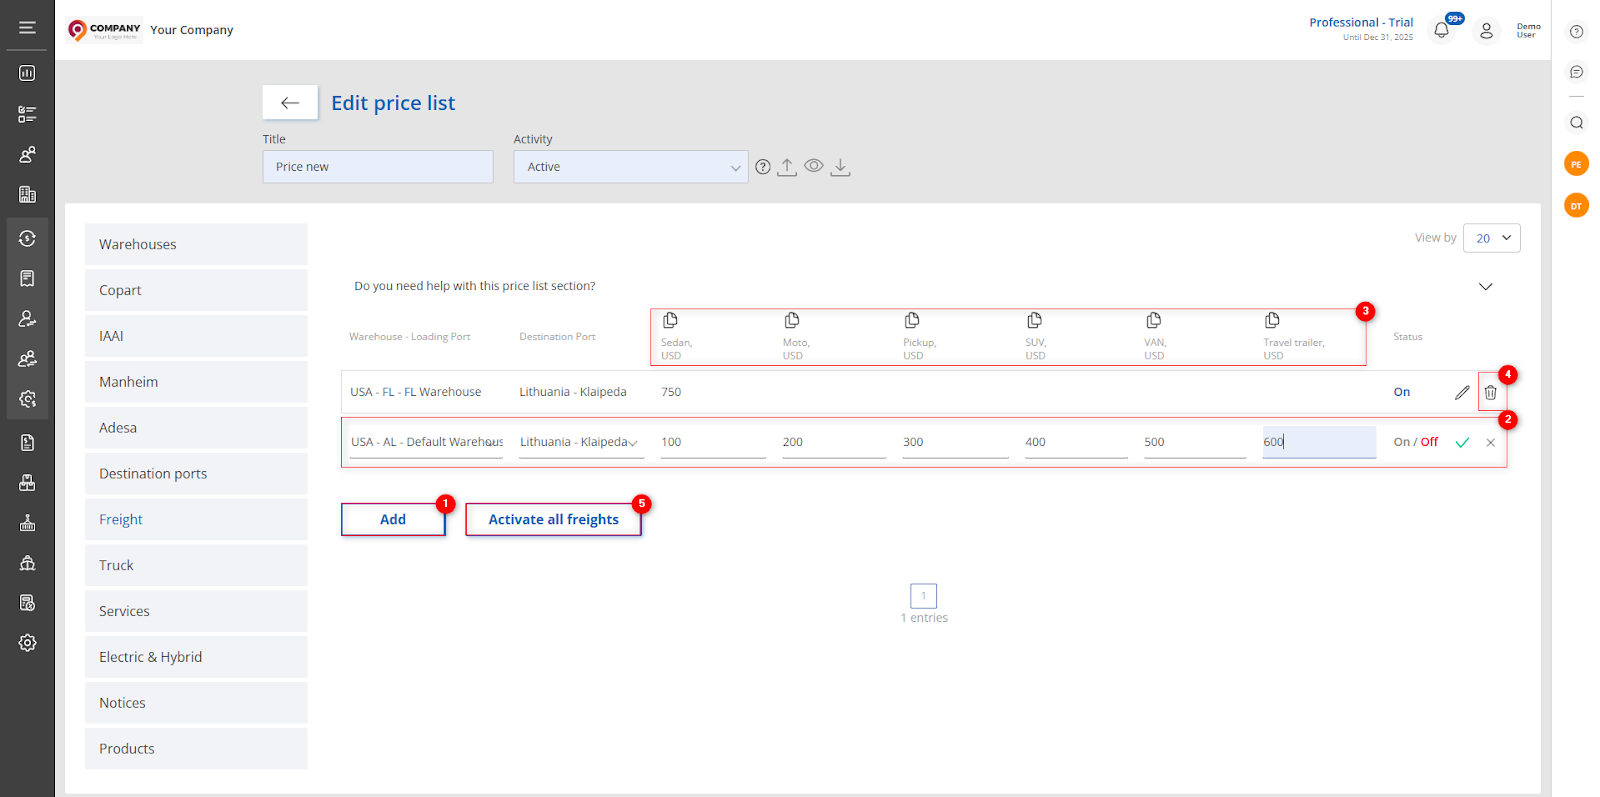
Figure 7 - "Freight" tab
If you need to delete a line, click on the ![]() button (Pointer 4). After that a window will open, in which to confirm the deletion of the location click on the "Delete" button, to cancel the button - "Cancel" (Figure 8).
button (Pointer 4). After that a window will open, in which to confirm the deletion of the location click on the "Delete" button, to cancel the button - "Cancel" (Figure 8).
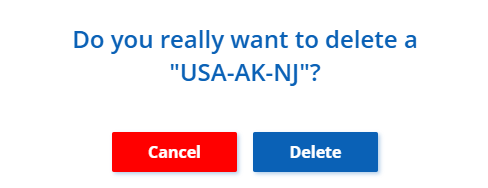
Figure 8 - Confirmation/cancellation of freight deletion
To activate all freights, click on the "Activate all freights" button (Figure 7, Pointer 5). After that a window will open, where to confirm the activation click on the "Activate" button, to cancel the activation click on the "Cancel" button (Figure 9).

Figure 9 - Confirmation/cancellation of activation of all freights
"Truck" tab
To add a shipping cost to an overland destination, select one of the methods (Figure 10):
-
Click on the "Add" button (Pointer 1). This will add a row (Pointer 2) in which you fill in the fields:
-
"Country From" - from the drop-down list that opens when you click on the
button , select the country from which you want to send; -
“Destination Country” - from the drop-down list that opens when you click on the
button, select the country to which the shipment is to be sent; -
“Destination City” - enter the name of the city to which the shipment is being sent;
-
using keyboard input enter the overland delivery cost in the appropriate field by vehicle type (Pointer 4);
-
"Status" - press the "On" button to activate the car transporter, in case of cancelation the "Off" button.
-
Click on the "Fill all Ports" button (Pointer 3). As a result, the data in the "Country From" fields will be filled in automatically based on the "Destination Port" fields, which are filled in the "Freight" tab. The number of filled lines on the "Truck" tab will be similar to the number of filled lines on the "Freight" tab.
After that, fill in the rest of the fields similarly to the first step.
To save the data, click the ![]() button (Figure 10, Pointer 5). As a result, the created truck/cars will be displayed on the tab.
button (Figure 10, Pointer 5). As a result, the created truck/cars will be displayed on the tab.

Figure 10 - "Truck" tab
If you need to delete a line, click on the ![]() button (Pointer 5). After that, a window will open, in which to confirm the deletion of the location click on the "Delete" button, to cancel the button - "Cancel" (Figure 11).
button (Pointer 5). After that, a window will open, in which to confirm the deletion of the location click on the "Delete" button, to cancel the button - "Cancel" (Figure 11).
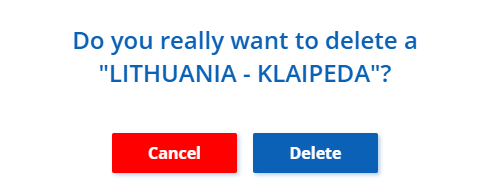
Figure 11 - Confirmation/Cancellation of Truck Deletion
To activate all the carriers, click on the "Active all trucks" button (Figure 10, Pointer 6). After that a window will open, where to confirm the activation click on the "Activate" button, to cancel the activation click on the "Cancel" button (Figure 12).
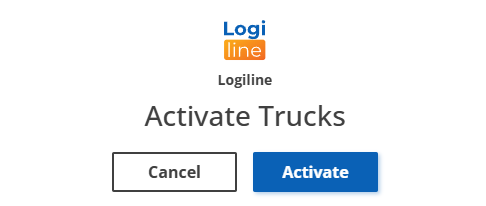
Figure 12 - Confirming/disconfirming activation of all trucks
"Services" tab
To add the cost of additional services that occur during the delivery process, click on the "Add" button (Figure 13, Pointer 1). This will add a line (Pointer 2), in which fill in the field:
-
“Country” - from the drop-down list that opens when you click on the
button, select the country in which the service will be provided; -
“Service” - enter the name of the service;
-
Using the keypad enter the service price in the appropriate field by vehicle type ( Pointer 3);
-
"Status" - click on the “On” button to activate the service, in case of cancelation the "Off" button;
-
“Use product in invoicing” - if it is necessary that the product is automatically added to the customer's invoice, enable the "On" option. If the addition is not required - turn “Off” off
-
“Use in calculator” - click the “On” button to have the service factored into the shipping calculator for the customer.
Note: The service must also be added in the client modal window under the Account Settings tab.
To save the data, click the ![]() button , as a result the created service/s will be displayed on the tab.
button , as a result the created service/s will be displayed on the tab.
To create multiple services, add the required number of rows and repeat the process of filling in the fields (described above).
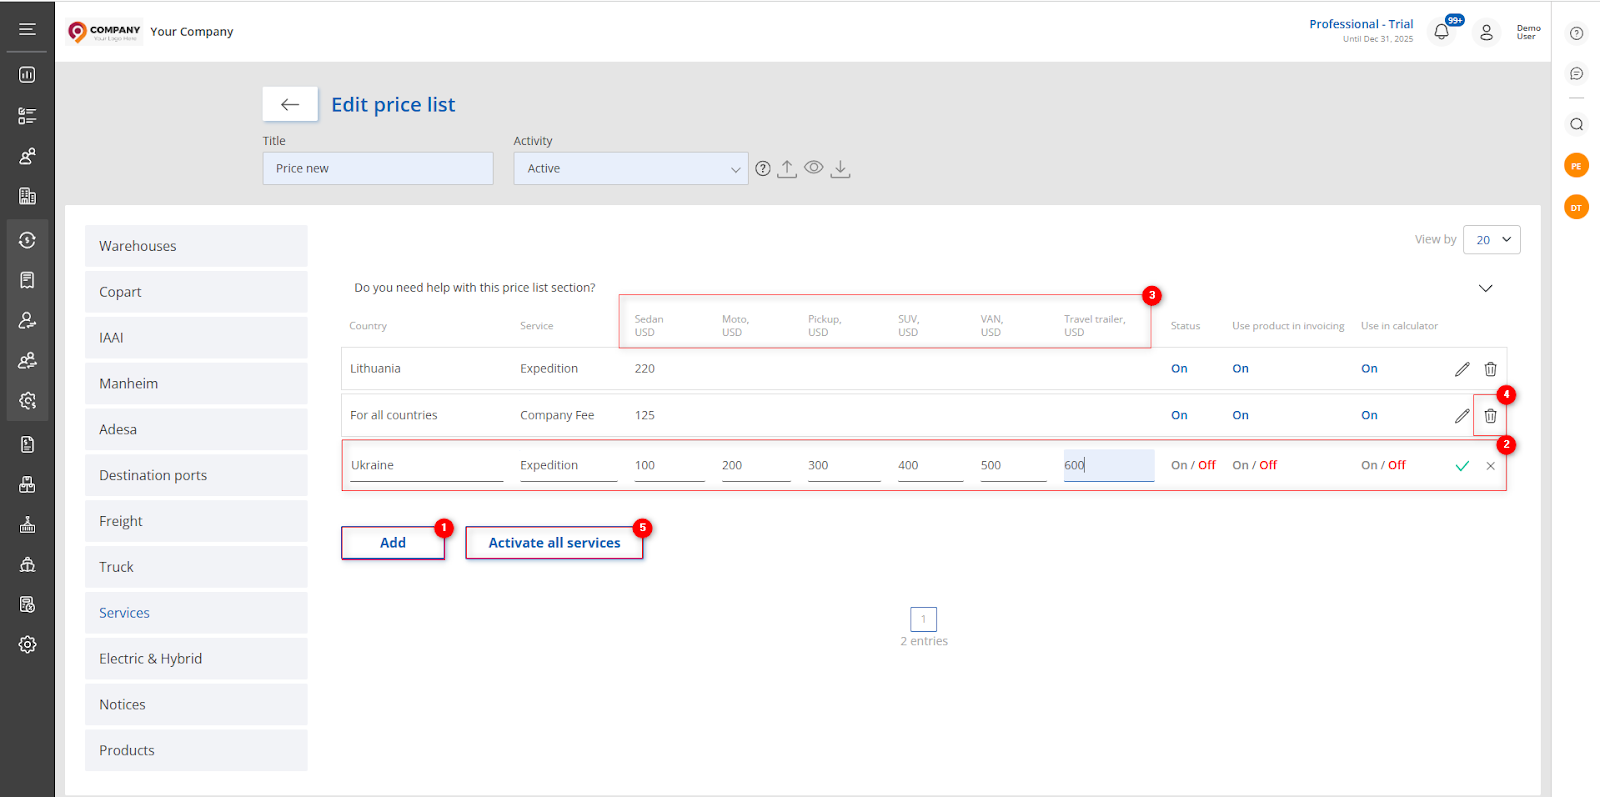
Figure 13 - "Services" tab
If it is necessary to delete a line, click on the ![]() button (Pointer 4). As a result, a window will open, in which to confirm the deletion of the service click on the "Delete" button, to cancel it click on the "Cancel" button (Figure 14).
button (Pointer 4). As a result, a window will open, in which to confirm the deletion of the service click on the "Delete" button, to cancel it click on the "Cancel" button (Figure 14).

Figure 14 - Confirmation/cancellation of service deletion
To activate all services, click on the "Activate all services" button (Figure 13, Pointer 5). After that a window will open, where you can confirm the activation by clicking on the "Activate" button, to cancel the activation click on the "Cancel" button (Figure 15).
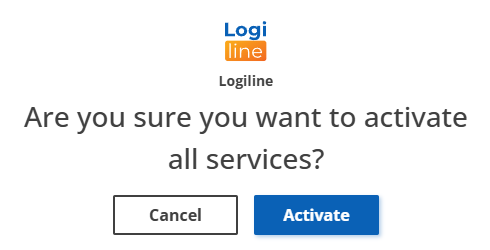 Figure 15 - Confirming/disconfirming activation of all service
Tab "Electric & Hybrid"
To add a service cost for financial risk services related to the delivery of electric and hybrid vehicles, click the ![]() button (Figure 16, Pointer 1) next to each of the fields and enter the appropriate cost.
button (Figure 16, Pointer 1) next to each of the fields and enter the appropriate cost.
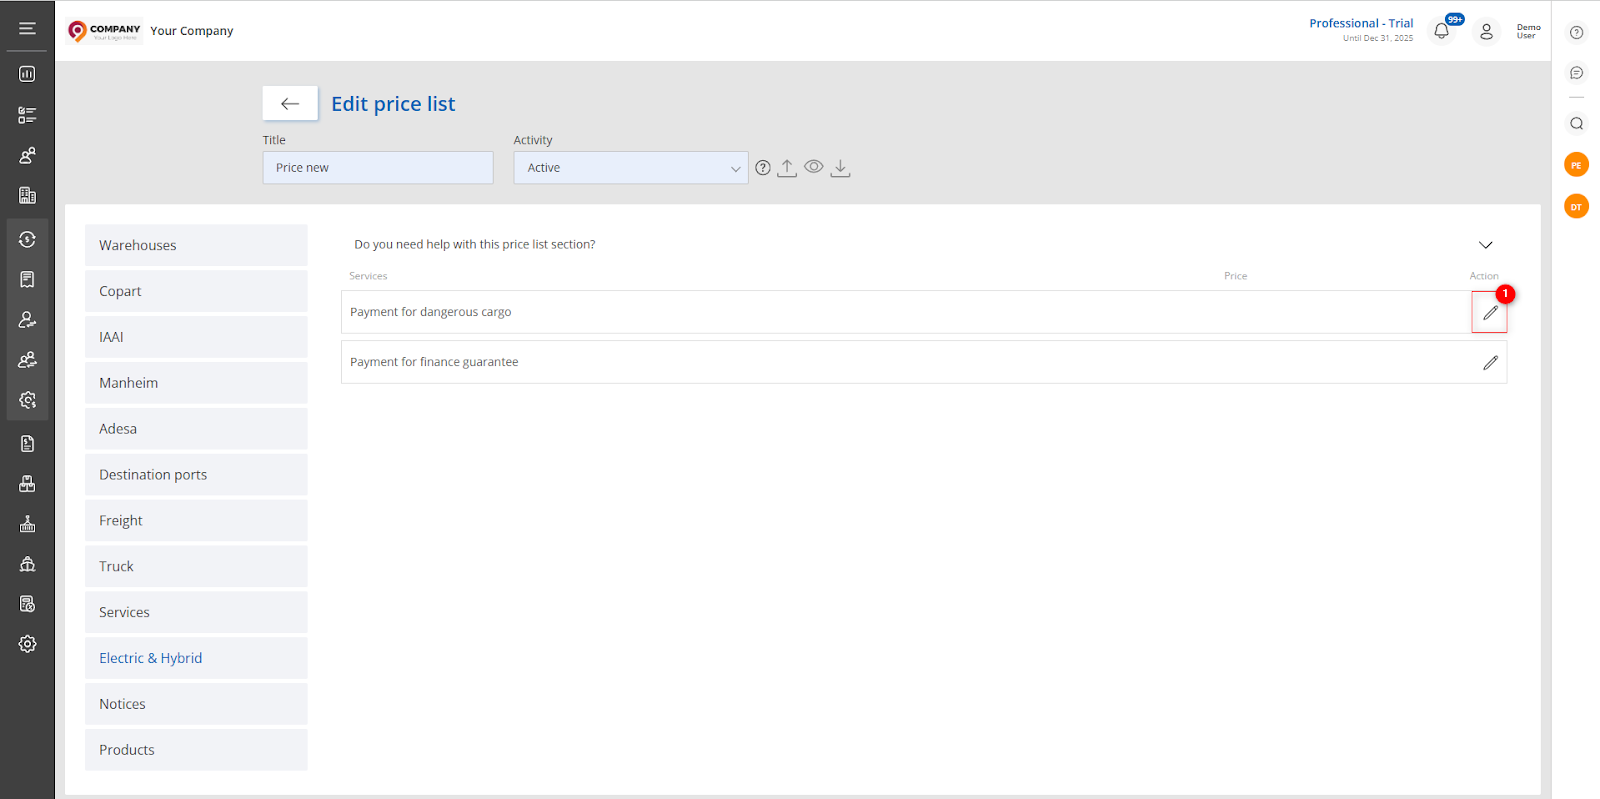 Figure 16 - Electric and Hybrid tab
"Notices" tab
The tab is designed for message management, here you can add a new notification by entering the appropriate text using the keyboard. This functionality provides a convenient way to update and distribute important messages or notifications in the price list (Figure 17).
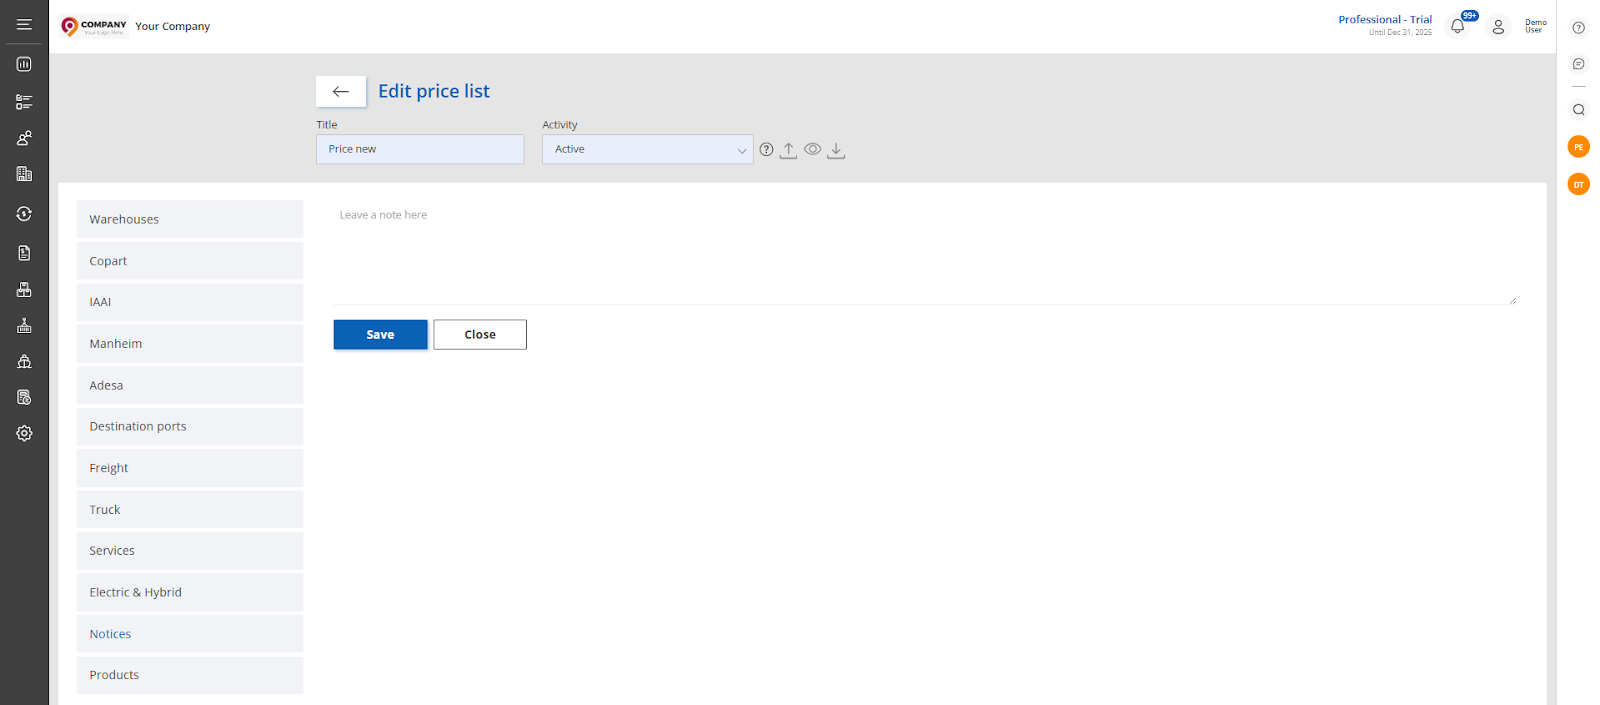 Figure 17 - Notifications tab
The “Products” tab
This tab contains the transportation stages to which products are bound, which will be automatically filled in the shipping calculation in the transaction modal window, provided that this price list is selected.
To do this, click on the “Edit” button. Then select the product to be assigned to the transportation stage (Figure 18, Pointer 1), set the activity status using the “On/Off” switch (Pointer 2) and save the changes by clicking on the “Save” button. If you want to cancel the action, click “Cancel”.
When the button ![]() is clicked, the product will be deleted and the status of the transport stage will be “Off”.
is clicked, the product will be deleted and the status of the transport stage will be “Off”.
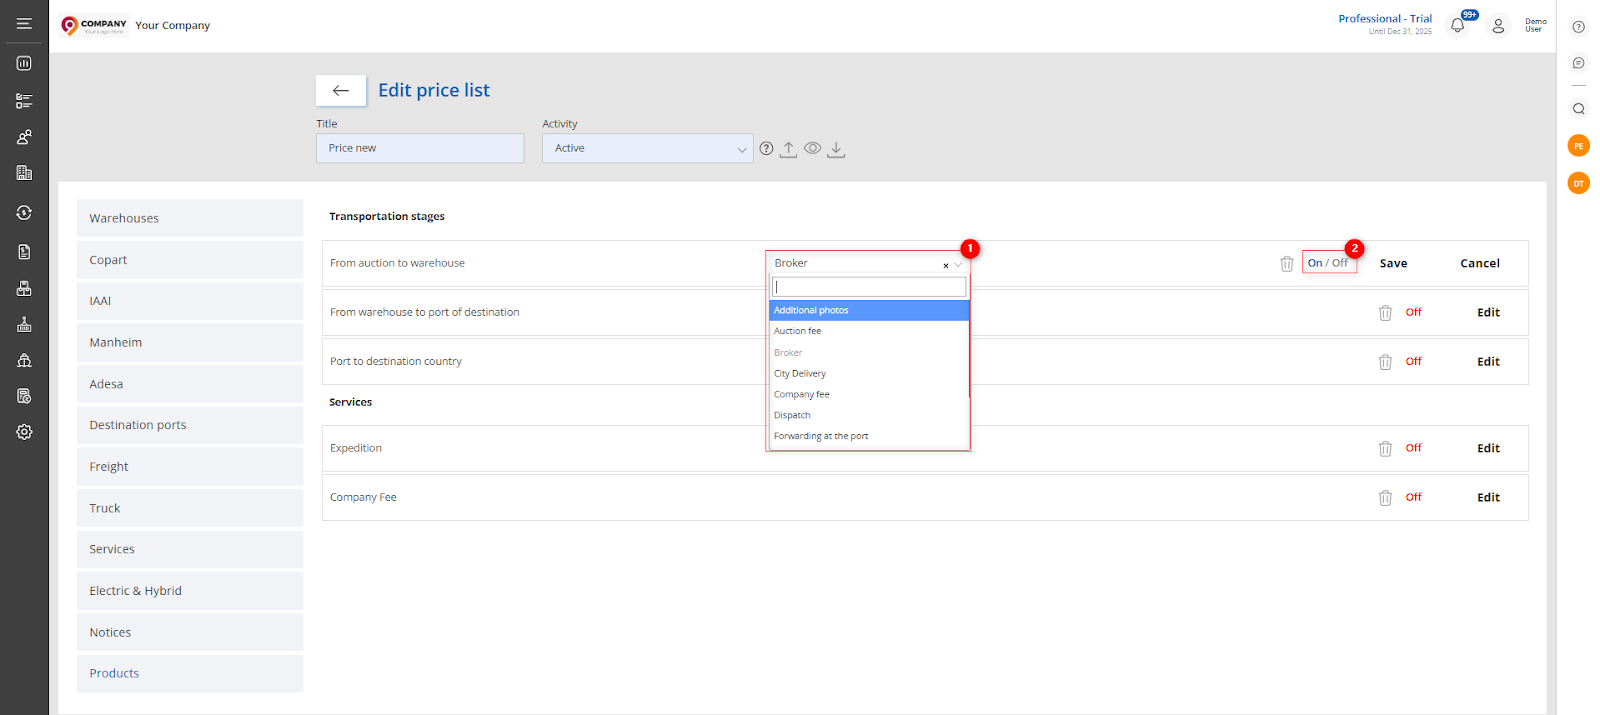 Figure 18 - Product tab
Once all tabs are filled in, a new price list will be created and displayed in the table (Figure 1, Pointer 9).
Price list editing
In order to make changes to the price list, select the necessary record in the table and click the ![]() button (Figure 1, Pointer 8). This will open the "Edit price list" page (Figure 2), where data changes are made in the same way as when creating a price list (see above).
button (Figure 1, Pointer 8). This will open the "Edit price list" page (Figure 2), where data changes are made in the same way as when creating a price list (see above).
Creating a copy of the price list
In order to create a copy of the price list with the possibility of changing prices, select the necessary record in the table and click the ![]() button, (Figure 1, Pointer 2). This will open the "Price change conditions" window (Figure 19), where you can set the price change conditions in the fields, if necessary:
button, (Figure 1, Pointer 2). This will open the "Price change conditions" window (Figure 19), where you can set the price change conditions in the fields, if necessary:
-
"Min, USD" - using keyboard input enter the minimum value by which the cost will be increased;
-
"% increase" - using keyboard input enter the total percentage of increase by which the price will be increased;
-
"Max, USD" - using keyboard input enter the maximum value by which the value will be increased.
After that click on the "Save" button, to cancel click on the "Cancel" button. As a result of these actions a copy of the price list will be created, with changed prices according to the specified data in the fields.
Note: if you need to create a copy of the price list, without changing the price, click on the "Save" button, skipping the step of filling in the fields.
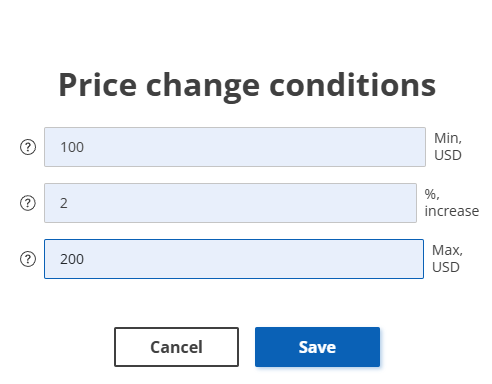 Figure 19 - Create price list copy window
PDF price list creation
In order to create a PDF format for the price list, select the necessary entry in the table and click on the ![]() button (Figure 1, Pointer 3). As a result of the performed actions PDF will be created, as evidenced by the information in the opened window, in which the following actions are available (Figure 20). When you click on the button:
button (Figure 1, Pointer 3). As a result of the performed actions PDF will be created, as evidenced by the information in the opened window, in which the following actions are available (Figure 20). When you click on the button:
-
"Open PDF" - the price list will be opened in a new browser tab;
-
"Download PDF" - the price list will be downloaded to the user's PC.
To close the window, click on the "Close" button.
 Figure 20 - Notification about PDF price list creation
Exporting a price list
To export the price list, click the ![]() button (Figure 1, Pointer 4), which will open the "Export" window, which consists of two tabular blocks "Current export" and "Completed export". To export a file, select the desired file format and click the "Start" button (Figure 21, Pointer 1/Pointer 2). When the export is complete, the file will be available under "Completed export". Then, click on the "Download" button (Pointer 3), select a location to save the file and click "Save".
button (Figure 1, Pointer 4), which will open the "Export" window, which consists of two tabular blocks "Current export" and "Completed export". To export a file, select the desired file format and click the "Start" button (Figure 21, Pointer 1/Pointer 2). When the export is complete, the file will be available under "Completed export". Then, click on the "Download" button (Pointer 3), select a location to save the file and click "Save".
If you cancel the price list export, click on the "Cancel" button (Pointer 4). As a result of this action, the file will be deleted from the "Current export" table. To close the window, click the "Close" button.
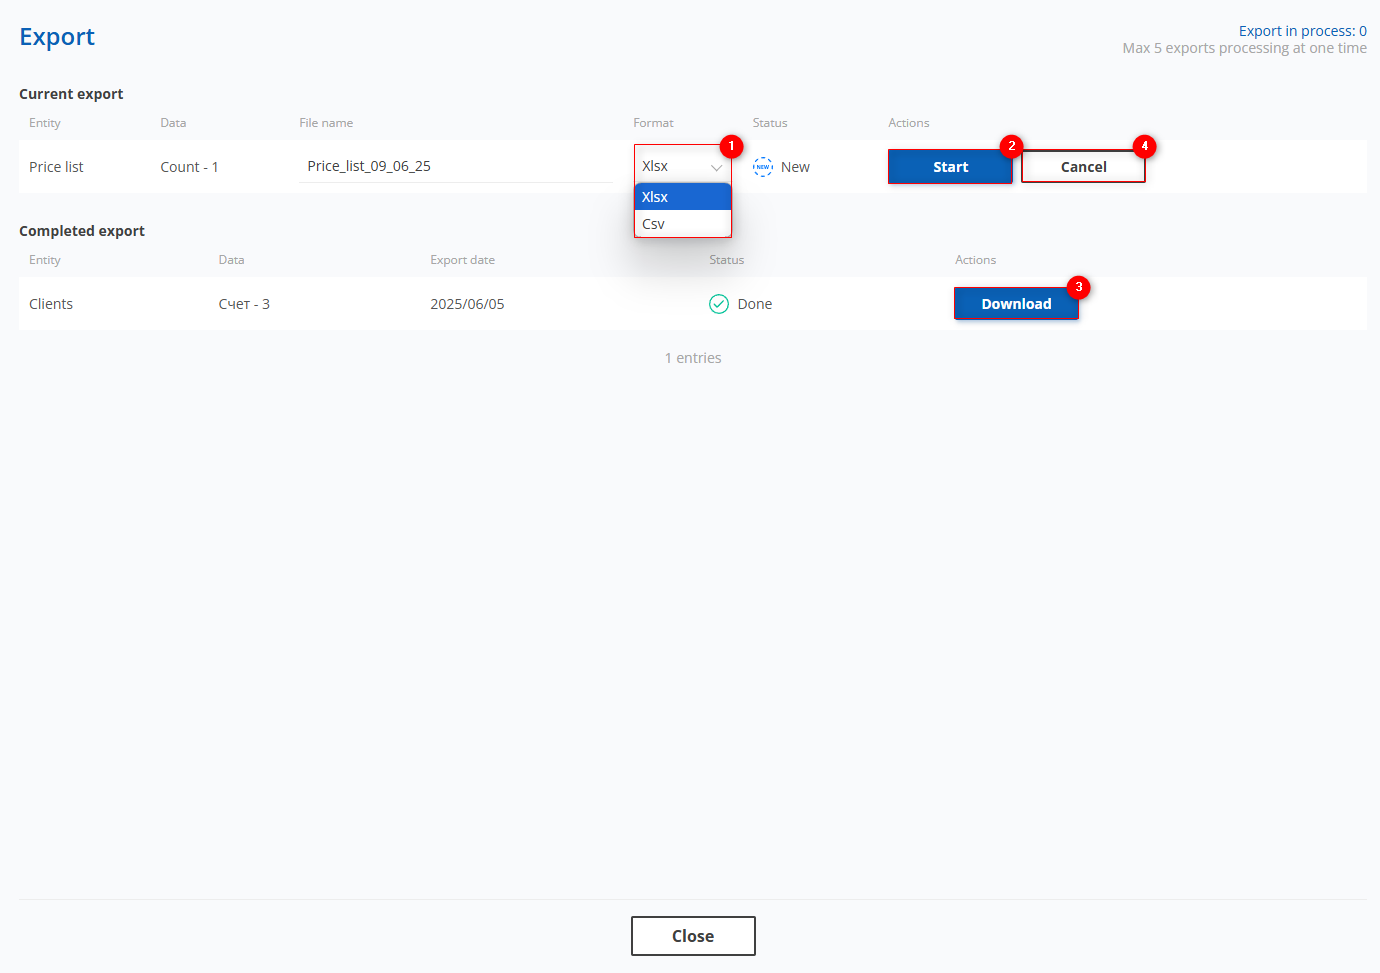 Figure 21- "Export" window
To view the export history of transactions, click the ![]() button (Figure 1, Pointer 5). This action will open the Export window, which is identical to the window used to perform price list export.
button (Figure 1, Pointer 5). This action will open the Export window, which is identical to the window used to perform price list export.
Price list import
To import the price list, click the ![]() button (Figure 1, Pointer 6), which will open the "Import" window, which consists of three blocks "Download template", "Import" and "Import history".
button (Figure 1, Pointer 6), which will open the "Import" window, which consists of three blocks "Download template", "Import" and "Import history".
When you click on the "Download Master price list" button (Figure 22, Pointer 1), a window will appear where you can select a location to save the file and then click "Save". This file is a master price list that includes all existing auction locations, as well as prices for shipping lots from the auction locations to the port of origin. This price list can be edited at your discretion for further importing.
To import a file, click on the ![]() button located in the Import block (Figure 22, Pointer 2). Select the file on your computer or device that you want to import and then click on the "Start import" button.
button located in the Import block (Figure 22, Pointer 2). Select the file on your computer or device that you want to import and then click on the "Start import" button.
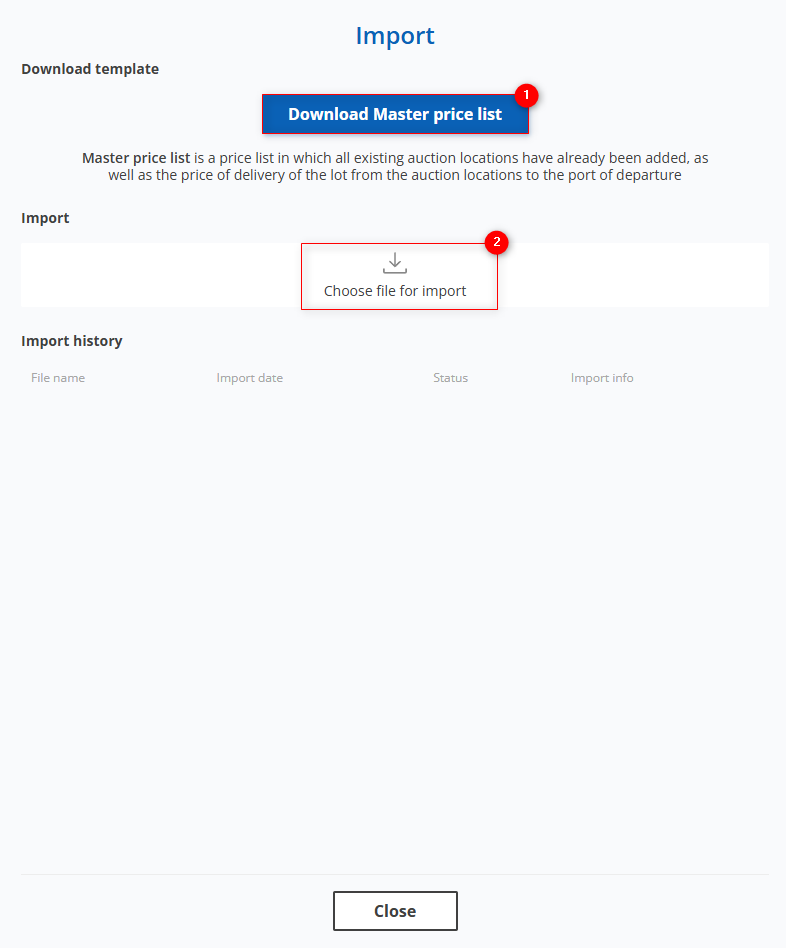 Figure 22- Import window
Once the import process is complete, the Import history section will provide detailed information on the current status of the import run:
-
Successful import - the corresponding record with information about time and status "Done" will appear;
-
Partly imported - problems occurred during the import process, a record with time and status "Partly imported" will be displayed in the history. In the import information the error log will be displayed for further correction.
Note: If a file format or structure mismatch is detected during the import process, the import operation will not complete and a window will appear indicating the reason for the failure. This may include information about column mismatches, incorrect data format, or other errors that prevent the system from successfully processing the file.
Price list deletion
To delete a price list, select the necessary entry in the table and click on the ![]() button (Figure 1, Pointer 7). After that a window will open, in which to confirm the deletion click on the "Yes" button, to cancel the button - "No" (Figure 23). As a result, the record will be absent from the table.
button (Figure 1, Pointer 7). After that a window will open, in which to confirm the deletion click on the "Yes" button, to cancel the button - "No" (Figure 23). As a result, the record will be absent from the table.
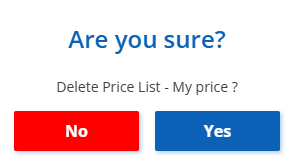 Figure 23 - Confirmation/Cancellation of Price List Deletion
Price list comparison
To use the price list comparison functionality, click the "Comparison Price Lists" button (Figure 1, Pointer 10).
Then the "Comparison of Price Lists" page will open, where a field will be available for selecting and adding the price lists you want to compare (Figure 24, Pointer 1). You can also set the vehicle type — to do this, specify the required vehicle type in the "Price Type" field (Figure 24, Pointer 2).
You can select up to 5 price lists for comparison. For each selected price list, information will be displayed for all its tabs with the ability to switch between them: auctions, freight, truck, services, electric and hybrid vehicles.
On the auctions tab, the comparison is performed by location and warehouse. The table displays data for each selected price list with prices shown. If necessary, the price can be changed directly in the table using the edit button without opening the price list (Figure 24, Pointer 3). If a price is missing for a specific location in the price list, it can be set by clicking the ![]() button, entering the amount in the field, and confirming the action by clicking the
button, entering the amount in the field, and confirming the action by clicking the ![]() button (Figure 24, Pointer 4).
button (Figure 24, Pointer 4).
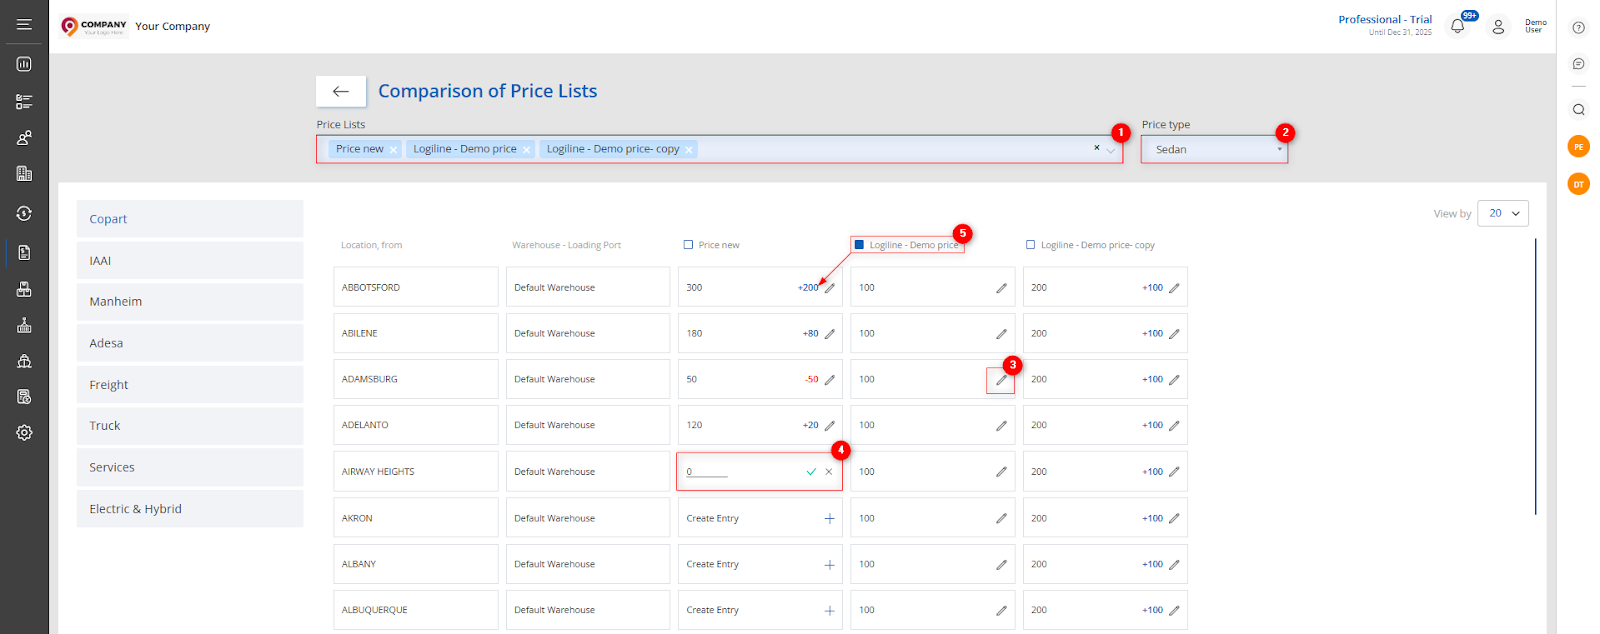 Figure 24 – Website page “Comparison of Price Lists”
To accurately calculate the price difference, select the desired price list, which will display the cost difference between price lists in each field (Figure 24, Pointer 5).
On the other tabs of the price list, the comparison works similarly to the auctions tab: data is displayed for each selected price list with the ability to edit prices directly in the table. This allows for quick analysis and adjustment of price lists without the need to open them separately. Thus, the comparison functionality provides a convenient and clear way to manage the company’s pricing.