


Logiline| Logistic CRM system - Site page "Carriers & Brokers"
Section of the Data Library site includes the following subsections: “Carriers & Brokers”.
The page of the site “Carriers & Brokers” is created to account for all companies engaged in transportation and logistics services. To open the page, go to the “Data Library” section of the menu from the dropdown list that opens when you click the ![]() button, select the tab “Carriers and Brokers”. After that you will be redirected to the desired page. On the page of the site “Carriers & Brokers” there is a search bar, a filter by specified parameters, a table in which the list of companies providing logistics services with all relevant information is displayed. (Figure 1).
button, select the tab “Carriers and Brokers”. After that you will be redirected to the desired page. On the page of the site “Carriers & Brokers” there is a search bar, a filter by specified parameters, a table in which the list of companies providing logistics services with all relevant information is displayed. (Figure 1).
The table of companies displays the following information (Figure 1, Indicator 1):
-
“Company name”;
-
“Company type”;
-
“Company location”;
-
“Number of trucks” - displays information about the number of trucks available for use in this company;
-
“Route description” - displays information about which route the company carries out transportation;
-
“Phone”;

Figure 1 - The site page“Carriers & Brokers”
Search
Search by specified parameters:
When you click the “Filter” button (Figure 1, Pointer 2) a filter window will open, with which search parameters are set (Figure 2):
-
“Company name, Email, Phone, Address” - enter the required value;
-
“Company type” - from the dropdown list that opens when you click the
 button, select the required company type;
 -
“Country” - from the dropdown list, select the country where the company is located;
-
“State” - from the dropdown list, select the state in which the company is located;
Note: For performing the search you may set one or more parameters.
After entering the parameters, click the![]() button . As a result, the table will display data according to the set filter parameters.
button . As a result, the table will display data according to the set filter parameters.
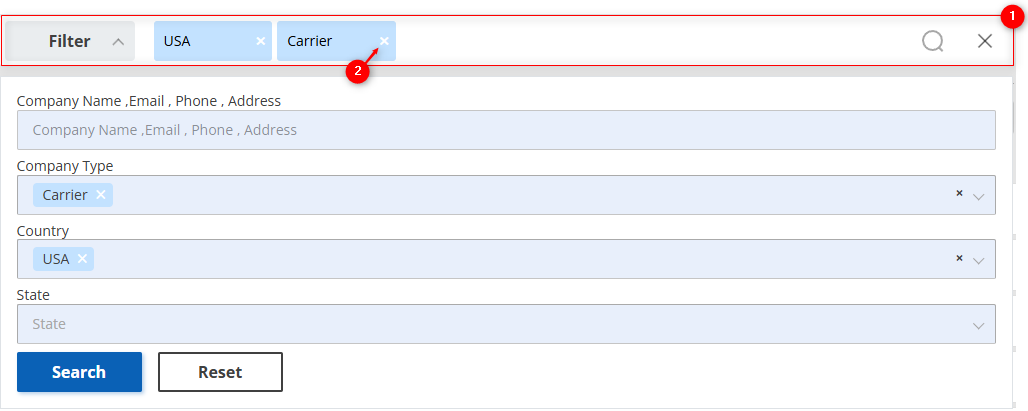
Figure 2 - The “Filter” window
Search in the search bar:
The search bar allows you to search by any parameter (Figure 2, Pointer 1). To do this, enter any query and click the ![]() button located in the search bar or the “Enter” button located on the keyboard. As a result, the found records that match the entered parameters will be displayed in the table. To clear the entire search window and reset the filter, click the
button located in the search bar or the “Enter” button located on the keyboard. As a result, the found records that match the entered parameters will be displayed in the table. To clear the entire search window and reset the filter, click the ![]() button. If you need to delete one of the parameters, click the cross located in the very window of the query (Figure 2, Pointer 2).
button. If you need to delete one of the parameters, click the cross located in the very window of the query (Figure 2, Pointer 2).
Window “Shippers / Receivers"
To view the full information about a company, select the needed entry in the table and click the ![]() button (Figure 1, Pointer 3).
button (Figure 1, Pointer 3).
As a result, the window “Shippers / Receivers" (Figure 3) will open, which displays detailed information about the selected company, including:
-
Company Information — general information and links to the аuthority Url and US DOT.
Note: When you click the lines “Authority Url” and “US Dot Url” you will be redirected to the page of the attached link.
-
Insurance — data about the insurance of the transported cargo.
-
Equipment — information about the route and the equipment used.
Note: These fields are created for viewing information and cannot be edited.
Based on this information you can create a new service company by clicking the “Create Company” button (Figure 4, Pointer 1). To close the window use the “Close” button (Figure 4, Pointer 2).
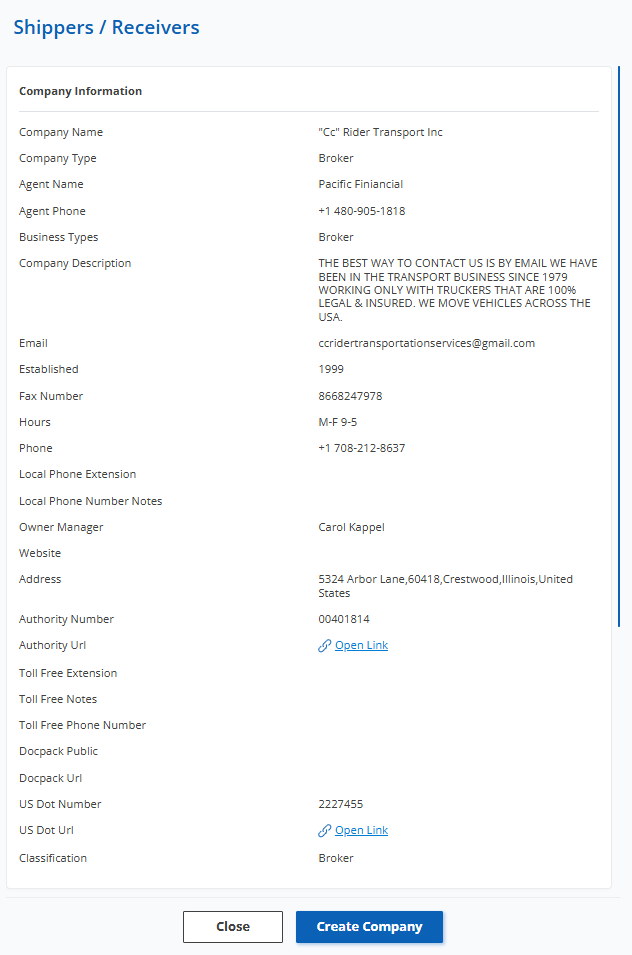
Figure 3 - Window “Shippers / Receivers"
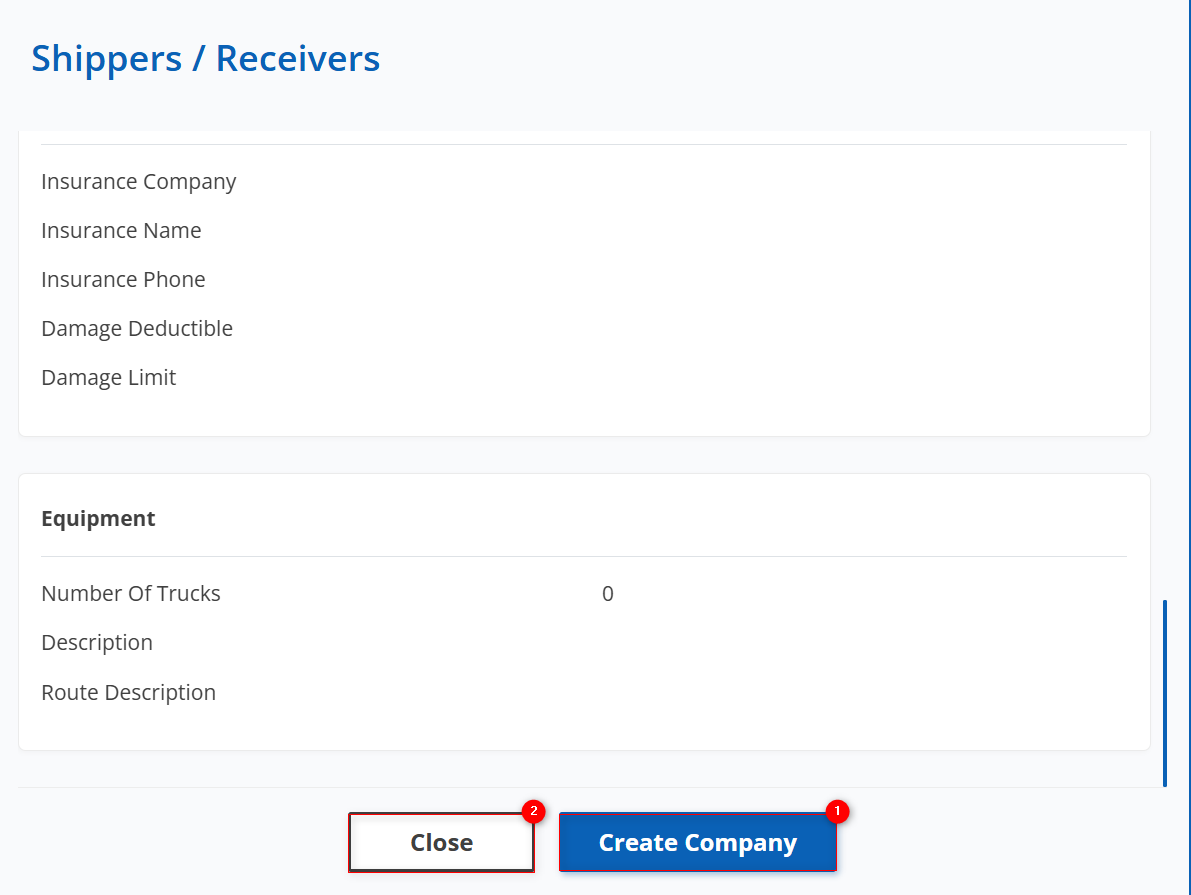
Figure 4 - Continuation of the window “Shippers / Receivers"
Creating a company
To create a new company, click the “Create Company” button in the “Shippers / Receivers" window (Figure 4, Pointer 1). After that the “Companies” window will open, which consists of 3 blocks.
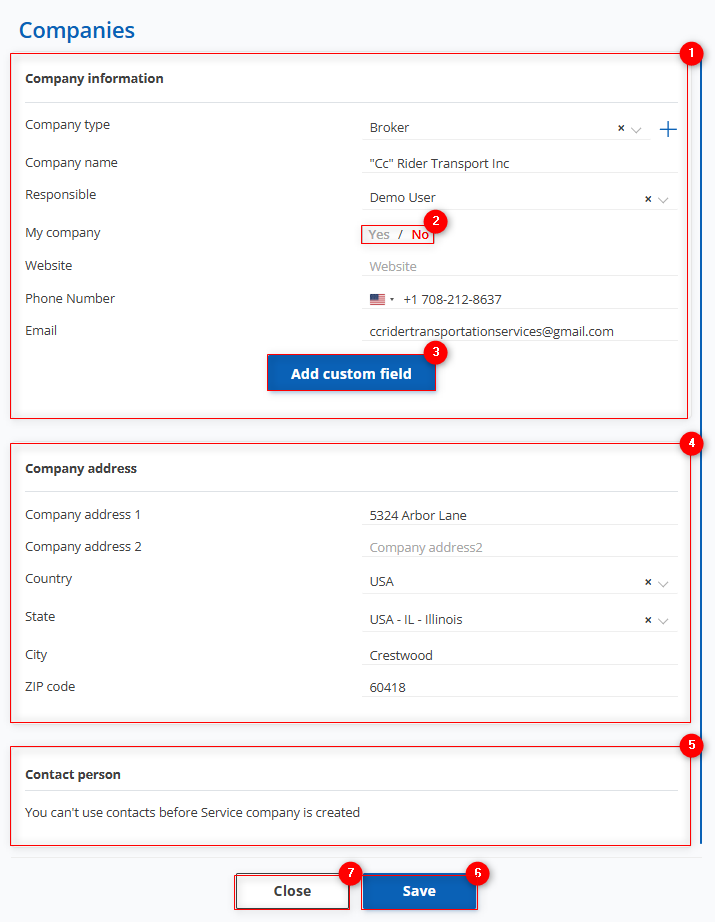
Figure 5 - Window “Companies”
– Block “Company Information”. This block displays information with general details about the company (Figure 5, Pointer 1):
-
“Company type” - from the dropdown list that opens when you click the
 button, select the required company type; by clicking on the
  button you can create a new company type;
 -
“Company name” - this field is filled automatically;
-
“Responsible” - from the dropdown list that opens when you click the
 button, select the responsible person;
 -
“My company” - the
 button (Figure 5, Pointer 2) toggle, indicating that this company belongs to you. Used for reporting;
 -
“Website” - enter the required value;
-
“Phone number” - this field is filled automatically;
-
“Email” - this field is filled automatically;
Note: If you need to add a custom field with additional information, click the “Add field” button (Figure 5, Pointer 3).
- Block “Company Address” (Figure 5, Pointer 4).
-
“Company Address 1” - this field is filled automatically;
-
“Company Address 2” - enter the required value;
-
“Country” - this field is filled automatically, but if you need to change it, from the dropdown list which opens when you click the
 button, select the required country;
 -
“State” - this field is filled automatically, but if you need to change it, from the dropdown list which opens when you click the
 button, select the required state;
 -
“City” - this field is filled automatically;
-
“ZIP Code” - this field is filled automatically;
-
“Email” - this field is filled automatically;
- Block “Contact Person” This block is editable after you create the company (Figure 5, Pointer 5).
To save changes, click the “Save” button. (Figure 5, Pointer 6). To close the window use the “Close” button (Figure 5, Pointer 7). After saving the created company will appear in the list on the site page “Companies”, where you can edit the data if needed. (Figure 6)
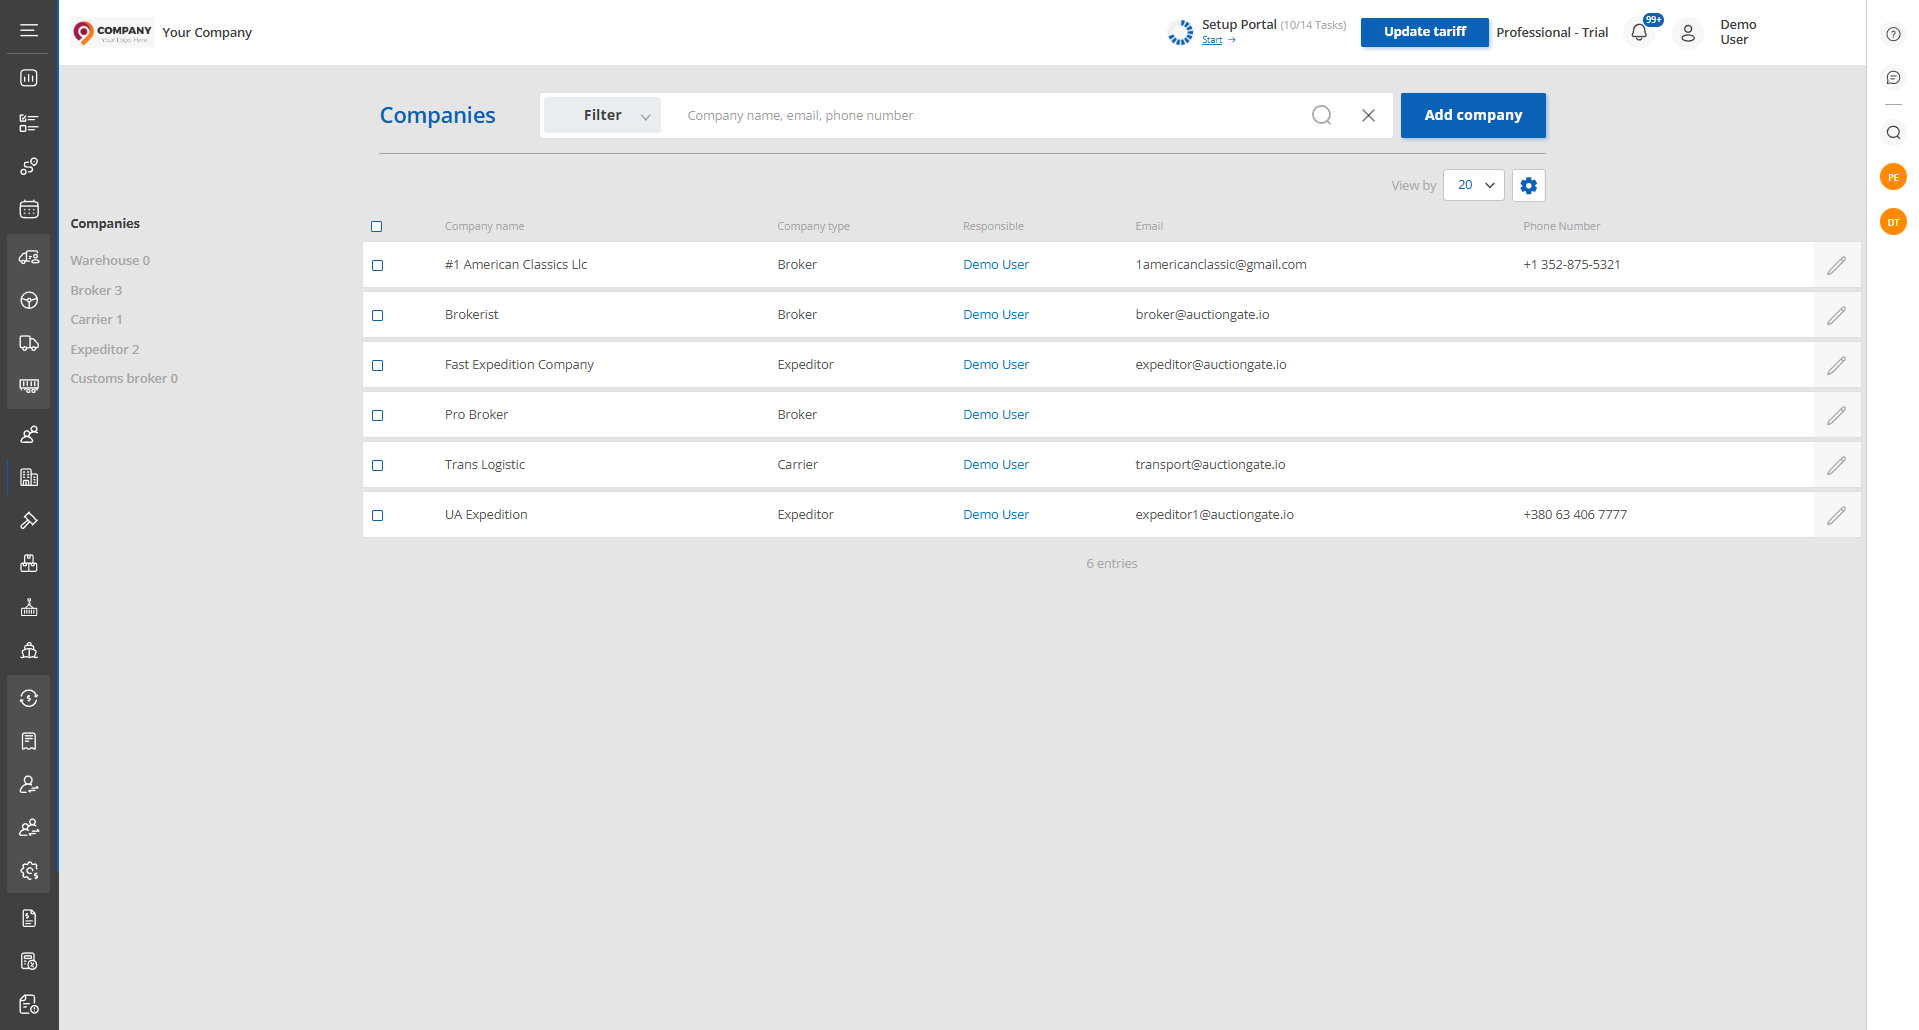
Figure 6 - The site page “Companies”