


Logiline| Logistic CRM system - Site page "Containers"
The "Containers" page is designed for managing already formed containers.
To open the page, go to the menu section and select the "Containers" tab. You will then be redirected to a page where you can view the formed containers and the vehicles contained within them, as well as edit the information if necessary.
On the "Containers" page, there is a search bar, a filter for specified parameters, and a table displaying the full list of formed containers along with all relevant information (Figure 1).
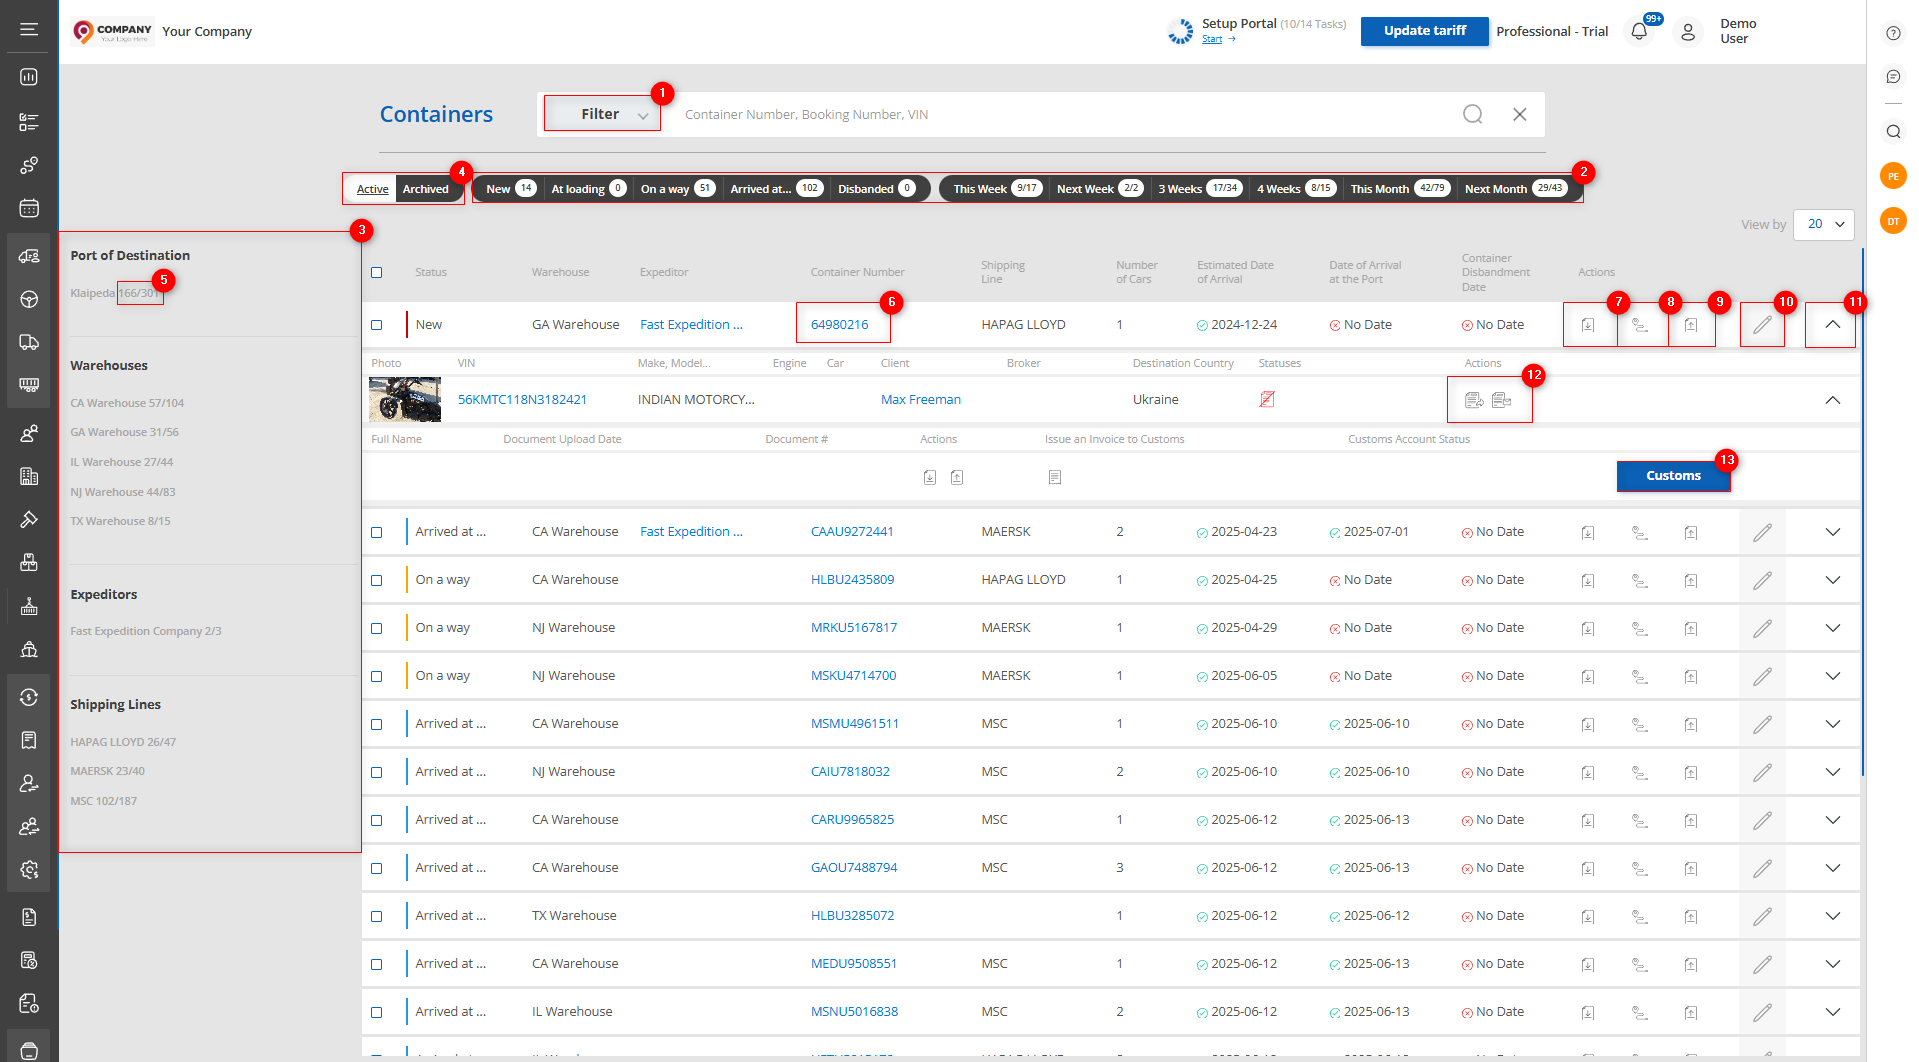
Figure 1 – Site page"Containers"
Search
Search by specified parameters:
Clicking the "Filter" button (Figure 1, Pointer 1) will open the filter window, which allows you to set search parameters (Figure 2):
-
"Container number, booking number, VIN" – enter the required value;
-
"Port of Destination" – select the required port from the dropdown list that opens when you click the button
 ;
; -
"Warehouses" – select the warehouse from the dropdown list;
-
"Expeditors" – select the expeditors responsible for logistics within customs clearance;
-
"Shipping lines" – select the shipping line used for container transportation from the dropdown list;
-
"Estimated arrival date" – set a specific date or date range for the estimated arrival at the port for the search;
-
"Date of Arrival at the Port" – select the actual date or a date range for the container’s arrival at the port.
-
"Container Disbandment Date" – set the date when the container was dismantled.
Note: You can specify one or multiple parameters to perform the search.
After entering the parameters, click the button ![]() . As a result, the table will display data according to the filter parameters set.
. As a result, the table will display data according to the filter parameters set.
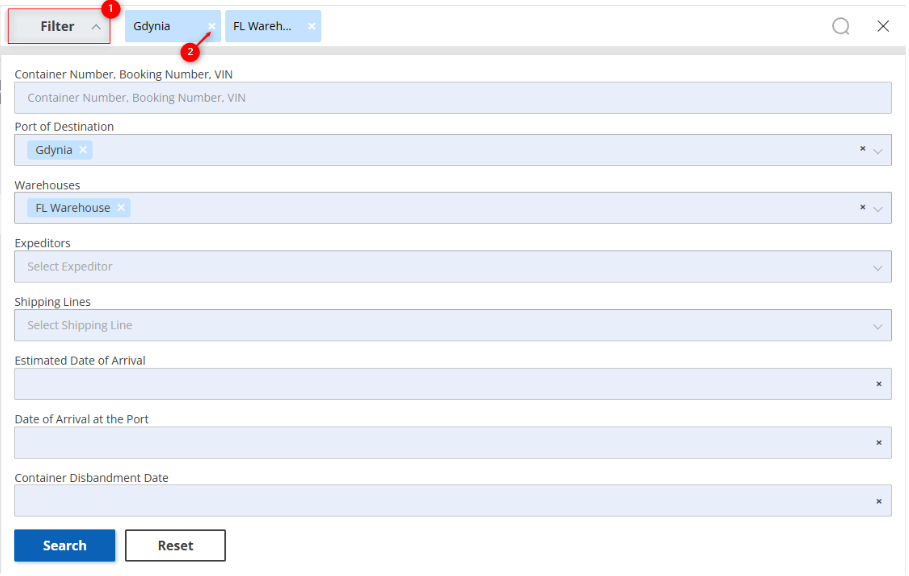
Figure 2 – “Filter” Window
Search in the Search Bar:
The search bar allows you to search by any parameter (Figure 2, Pointer 1). To do this, enter any query and click the button ![]() located in the search bar or press the “Enter” key on your keyboard. As a result, the records matching the entered parameters will be displayed in the table.
located in the search bar or press the “Enter” key on your keyboard. As a result, the records matching the entered parameters will be displayed in the table.
To clear the entire search field and reset the filter, click the button ![]() . If you need to remove a single parameter, click the “X” icon located within the query window (Figure 2, Pointer 2).
. If you need to remove a single parameter, click the “X” icon located within the query window (Figure 2, Pointer 2).
Counters Filter:
On the page, there is a counter displaying information about the container’s status, its duration of stay, and arrival at the port (Figure 1, Pointer 2). Clicking on any of the counter items will automatically filter and display the corresponding containers. This provides a convenient way to quickly find and process container information.
Container Filtering Block:
On the left side of the page, there is a block showing containers grouped by key parameters (Figure 1, Pointer 3):
-
Port of Destination;
-
Warehouses;
-
Expeditors;
-
Shipping lines.
For each of these parameters, the number of containers and the number of vehicles within the containers are displayed (Figure 1,Pointer 5). Selecting a parameter will automatically display only the corresponding containers in the table.
On the "Containers" page, there is a toggle switch (Figure 1, Pointer 4) to select the display mode: active containers with current statuses or the archive of dismantled containers.
Containers Table
The table displays information about each formed container. Below is a description of the main fields:
-
Status – information about the status of the formed container;
-
Warehouse – the warehouse from which the vehicles will be grouped into the container;
-
Expeditor - information about the forwarder responsible for this container;
-
Container Number – clicking on the VIN in the table (Figure 1, Pointer 6) will open the container view window, which contains detailed information about the selected container with the option to edit it;
-
Shipping Line – the shipping line by which the container will be delivered to the destination port;
-
Number of Cars – the number of vehicles grouped into this container;
-
Estimated Date of Arrival – the estimated date of the container’s arrival at the destination port;
-
Date of Arrival at the Port – the actual date of the container’s arrival at the destination port;
-
Container Disbandment Date – the date when the container was dismantled.
Note: Clicking on the icon ![]() in the arrival date or dismantling date row will open a window prompting you to add a date, while clicking the button
in the arrival date or dismantling date row will open a window prompting you to add a date, while clicking the button ![]() will open a window allowing you to delete or modify the date.
will open a window allowing you to delete or modify the date.
To upload documents, loading or unloading photos for the container, click the button ![]() (Figure 1, Pointer 9) and select the desired action from the dropdown menu. After selection, a window will open where you need to click the “Upload” button (Figure 3, Pointer 1) and choose files. Uploaded files will be displayed in the window, where they can be viewed or deleted.
(Figure 1, Pointer 9) and select the desired action from the dropdown menu. After selection, a window will open where you need to click the “Upload” button (Figure 3, Pointer 1) and choose files. Uploaded files will be displayed in the window, where they can be viewed or deleted.
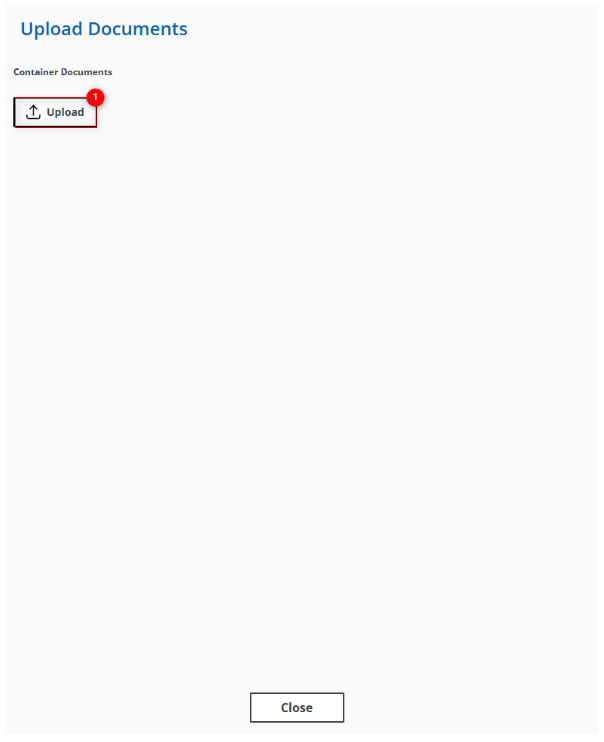
Figure 3 – Container Documents Upload Window
To download uploaded files, click the button ![]() (Figure 1, Pointer 7), select the desired option from the dropdown menu — the files will then be downloaded to your device.
(Figure 1, Pointer 7), select the desired option from the dropdown menu — the files will then be downloaded to your device.
Clicking the button ![]() (Figure 1, Pointer 8) will open the logistics company’s webpage, where you can track the container.
(Figure 1, Pointer 8) will open the logistics company’s webpage, where you can track the container.
To view the list of vehicles in the container, click the button ![]() (Figure 1, Pointer 11). This will open a detailed list for each vehicle, including VIN, make, model, year, engine type, vehicle type, client, broker, destination country, and document status.
(Figure 1, Pointer 11). This will open a detailed list for each vehicle, including VIN, make, model, year, engine type, vehicle type, client, broker, destination country, and document status.
The following actions are also available: to request documents from the client, click the button ![]() to send the corresponding request. To send client documents to the broker, click the button
to send the corresponding request. To send client documents to the broker, click the button![]() , enabling prompt transfer of necessary files to the broker (Figure 1, Pointer 12).
, enabling prompt transfer of necessary files to the broker (Figure 1, Pointer 12).
A customs terminal can be assigned to each vehicle. To do this, click the button ![]() , after which the “Terminal” button will become available (Figure 1, Pointer 13). Clicking it opens a window containing information about the terminal name, arrival date, and departure date.
, after which the “Terminal” button will become available (Figure 1, Pointer 13). Clicking it opens a window containing information about the terminal name, arrival date, and departure date.
Container Editing
To edit container data, click the button ![]() (Figure 1, Pointer 10) located on the right side of the table. This will open a window where you can review the container information and make changes if necessary.
(Figure 1, Pointer 10) located on the right side of the table. This will open a window where you can review the container information and make changes if necessary.
To make edits, click the “Edit” button. This will open a window consisting of three sections: “Container Information,” “Vehicle Information,” and “Upload Documents.”
Container Information Section
This section contains key data required for tracking and managing the container throughout the logistics process. It displays the following fields (Figure 4, Pointer 1):
-
Status – the current status of the container. It is determined automatically based on key dates: if the departure date from the port has not yet occurred or is today, the status will be “In Transit.” When the container arrives at the port, the status changes to “Arrived at Port.” After the container is dismantled, its status updates to “Dismantled.”
-
Receiving Port – select the arrival port from a dropdown menu opened by clicking the button
 ;
; -
Expeditor – select the forwarder responsible for this container from a dropdown menu;
-
Shipping Line – the shipping company performing the transportation;
-
Booking Number – displays the container’s booking number;
-
Container Number – displays the unique container identifier;
-
Container Loading Date – click the empty field to select the specific loading date;
-
Estimated Date of Departure – click the empty field to select the estimated departure date;
-
Date of Departure from the Port – specify the actual departure date;
-
Estimated Date of Arrival – select the estimated arrival date;
-
Date of Arrival at the Port – select the actual container arrival date;
-
Container Disbandment Date – specify the date when the container was dismantled;
-
Date of Release – click the empty field to select the specific cargo departure date from the port.
Vehicle Information Section
To add vehicles to the container, click the “Add Car” button (Figure 4, Pointer 2). A window will open showing a list of vehicles available for loading at the selected warehouse. In this window, check ![]() the desired vehicles and confirm by clicking the “Add Car” button. To cancel, click “Close.” Added vehicles will automatically appear in the section (Figure 4, Pointer 3), showing full information for each vehicle included in the container, namely:
the desired vehicles and confirm by clicking the “Add Car” button. To cancel, click “Close.” Added vehicles will automatically appear in the section (Figure 4, Pointer 3), showing full information for each vehicle included in the container, namely:
-
Photo;
-
Make, Model, Year, VIN – clicking the VIN in the table opens the lot view page with detailed information about the selected vehicle (see “Lot Viewing” description);
-
Engine Type – information about the vehicle’s engine type;
-
Vehicle Type – information about the vehicle type;
-
Client – clicking the client’s name opens a window with full client information where you can make necessary edits (see “Clients” page description);
-
Broker – select the broker from a dropdown menu opened by clicking the button
 ;
; -
Country – displays the destination country where the vehicle must be delivered;
-
Key – information about the availability of vehicle keys;
-
Document – information about the availability of the vehicle documents.
Note: Only the fields “Broker” and “Formation Instructions” are editable.
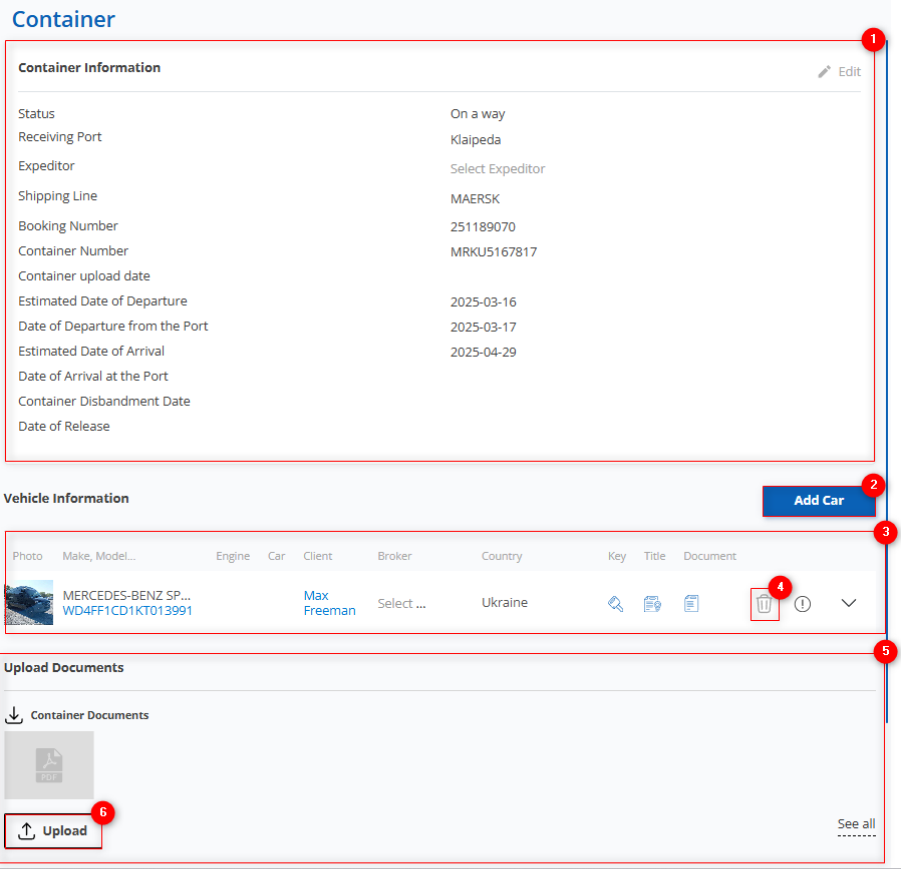
Figure 4 – “Container” Window
Clicking the button ![]() at the bottom of the row will open a section with the same fields as above, plus additional sections: “Customs Documents” (Figure 5, Pointer 1), “Customs Payments” (Figure 5, Pointer 2), and “Photos from Destination Port” (Figure 5, Pointer 3).
at the bottom of the row will open a section with the same fields as above, plus additional sections: “Customs Documents” (Figure 5, Pointer 1), “Customs Payments” (Figure 5, Pointer 2), and “Photos from Destination Port” (Figure 5, Pointer 3).
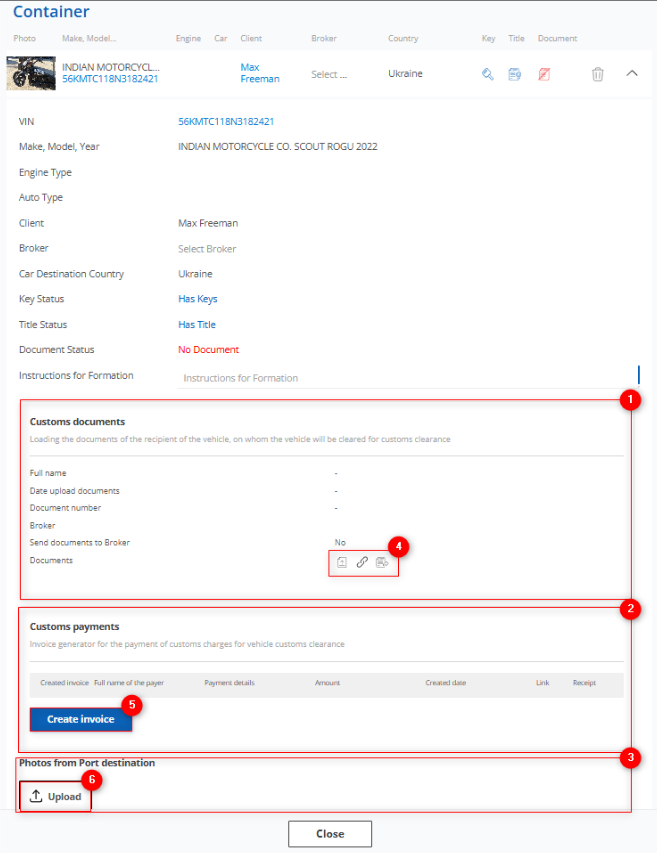
Figure 5 – “Container” Window / Vehicle Information
In the “Customs Documents” section, clicking the buttons ![]() (Figure 5, Pointer 4) opens respective windows for uploading and submitting customs documents (see the “Uploading Customs Documents” description).
(Figure 5, Pointer 4) opens respective windows for uploading and submitting customs documents (see the “Uploading Customs Documents” description).
In the “Customs Payments” section, you can generate an invoice by clicking the “Create Invoice” button (Figure 5, Pointer 5). This opens the “Customs Payments” window, where you must fill in the amount, select payment details, and specify the client’s first and last name (see the “Customs Expense Invoice Generator” description).
In the “Photos from Destination Port” section, you can upload photos of the vehicle that arrived at the port. To do this, click the “Upload” button (Figure 5, Pointer 6).
Clicking the button ![]() (Figure 4, Pointer 4) will open the vehicle removal window from the container (Figure 6), where you must click “Yes” to confirm deletion or “No” to cancel.
(Figure 4, Pointer 4) will open the vehicle removal window from the container (Figure 6), where you must click “Yes” to confirm deletion or “No” to cancel.

Figure 6 – Vehicle Removal Window
The “Upload Documents” section contains photos of the container documents as well as images documenting the loading and unloading process of vehicles, capturing their external condition (Figure 4, Pointer 5). To add files, use the button ![]() (Figure 4, Pointer 6).
(Figure 4, Pointer 6).
Note: Allowed file formats for upload are: .jpg, .png, .webp, .pdf. To save a photo to your computer, click the button![]() . To view, delete, or download all photos related to the current transaction, click the “View All” button.
. To view, delete, or download all photos related to the current transaction, click the “View All” button.
To delete a container, click the “Delete Container” button. A confirmation window will appear where you must click “Yes” to confirm deletion or “No” to cancel (Figure 7).
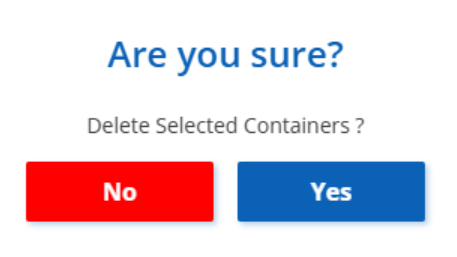
Figure 7 – Container Deletion Window
Bulk Editing Function
The bulk editing function for containers provides a convenient way to simultaneously modify multiple records when it is necessary to apply uniform data changes.
To use this function, follow these steps:
-
In the table, check the box
 next to each container you want to edit (Figure 8, Pointer 1).
-
After selecting containers, a bulk editing options panel will appear at the bottom of the table. Use the available options on this panel to modify parameters (Figure 8, Pointer 2).
Note: Selecting the “Select All” checkbox (Figure 8, Pointer 3) will highlight all records, allowing you to apply changes to all containers at once.
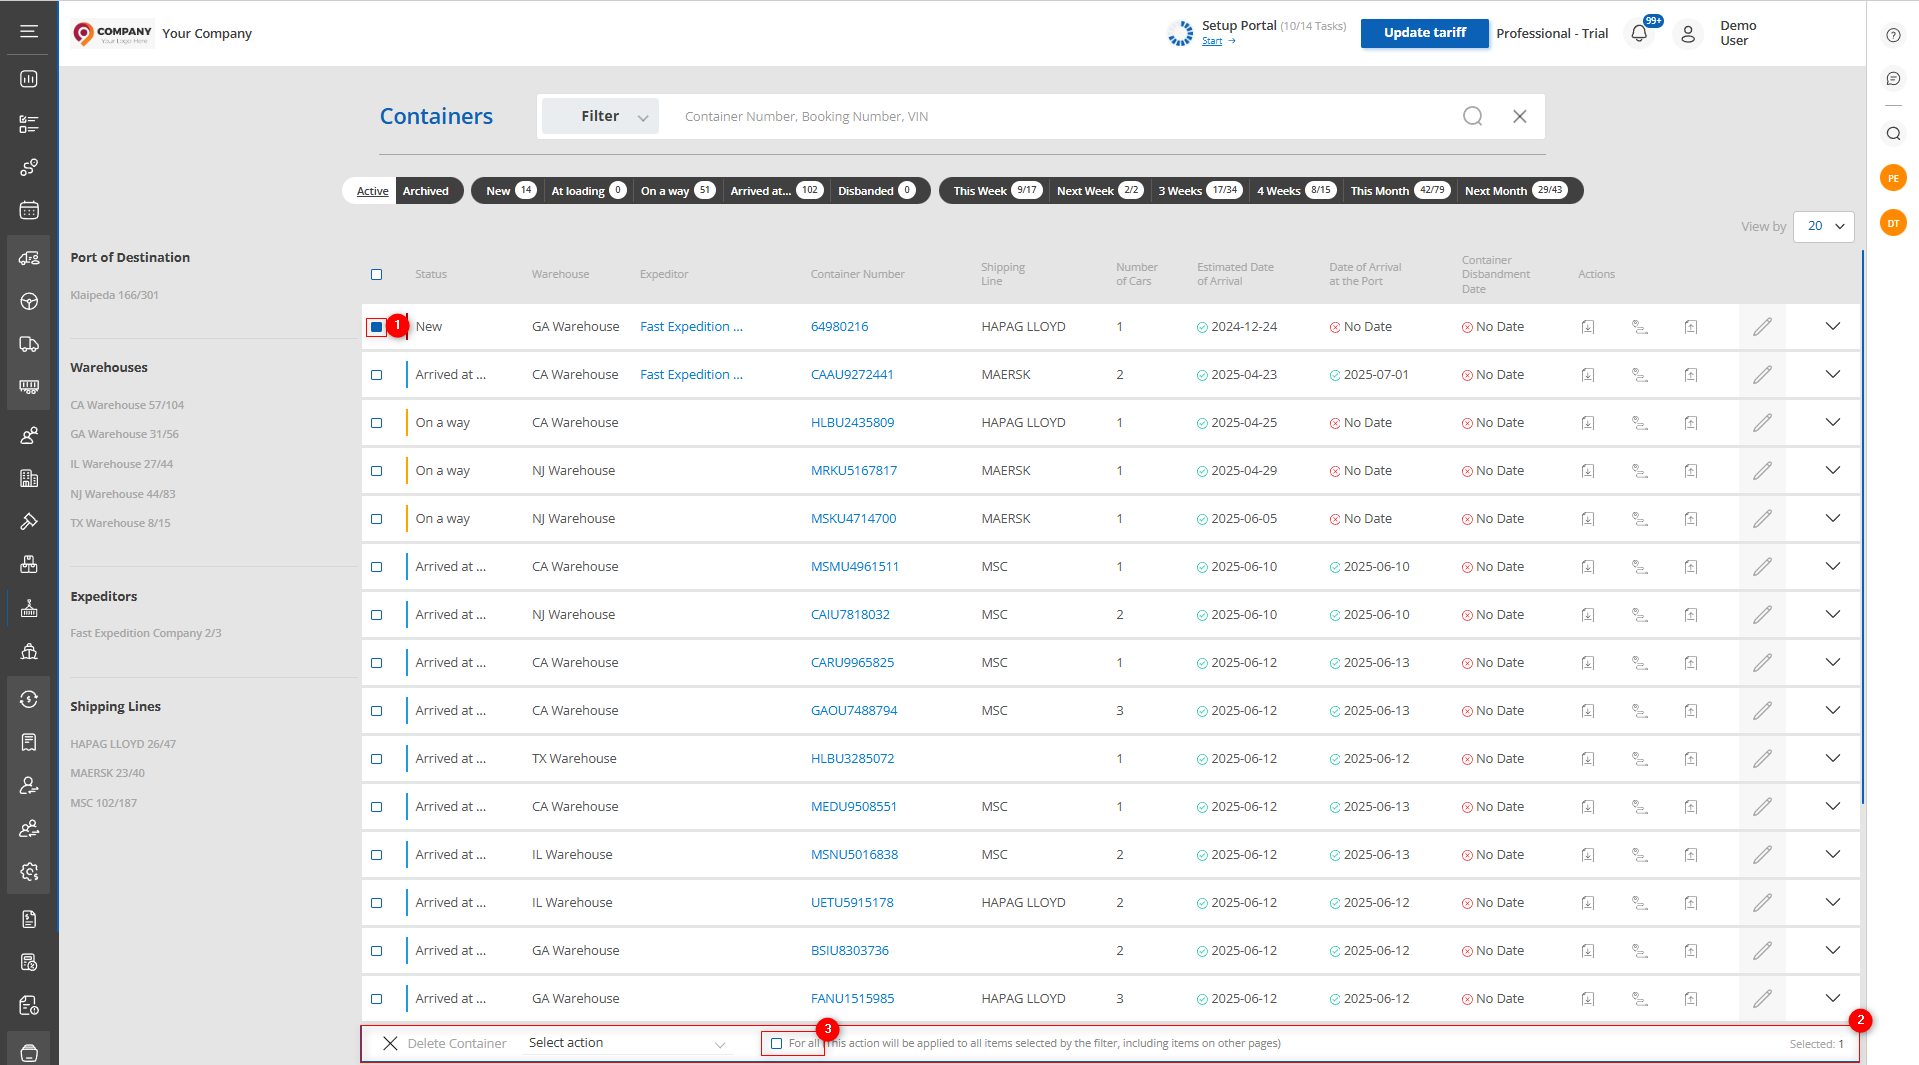
Figure 8 – Bulk Editing Function
Available Options:
-
Delete Container – on the bulk editing panel, choose the “Delete Container” option (Figure 9, Pointer 1). A confirmation window will open where you must click “Yes” to confirm deletion or “No” to cancel.

Figure 9 — Bulk Delete Function
-
Set Date of Arrival at the Port – select the “Set Date of Arrival at the Port” option (Figure 10, Pointer 1), then choose the date and click the “Apply”button (Figure 10, Pointer 2) to save changes.

Figure 10 — Bulk Update of Arrival Date at Port
-
Set Container Disbandment Date – select the “Set Container Disbandment Date” option (Figure 11, Pointer 1), then select the date, specify the terminal, and click the "Apply" button (Figure 11, Pointer 2) to save the changes.
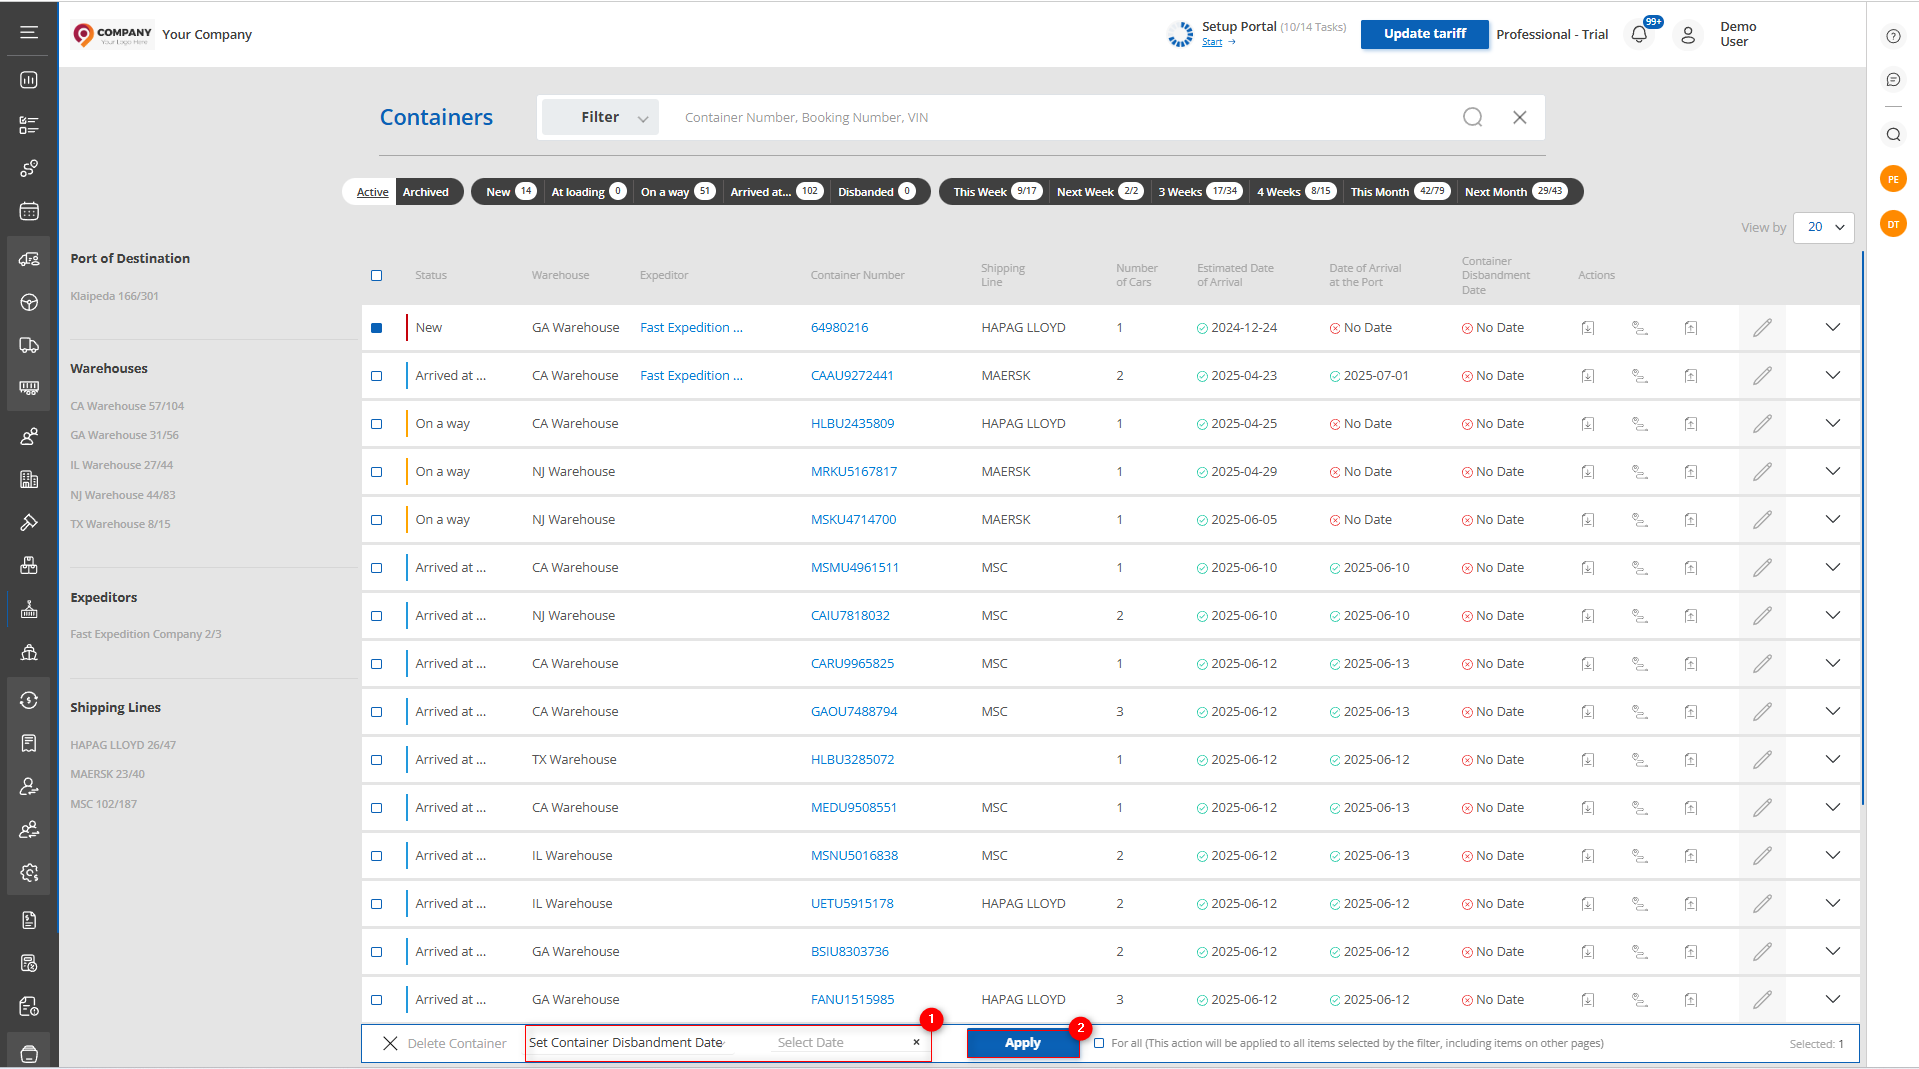
Figure 11 — Bulk Update of Container Disbandment Date
To create a new container, navigate to the “Warehouses” page (see the “How the Warehouses Page Works” description).