


Logiline| Logistic CRM system - Site page "Clients"
The "Clients" section of the site menu is intended for creating, editing and deleting clients. It also provides the possibility of mass editing of clients and creating an export of information about clients.
The "Clients" page of the site contains a search bar, a filter area and a table displaying all clients.
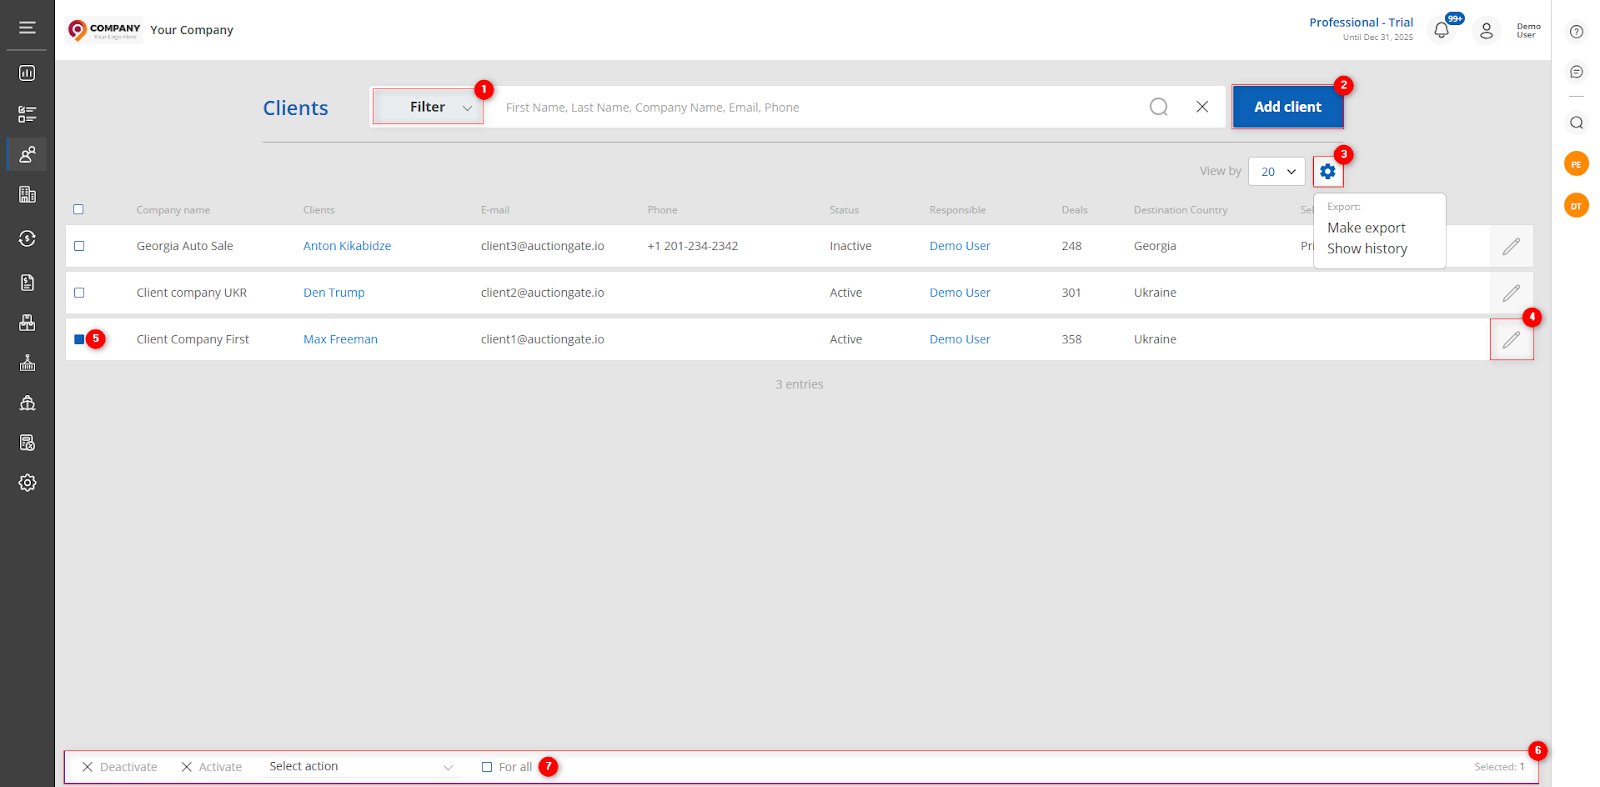 Figure 1 - Site page "Clients"
Search by specified filters
When you click on the "Filter" button (Figure 1, Pointer 1), a filter window opens, which is used to set the search parameters (Figure 2):
-
“Responsible” - from the drop-down list that opens when you press the
 button, select the employee assigned to the client;
 -
“Price Lists” - select the price list from the drop-down list that opens when you click on the
button; -
“Destination Country” - from the drop-down list that opens when you click on the
button, select the country to which the vehicle is destined; -
“Status” - select the client's activity status from the drop-down list that opens when you click the
button;
Note: It is possible to set one or more parameters to perform a search.
After entering the parameters, click on the "Apply" button to generate the list of clients, in case of cancellation - the "Reset" button.
As a result, the search window will display all queries entered in the filter and the search result in the table.
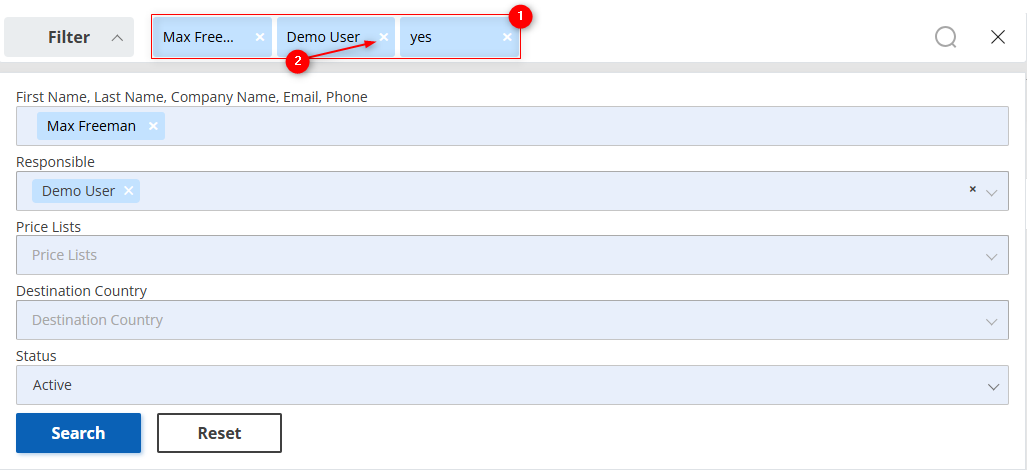 Figure 2 - Filter window
The search bar allows you to search by any parameter (Figure 2, Pointer 1). To do this, enter any query and click on the ![]() button located in the search bar or on the "Enter" button located on the keyboard. As a result, the found records corresponding to the entered parameters will be displayed in the table.
button located in the search bar or on the "Enter" button located on the keyboard. As a result, the found records corresponding to the entered parameters will be displayed in the table.
To clear the entire search window and reset the filter, click on the ![]() button. If you want to remove one of the parameters, click on the cross that is located in the query window itself (Figure 2, Pointer 2).
button. If you want to remove one of the parameters, click on the cross that is located in the query window itself (Figure 2, Pointer 2).
Client Creation
To create a new client, click on the "Add user" button (Figure 1, Рointer 2). After that the "Add user" window will open, which presents 4 blocks with information.
- Block “Authorization data”. This block displays information with general information about the client (Figure 3, Pointer 1):
-
“Select status” - set the client activity;
-
“Responsible” - from the drop-down list that opens when you press the
button, select the employee to be assigned to the client; -
“First Name” - enter the client's name;
-
“Last Name” - enter the client's last name;
-
“Email” - specify the customer's e-mail address;
-
“Phone” - provide the customer's phone number;
-
“Password” - specify the password for the client. The password must be 5 or more characters long.
-
“Confirm password” - repeat the password.
Note: The Status, First Name, Last Name, Email, Password, Confirm password fields are mandatory.
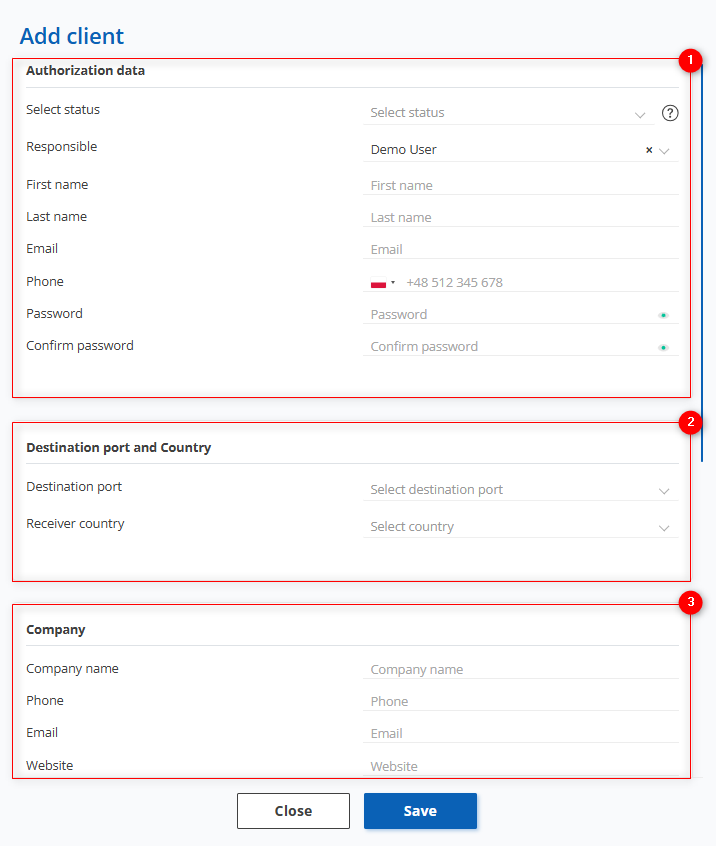 Figure 3 - "Add user" window
- Block “Destination port and Country” is used to specify the port of destination and the country to which the shipment is destined (Figure 3, Pointer 2):
-
“Destination port” - from the drop-down list that opens when you click on the
button, select the port to which the vehicle is destined; -
“Receiver country” - from the drop-down list that opens when you click on the
button, select the country to which the vehicle is destined;
- Block “Company” This block displays general information about the customer's company (Figure 3, Pointer 3):
-
“Company name” - enter the customer's company name;
-
“Phone” - provide the company's phone number;
-
“Email” - provide the company's e-mail address;
-
“Website” - company website;
- Block “Company address”. This block displays information about the company's location (Figure 4, Pointer 1):
-
“Address 1” - enter the company's primary address;
-
“Address 2” - provide an additional address (if necessary);
-
“Country” - specify the country where the company is located;
-
“City” - enter the city where the company is located;
-
“State” - specify the state;
-
“Zip code” - enter your zip code;
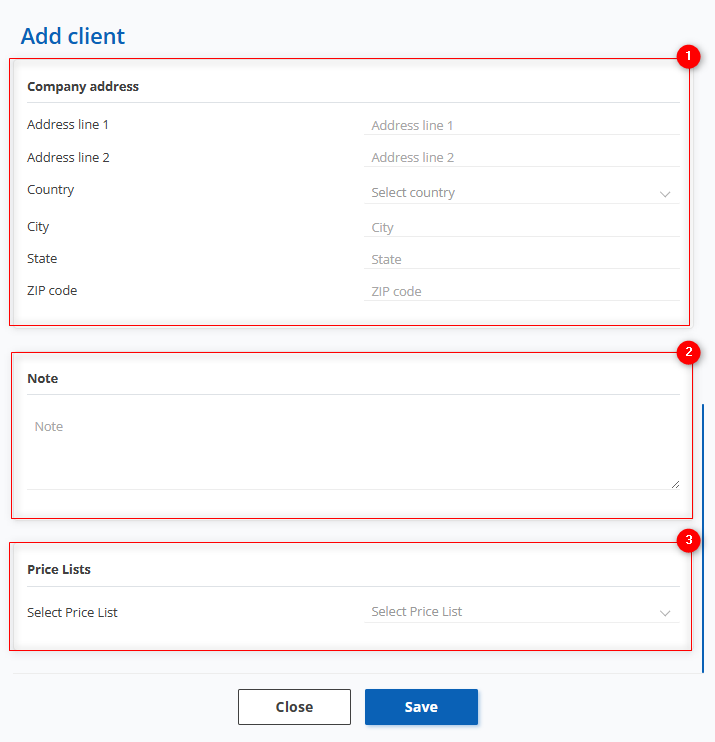 Figure 4 - Continuation of the "Add user" window
- Block “Note” provides the ability to add notes or additional information that may be useful in describing features or additional customer data (Figure 4, Pointer 2).
- Block “Price Lists” is intended for setting the price list for the client (Figure 4, Pointer 3). From the drop-down list that opens when you click the button, select the desired price list for the client.
To save the data, click on the "Save" button, if canceled, click on the "Close" button.
Editing a client
In order to edit a client, select the necessary record in the table and click the ![]() button (Figure 1, Pointer 4).
button (Figure 1, Pointer 4).
As a result, the "Client" window will open, which includes five tabs: "General", "Deals", "Invoice", "Invoices settings", and "Integrations" (Figure 5, Pointer 1) .
General tab:
Includes general information about the customer, to make the fields available for editing, click "Edit" (Figure 5, Pointer 2), where changes to the data are made in the same way as when creating (see above).
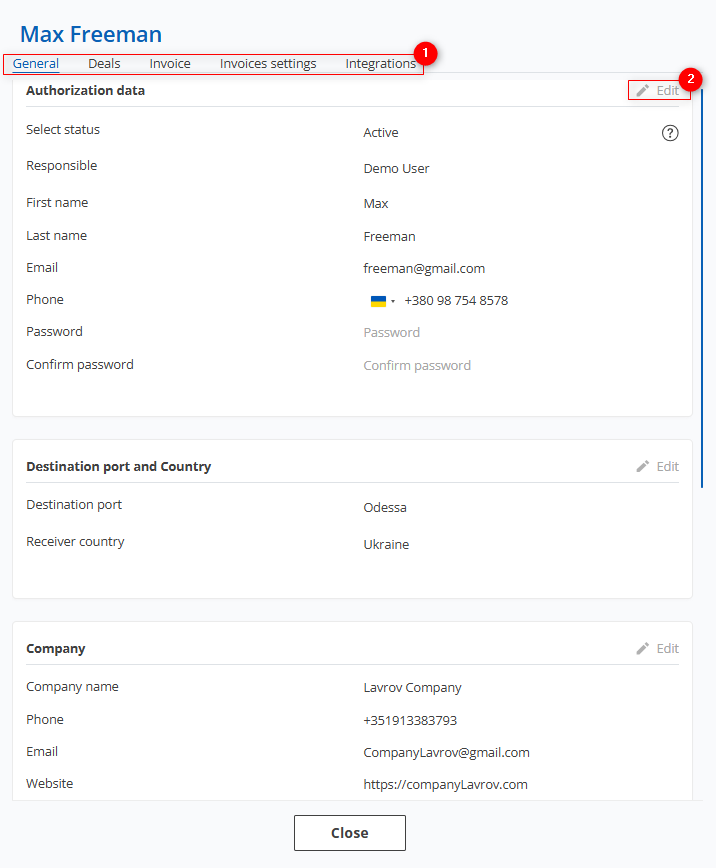 Figure 5 - "User"/General window
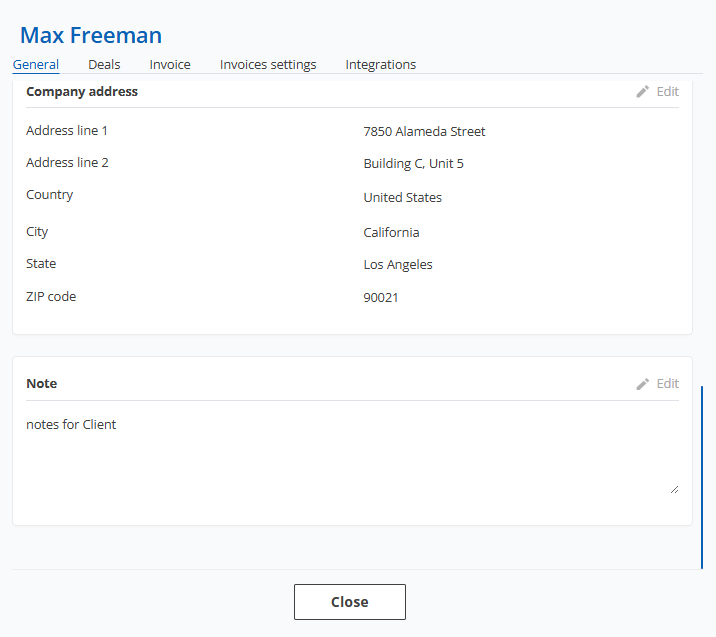
Figure 6 - Continuation of the "User"/General window
To save the changes, click the "Save" button. Use the "Close" button to close the window (Figure 6).
Deals tab:
The Deals tab provides a summary of the customer's transactions, including the stage the vehicle is in. It also provides data on the date of sale, VIN number, make, model, year of manufacture of the vehicle, and indicates the warehouse where the vehicle is located.
Clicking on a vehicle (Figure 7, Pointer 1) will open the "Deals" window with full details of the transaction, providing the ability to enter or edit data .
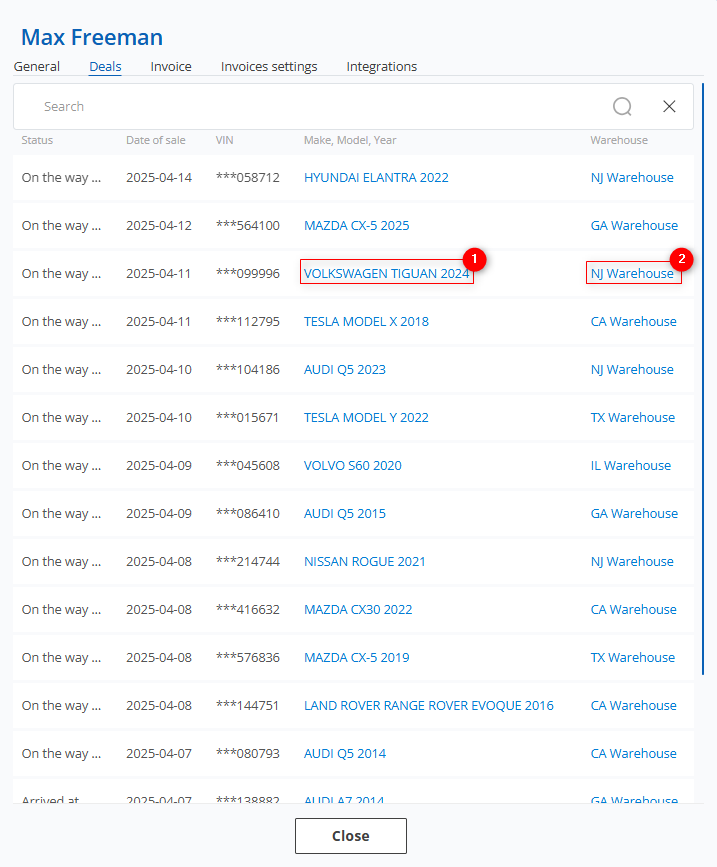 Figure 7 - "User"/Deals window
Clicking on a warehouse (Figure 7, Pointer 2) will open the "Warehouse" window, which will show all the vehicles in that warehouse. For each of them, information about the current stage of the transaction, the customer and the delivery date will be available (Figure 8).
Note: Only those vehicles that are at the stages Delivery to warehouse, Ready for loading, In the process of loading will be displayed in the warehouse.
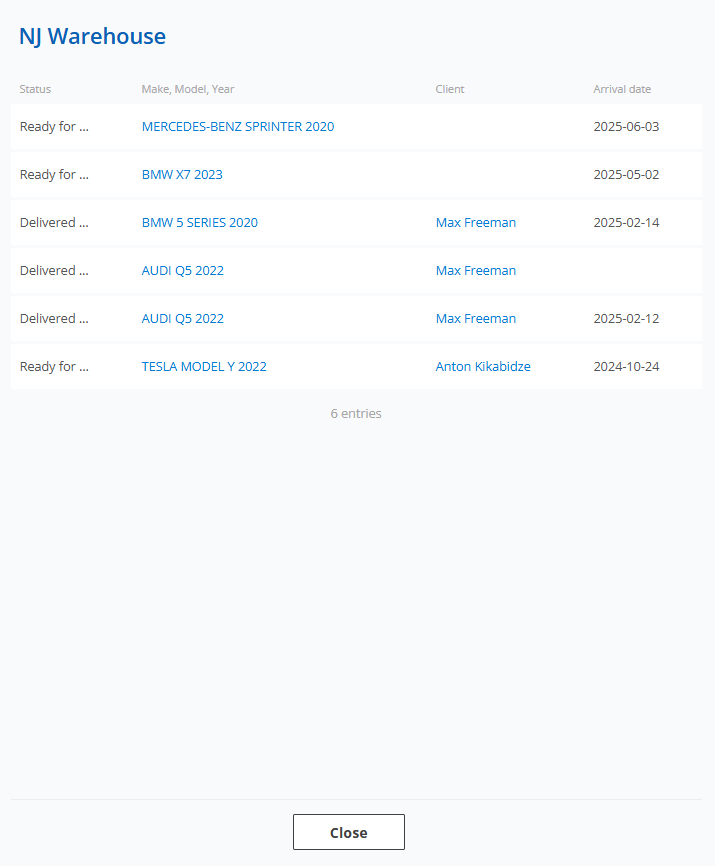 Figure 8 - "Warehouse" window
Invoice tab:
The "Invoice" tab contains a summary of the client's invoices, including status, invoice number, creation date, invoice amount, payment date, and payment amount. It also displays a counter showing the total number of invoices, total invoice amount, as well as the amounts of paid, unpaid, and overdue invoices (Figure 9, Pointer 3).
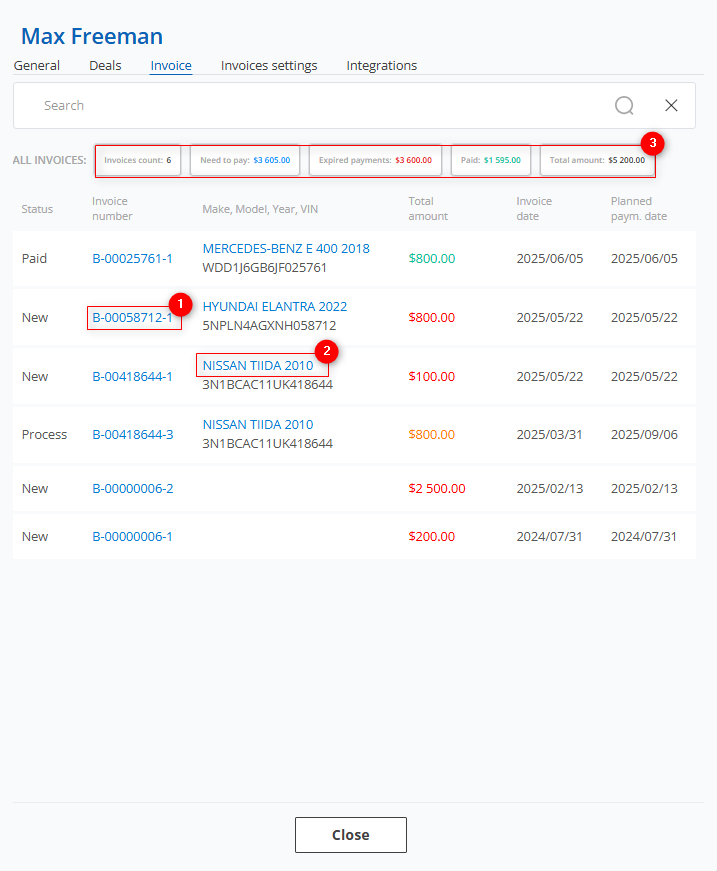 Рисунок 9- "User"/Invoice window
Clicking on an account number (Figure 9, Pointer 1) will open the "Bills" window, which will provide detailed information about a specific customer account. Here you will be able to make edits and changes to the account details. See the "Bills" page of the website for a detailed description of the page.
Clicking on a vehicle (Figure 9, Pointer 2) will open the "Deals" window with full details of the transaction, giving you the opportunity to enter or edit details. For a detailed description of the page, see the "Deals" page of the website.
Invoices settings tab:
This section is intended for configuring the price list, products, and services. It is designed to allow individual pricing setup for each client.
To assign a price list, click the “Edit” button (Figure 10, Pointer 1) then click the ![]() button to open the dropdown menu and select the appropriate price list for the client.
button to open the dropdown menu and select the appropriate price list for the client.
To add a product, click the "Add line" button (Figure 10, Pointer 2). Then, select a product from the dropdown list, set its price, and specify its activity status .
To delete a product, click . To save the product list, click the "Save" button (Рисунок 10, Pointer 3).
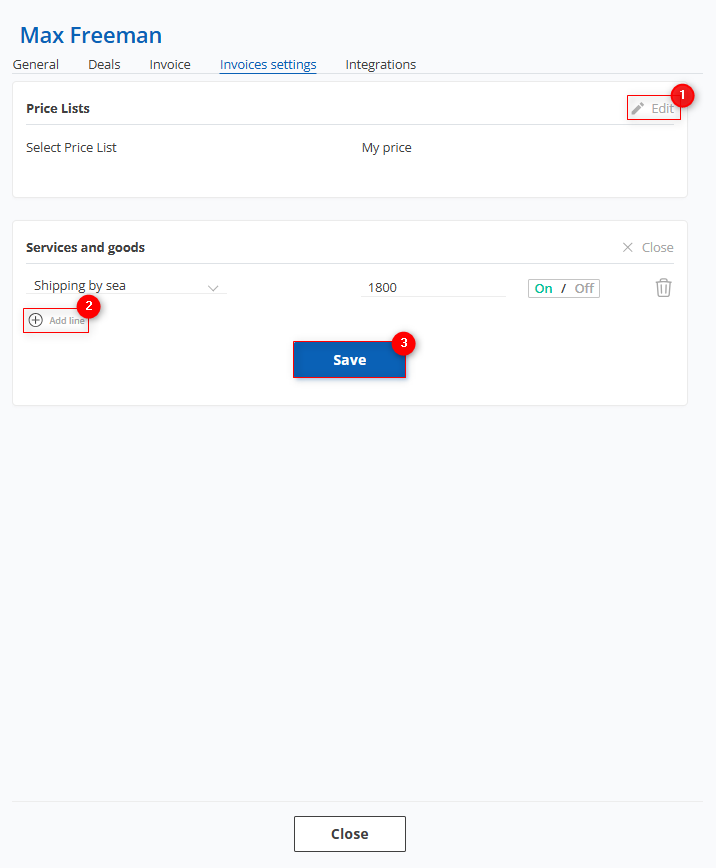 Figure 10 - "User" window / Invoices settings
After setting an individual price for the client, it will be applied during delivery calculation in the deal modal window. If the client has a price assigned for a product that matches an item in the price list and the product is active, the client-specific price will be used. If the product is disabled or not set in the client's configuration, the default price list will be applied.
Integrations Tab:
This section allows you to enable synchronization with the "AuctionGate" account management system. When synchronization is activated, lots purchased through "AuctionGate" will automatically sync with the account, and corresponding deals will be created (Figure 11, Pointer 1).
To enable this feature, go to the "Settings" page under the "Automation" tab and turn on synchronization. Then, fill in the “API Key” field by entering the key found in the "AuctionGate" account management system, located in the client's window under the CRM Key field. After that, click the “Sync lots of clients” button (Figure 11, Pointer 2). Once synchronization is successful, the field “Synchronize lots by client” will show the status “Yes.”
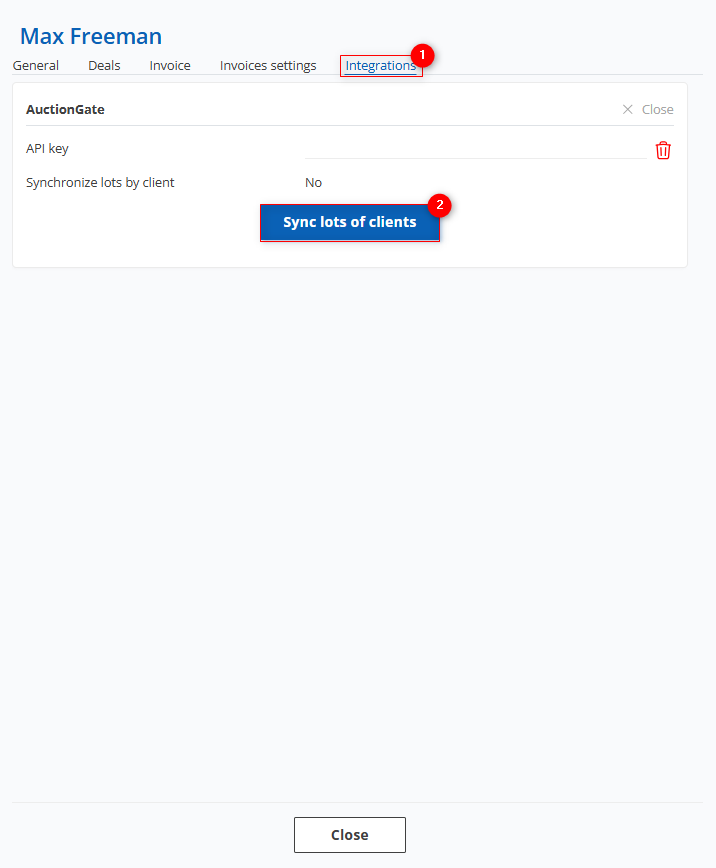 Figure 11 – "Client" Window / Integrations
Creating exports
One of the key features of the Clients page is the function to export data to various formats such as Excel spreadsheets or CSV files, making it possible to save and analyze data off-site.
To export clients, click the ![]() button (Figure 1, Pointer 3), where selecting Make export will open the ‘Export’ window, which consists of two tabular blocks “Current export” and “Completed export”. To export a file, select the desired file format and click on the “Start” button (Figure 12, Pointer 1/Pointer 2). When the export is complete, the file will be available under “Completed export”. Then, click the “Download” button (Figure 12, Pointer 3), select a location to save the file and click “Save”.
button (Figure 1, Pointer 3), where selecting Make export will open the ‘Export’ window, which consists of two tabular blocks “Current export” and “Completed export”. To export a file, select the desired file format and click on the “Start” button (Figure 12, Pointer 1/Pointer 2). When the export is complete, the file will be available under “Completed export”. Then, click the “Download” button (Figure 12, Pointer 3), select a location to save the file and click “Save”.
Note: If the export has not been completed, the next time the Export window is opened, a newly created file will be presented in the "Current Export" block. The old file will be removed from the queue.
To cancel the export, click the "Cancel" button (Figure 12, Pointer 4). As a result of this action, the file will be removed from the "Current Export" table.
To close the window, click the "Close" button.
If necessary, you can apply a filter to the exported file using the filter function (Figure 2) or by selecting the check boxes in the table (Figure 1, Pointer 5).
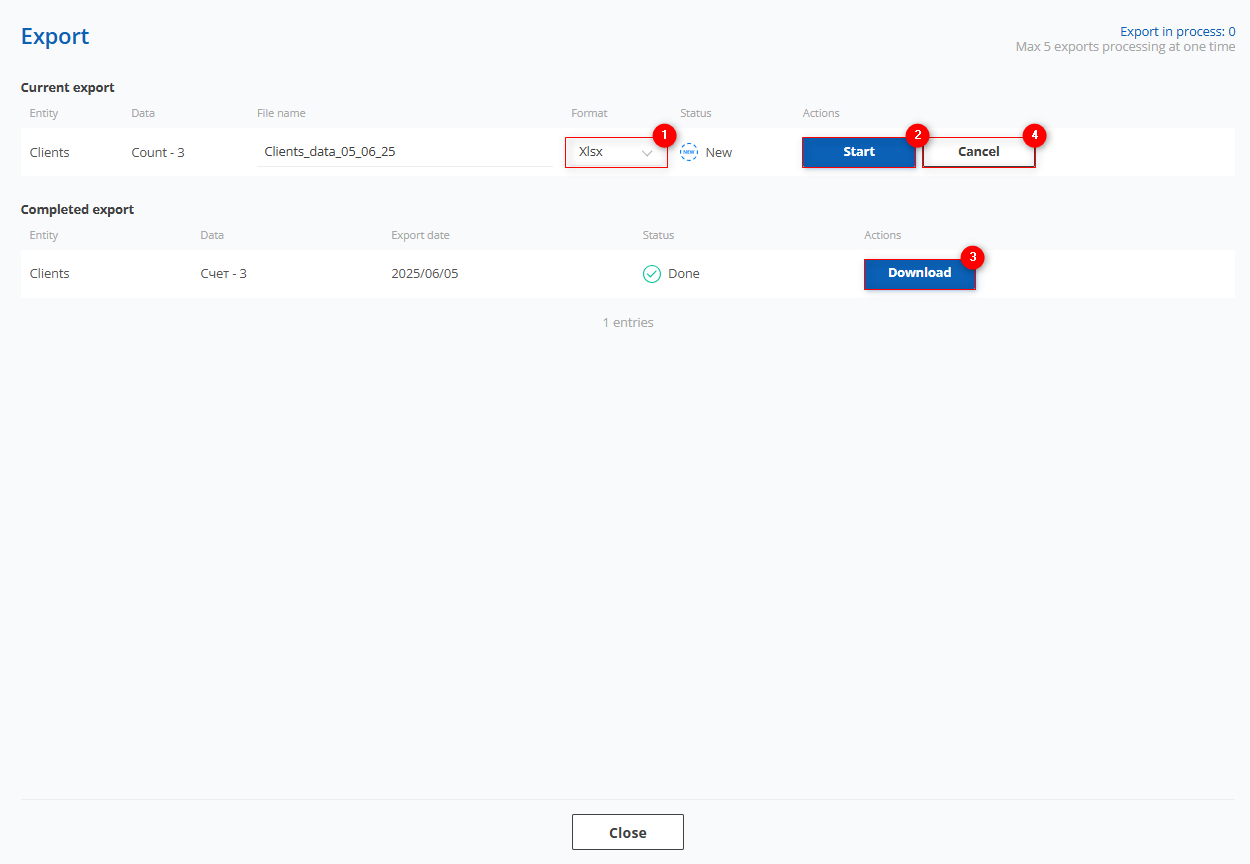 Figure 12- Export window
To view the export history, click the button ![]() (Figure 1, Pointer 3), where selecting Show export will open the Export window, which is identical to the window used to perform the export.
(Figure 1, Pointer 3), where selecting Show export will open the Export window, which is identical to the window used to perform the export.
Mass client editing function
The bulk edit client function provides a convenient way to make simultaneous changes when you need to make the same type of data in multiple records.
To use this feature, follow these steps:
-
In the table, check the
 box next to each customer you want to edit (Figure 1, Pointer 5).
 -
After marking users, a bulk edit options panel will appear at the bottom of the table, in which use the available options to modify the parameters (Figure 1, Pointer 6).
Note: Checking the "For All" checkbox (Figure 1, Pointer 7) will cause all clients to be highlighted, so changes can be applied to all at once.
Available options:
-
Deactivate/Activate Client - click the "Deactivate"/"Activate" button on the bulk edit panel (Figure 13, Pointer 1), a window will open, in which you can confirm by clicking the "Yes" button and cancel by clicking the "No" button. As a result, the client status will be changed.
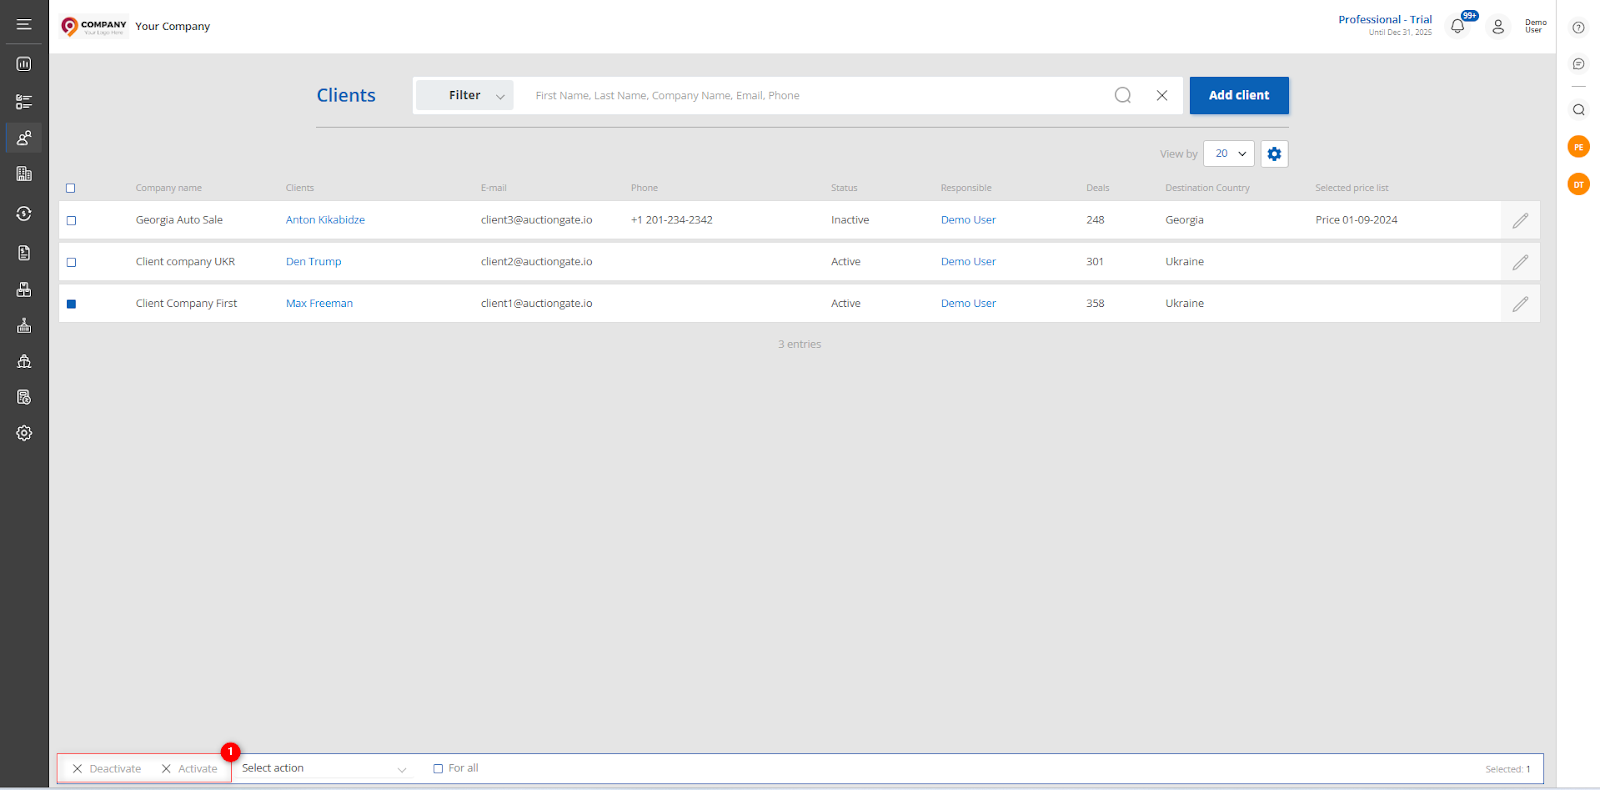 Figure 13 - Client Deactivation/Activation option
-
Set Responsible - select the "Set responsible" option (Figure 14, Pointer 1) , then select the desired employee from the available options and click the "Apply" button (Pointer 2) to save the changes.
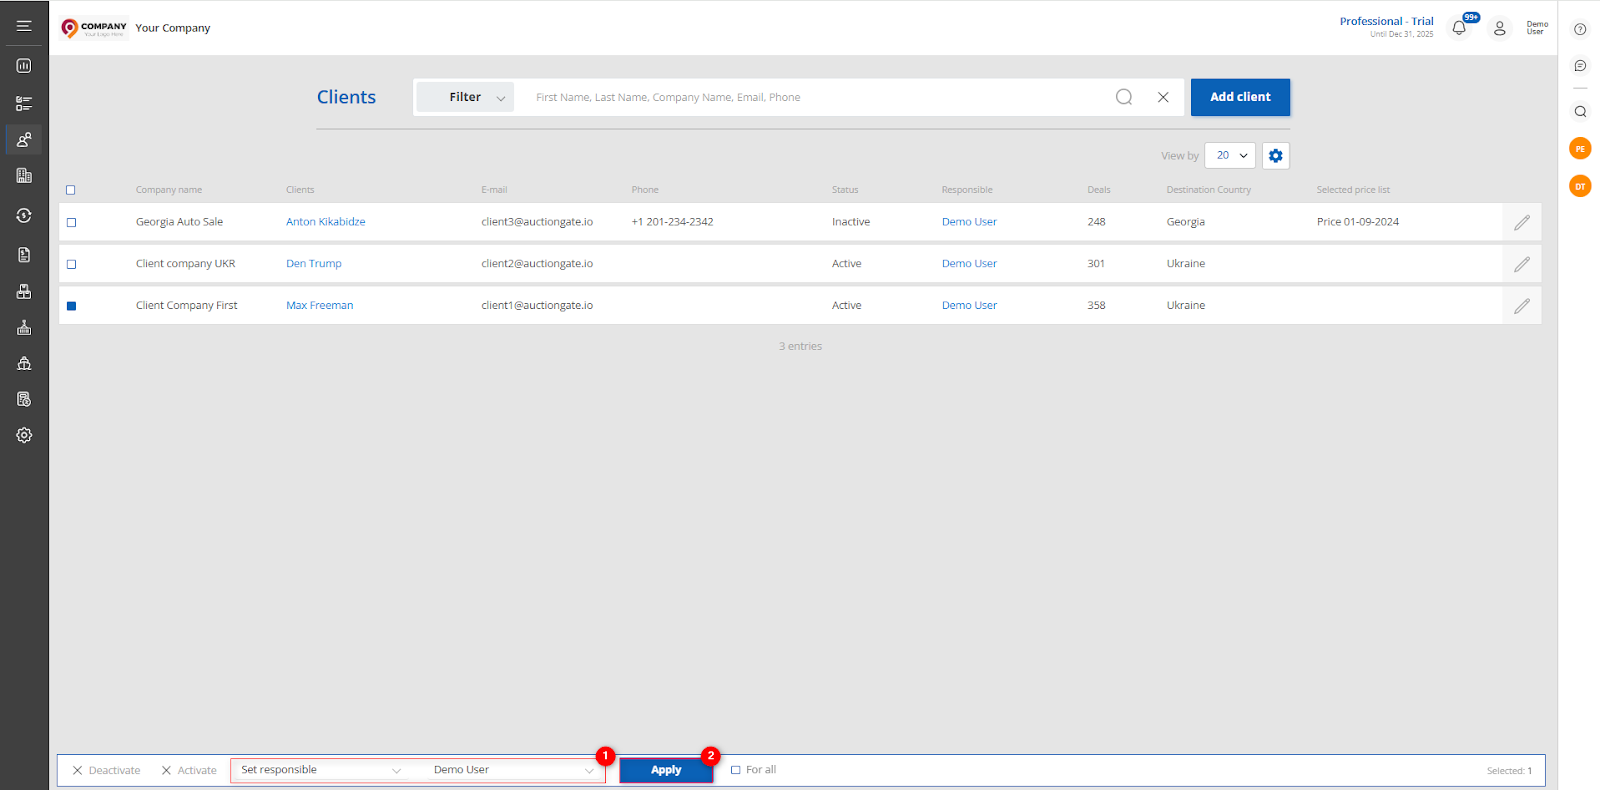 Figure 14 - Employee change option
-
Set Price List - select the "Set price list" option (Figure 15, Pointer 1), then select the desired price list from the available options and click "Apply" (Pointer 2) to save your changes.
 Figure 15- Price list assignment option
Note: In the list of employees and price lists available for application, only those with the status set to "Active" are displayed.
-
Set Destination Port - Select the "Set destination port" option (Figure 16, Pointer 1), then select the desired port from the available options and click "Apply" (Pointer 2) to save your changes.
 Figure 16- Destination Port Setup option
-
Set Receiver Country - Select the "Set receiver country" option (Figure 17, Pointer 1), then select a country and click "Apply" (Pointer 2) to save your changes.
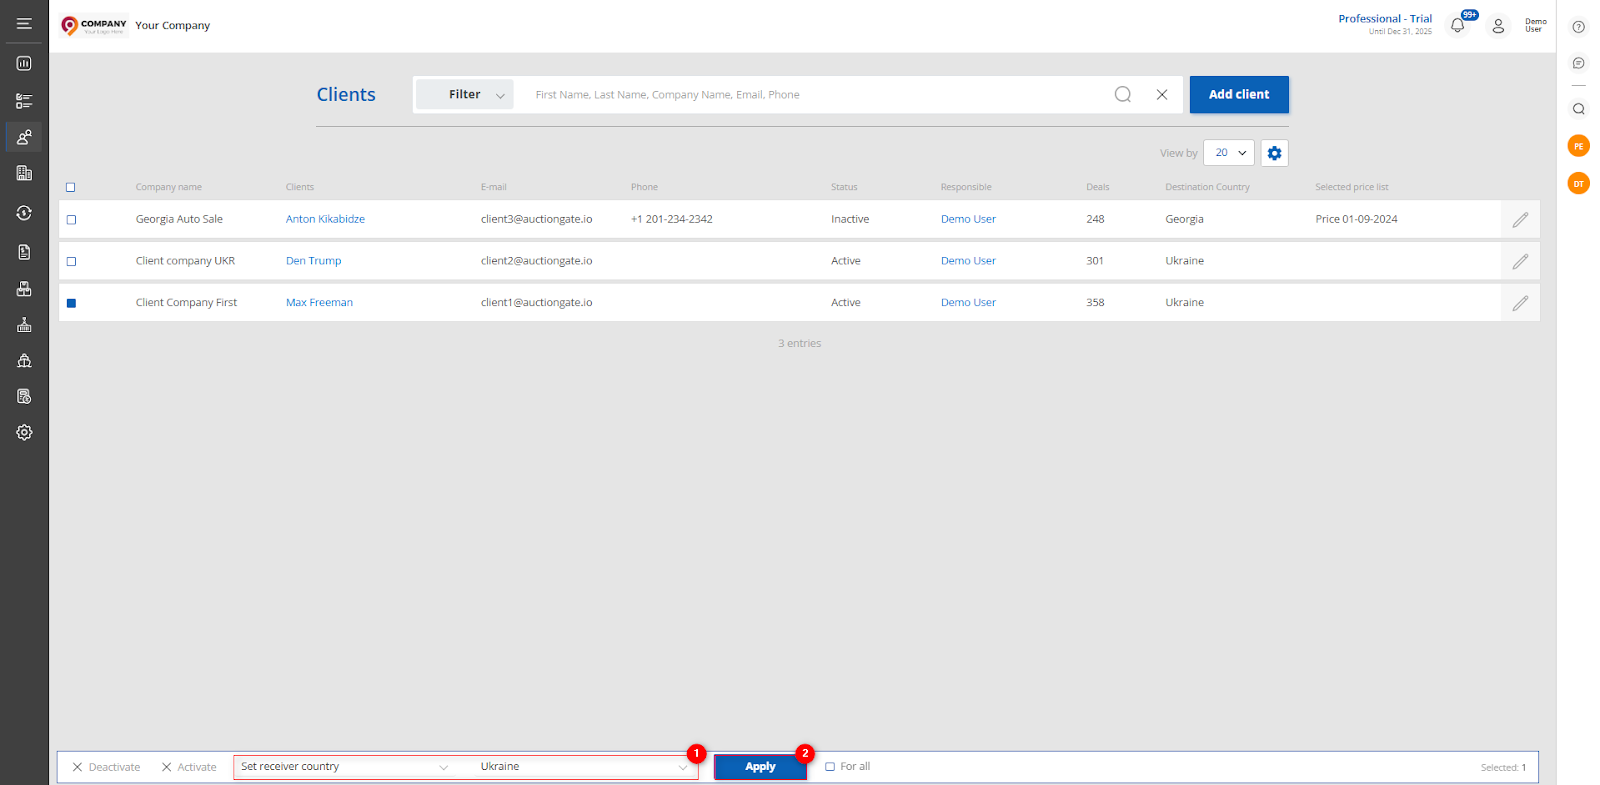 Figure 17- Receiver country assignment option